Hi funsters!
I absolutely love making Ginger Jeans (5 paris and counting!), and I’ve received a bunch of questions about topstitching, so I thought I’d share some tips for getting professional results. And of course as with all sewing the best thing you can do is practice! But in the meantime, I hope these tips will help.
1. Use your feet
This was my biggest “aha” – that perfect topstitching on your ready to wear jeans isn’t due to someone with super-human steady hands. Nope, they’re just using specialist feet. Now not all of us can have presser feet for every task, but if you have a couple I’ll bet that you can get great results.
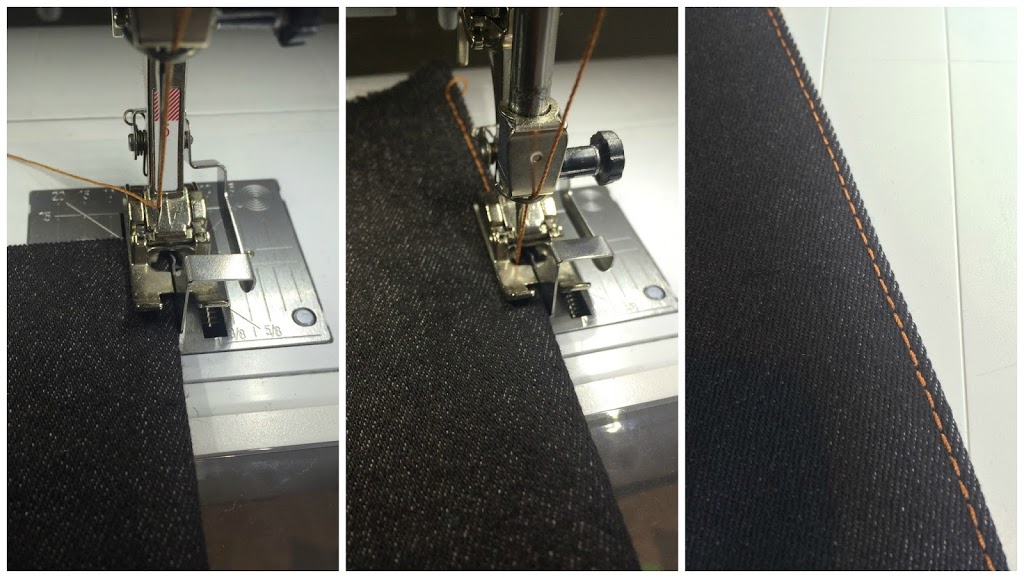
First, you want a foot that will get your first line perfectly straight and very close to the edge. The best option is an edge-stitching (sometimes called edge-joining) foot, or a blind hemming foot. I use this foot from Bernina, but there are also generic feet available that work on a variety of machines. They have a little dull blade in the middle of the foot – you move your needle over to the side (I go all the way to the left), and then press the fabric up against the blade for stitching edges like pockets, or place the blade in the seam join if you’re stitching along places where the seams are already sewn, like on the yoke.
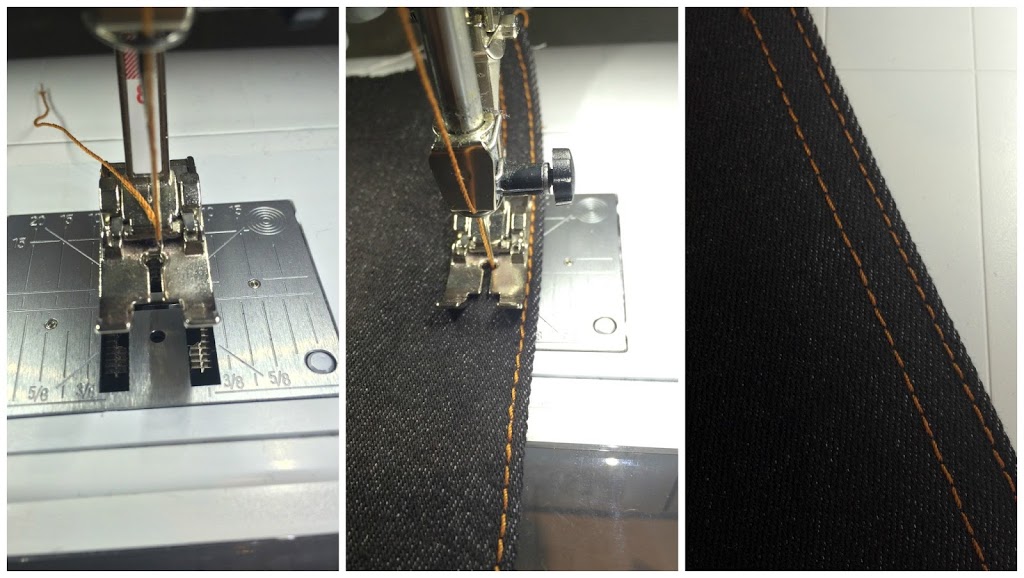
Then, for the second line you need a foot with a marking that will get you a perfect 1/4 inch width. You could use a specialist quarter inch foot (they’re very popular with quilters), or, just find a marking on one of your other feet that lines up. For me, I use my regular presser foot and put my needle two places over to the right which makes it an exact 1/4 inch from the edge of the foot. Be very precise about where you line up the foot compared to the first line of stitching – I make sure that the edge of my foot is going along the *edge* of the previous line of stitching, so I can see it (rather than covering it) – this type of precision really helps.
2. Chalk it in first
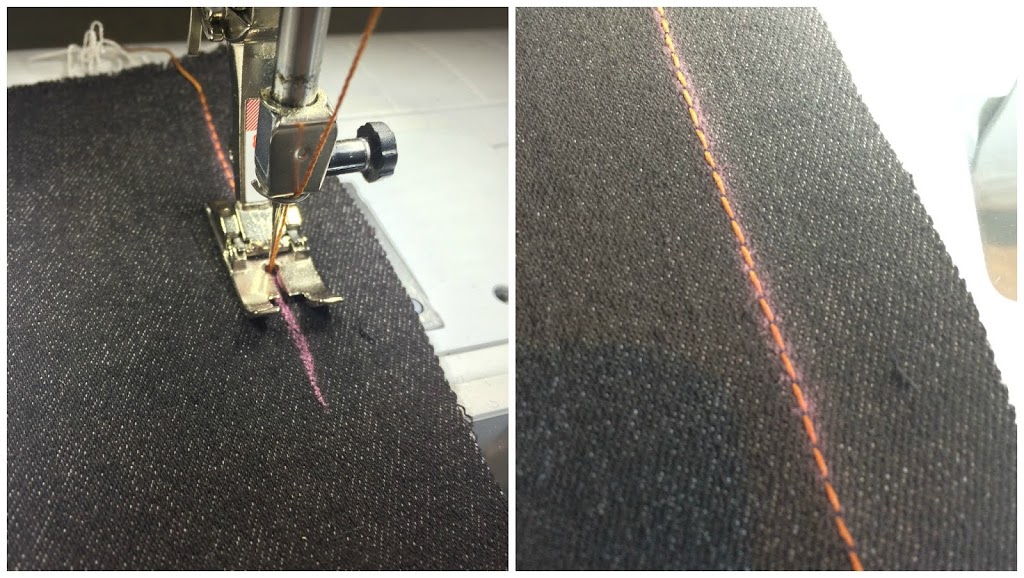
There’s no shame in chalking on your lines before you stitch them. I usually only do this for the fly front, but if you’re just starting out, why not do it for all the seams? Following a line is much easier than following the seam allowance gauge on your machine (or at least it is for me), so give it a go. I have a rainbow assortment of Clover chalk liners which I love and give a fantastic thin line for this type of job.
3. Use topstitching thread in your top needle, and regular thread in your bobbin
I’ve had really good results using Gutermann topstitching thread. There’s no need to put topstitching in your bobbin though – in fact, it’s likely your machine won’t like it! As long as you have the tension correct (see below), you shouldn’t get any bobbin thread appearing on the top.
4. Increase the tension of your top thread
I’m not sure if this is universal or not, but on my machine, it helps to increase the tension to 7 (it’s usually around 4).
5. Increase your stitch length
The best topstitching will almost always be at a longer stitch length, especially if you’re using heavier topstitching thread. I usually go from my regular 2.5 stitch up to a 3.5 or 4. Definitely do a test on a piece of denim before you start to see which length you prefer.
6. Don’t backstitch!
Backstitching with topstitching thread is the worst. It just gets tangled up and nasty! Instead, start and end with a few really small stitches (I usually go down to 1 – 1.5). This secures the topstitching thread in place without snaggles.
So that’s what I do – do you have any other tips to add? I haven’t been at this jeans-making malarkey for very long so I’m sure there’s a lot more I haven’t learned yet!
Disclosure: this post contains affiliate links to some of the products that I personally use and recommend. If you’d rather not participate, feel free to Google the products instead.



What a really helpful post. I have only used top stitching once and had no idea there were special feet so thanks. Also, love being addressed as a funster!
Glad to help! You don’t *need* special feet, but there are a help!
Kenneth D King uses two spools of regular Gutermann thread, fed through a regular machine needle, in the ‘Jeanius’ Craftsy class. A very useful tip for when you want a very specific colour of topstitching. It really works!
That’s a good idea! My machine does not want to sew the fancy topstitching thread and I just end up with a bird’s nest of thread on the bobbin side of my fabric. booo…. I’m going to try that next time.
Great tip! I’ve also heard that you can use the “triple stitch” function to give the impression of topstitching thread using normal thread.
What a helpful comment! I will do this. Thanks!
For fly fronts, I make a template from wide painter’s tape, and stick it to the front of the pants. Then I just sew around it and peel it off. Perfect every time! — Martina
Love this one! I need to get some painters tape
Brilliant tips thanks! Embarrassingly I’ve only just realised myself that moving the needle would make things easier (for understitching etc)!
The more you sew, the more you know!
Thanks – great post, I wondered how yours looked so good!
A lot of nice tips here. thanks.
A lot of nice tips here. thanks.
These are great tips thanks!
Fresh from the deed myself, may I add: Test out your stitches. Make a sample (and make it long) ‘waistband/ pocket top’ (not just a stitching sample in the middle of a scrap) and try a couple stitch lengths and tensions. I wish I could say I do this every time, but I’m getting better about it. Possibly all the self-crafted, slighly insulting reminder signage over my machine is helping…..
Great idea! I’m the same as you – I always intend to do this, but I don’t *always* do it 🙂
Great idea! I’m the same as you – I always intend to do this, but I don’t *always* do it 🙂
Thanks for this! I currently have a ginger toile on my sewing table and this will come in super helpful.
Great tip on the no-backstitching thing. My thread did get in weird tangles on the underside when I backstitched and I thought it was just my machine or something.
Also, use a topstitching needle. They have a deeper groove to accommodate heavier thread allowing the thread to be guided through the fabric without hanging. This could also explain the need for tension adjustment. If you think about it the heavier thread should already mean greater top tension since a thicker thread is passing through the disks. The fact that you need to dial it up probably means the machine is fighting a little to pass through the fabric.
Oh yes, I always use a topstitching needle! It helps a lot.
Thank you so much. Those are awesome suggestions.
Use your HeightCompensationTool when you’re sewing over humps-and-bumps. As long as you can keep your foot -or at least a part of your foot- level with the fabric, your stitching will be nice and even.
My Bernina HeightCompensationTool looks like three white plastic strips hold together with a rivet. (always wonderd what this thingy in your toolbox was?) I also own a greyish hooked heighttool from Husqvarna wich also works great.
A piece of a cardboard box will work in a pinch too!