If you’re anything like me, your weight probably goes up and down quite a bit. Over the years I’ve come to accept it as a natural process, affected by different things going on in my life and body. That said, one thing that can still make it frustrating is sewing: no-one wants to spend countless hours sewing beautiful things only for them not to fit over time! Thankfully, I’ve learned a few tricks that help me sew garments that will fit whether I gain or lose a few inches, so I thought I’d share them with you today. These approaches for what to sew when your weight fluctuates work for when you change around 1 – 3 clothes sizes; much beyond that, and you may well need some new garments (which, looking on the bright side, means fabric shopping, yay!).
1. Sewing with knits
This is perhaps the most obvious tip, but: sew with knits! Because they stretch, knits are inherently much more accommodating to changes in body size and shape, not to mention super-comfortable to wear. In fact, I’ve found there are knit garments I made when I was 3 or 4 sizes different that still fit me now.
If you haven’t sewn with knits before, don’t worry: they’re actually very straightforward to sew on a sewing machine (simply use a zigzag stitch and a ballpoint needle), and if you do have the luck of owning a serger, they’re super fast to sew, too. They’re widely available online: if you want to be sure of quality, either buy from high-end stores like EmmaOneSock, or choose branded ranges like Art Gallery Knits or Robert Kaufmann.
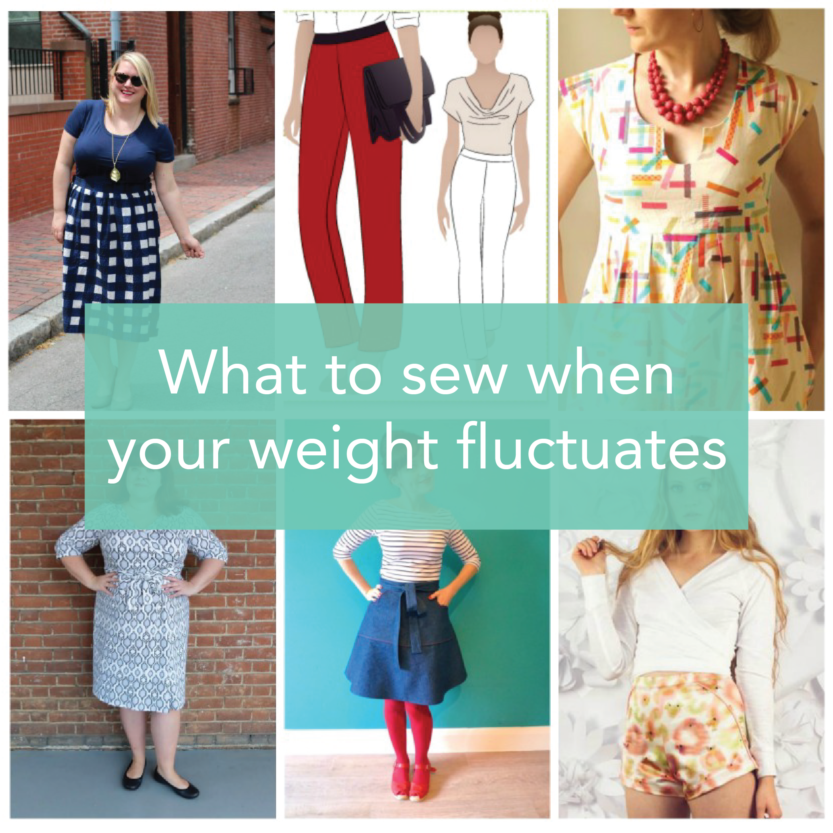
Knits are often associated with casual garments like t-shirts, but you can also make very professional or even fancy clothes with knits – my sheer overlay polka dot Turner Dress is a great example of an incredibly comfortable dressy knit garment that would fit me over at least 3 sizes.
Here are some of my favorite knit options (left to right): the Cashmerette Concord T-Shirt, the Colette Moneta Dress, and the Cashmerette Turner Dress.
2. Go for a wrap
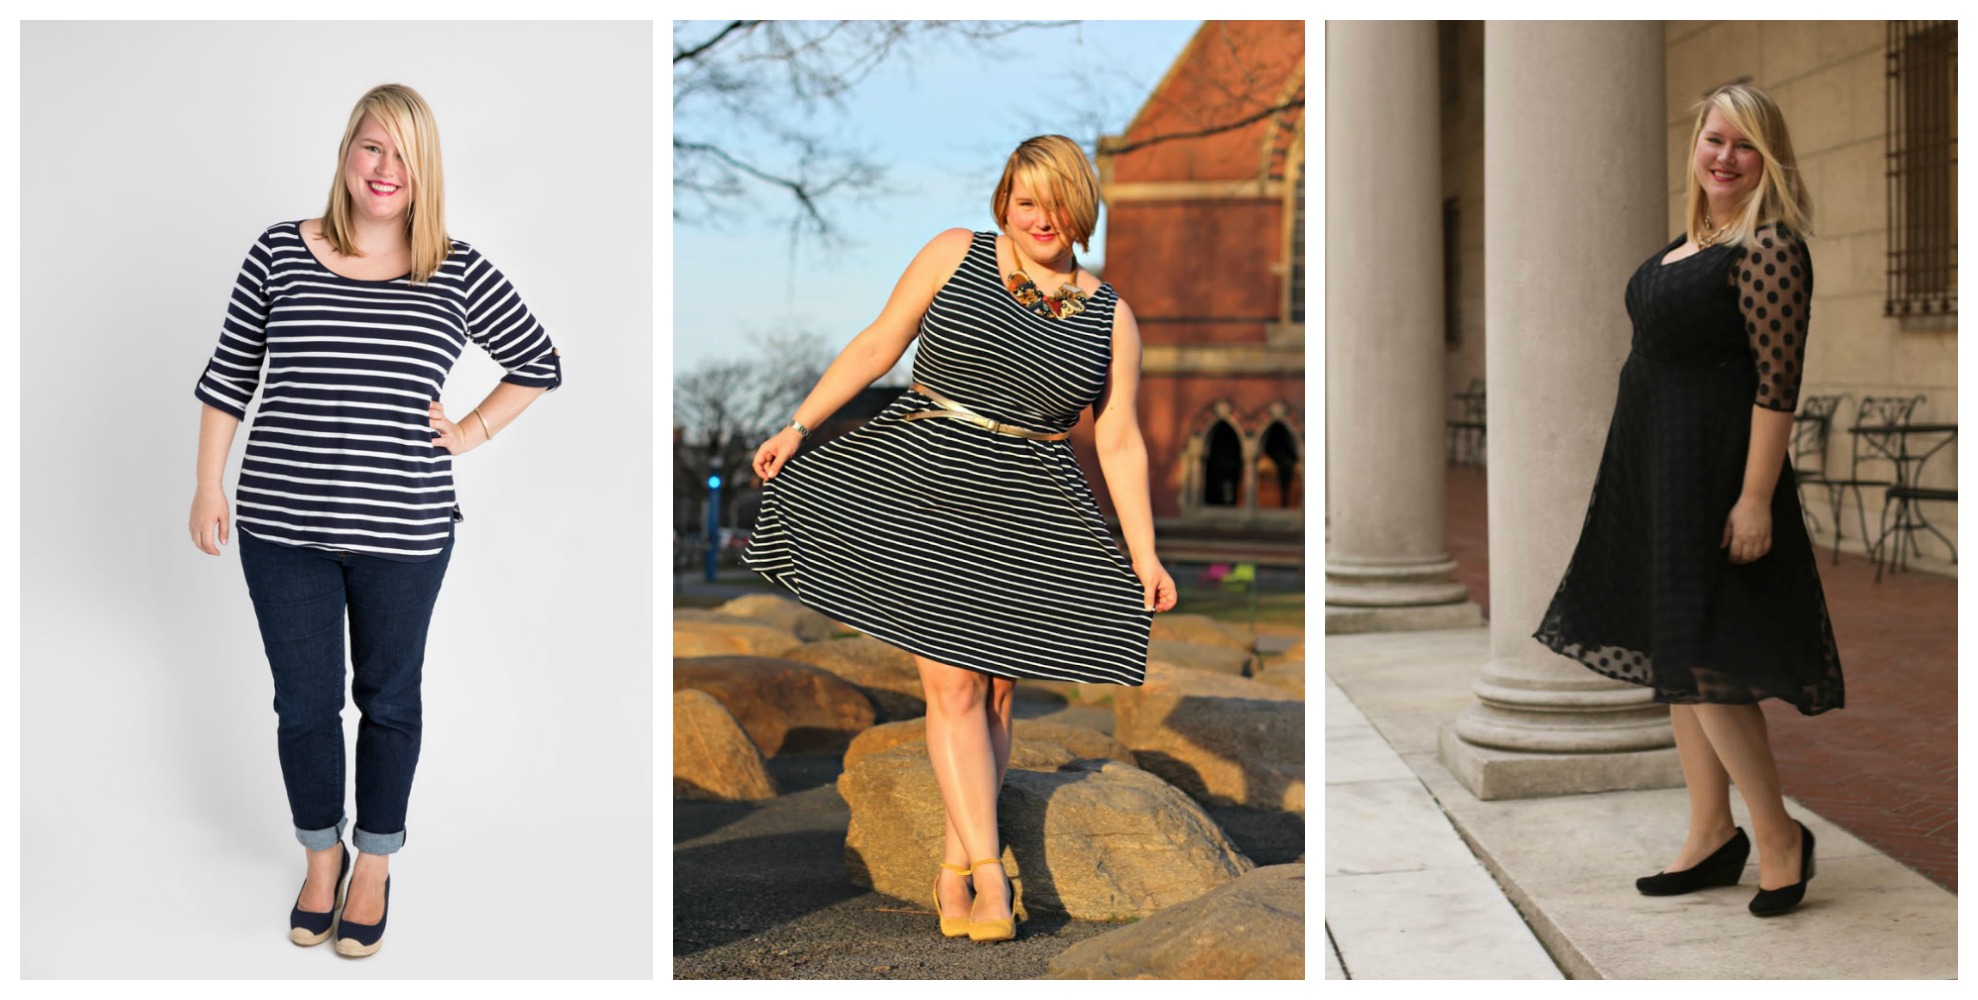
If your torso changes size and shape a lot, then buttons and zips are going to be uncomfortable and constricting. But, if you wear a garment that wraps around your body, you simply wrap to fit whatever size you are right now. The most obvious example of this is a wrap dress like the Appleton Dress – I’ve found that women across 3 – 4 sizes can all fit in the same dress (assuming their shoulders are the same size). But there are also other wrap garments, like the Tilly & The Buttons Miette wrap skirt, the Papercut Patterns Coppelia wrap top, and my free pattern hack of the Appleton Top. To add extra “insurance” to your wrap, you can add a little bit of extra length around the body – in the case of the Appleton Dress, simply cut two pieces of the wider side.
Left to right: Cashmerette Appleton Dress, Tilly & The Buttons Miette Skirt, Papercut Patterns Coppelia
3. Add elastic
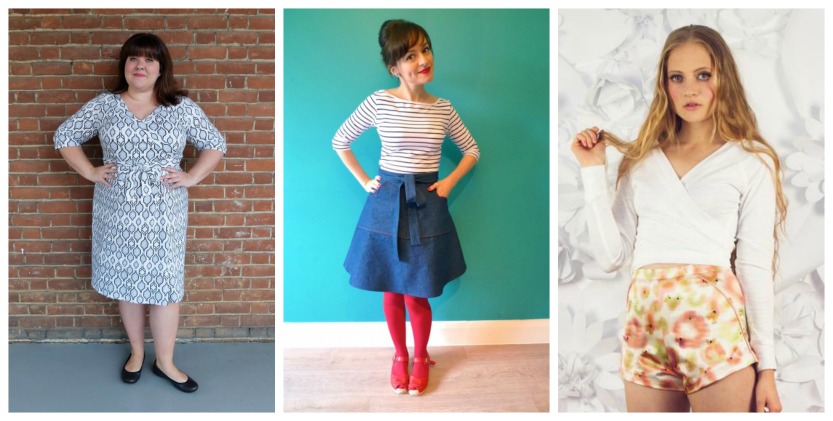
If you don’t want to wear knits all the time, a great approach with woven garments is to incorporate elastic or shirring. I tend to lose or gain around my waist, so a waistband with some stretch is essential; my free flat-front, elastic-back skirt pattern saves the day on this front, as it has about 5 inches of extra stretch for when I’m a bit bigger (get the free download here). Another really popular pattern with an elastic waistband is the StyleArc Barb Pant; in fact, it’s pretty easy to give any stretch pants an elastic waist – even jeans! – as demonstrated in this tutorial by Gillian. Shirring with elastic thread also gives a lovely amount of “give” in a woven pattern – one classic example is the Washi Dress by Made By Rae which is woven but has elastic shirring at the back.
Left to right: free Cashmerette skirt pattern, StyleArc Barb Pant, Washi Dress
4. Increase your seam allowances
Finally, an approach which involves alterations later on, but can work for many garments: increase your seam allowances. Most patterns have a seam allowance from 3/8″ – 5/8″, which is economical on fabric and fairly easy to sew. However, that means there’s very little wiggle room for making the garment bigger later.
Instead, if you sew with a larger seam allowance (such as 1″), you give yourself the option at a later date to unpick and resew some seams and make the garment bigger. This technique is often used in couture sewing (if a garment is worth thousands of dollars you want it to be alterable!) and in costume departments at theaters who have to adapt the same costume to different bodies. It works best on simple garments without too many seams – ideally, you’ll just be adding at the side seams of the garment.
So there are four tips on how to what to sew when your weight fluctuates, and how to make sure your hand-sewn garments get as much wear as possible over the years. Have you used any of these success fully? And do you have any more to add? I’d love to hear your ideas!

I tend to fluctuate about 20 lbs. from year to year, and I’ve used all of the methods you describe. I also add or subtract front waist fitting darts in one piece shift dresses or blouses – my weight tends to accumulate around my middle, particularly in the front. I tend to use back waist fitting darts all the time, but with a large bust, I find that at a higher weight I’m happy to have fabric draping down off my bustline to cover my tummy. At a lower weight, my tummy is a bit flatter and the somewhat narrow waist darts give just enough shaping so the garment doesn’t look sack-like, and I usually don’t have to take in the side seams at all then.
One really simple thing I do is to not sew the waist darts – particularly on my go-to dresses with a fitted bodice and a full skirt. It gives a little more room at the waist, but leaves the fitting in the bust. Works best in a drapey fabric, and if you are feeling slimmer that day, you can always cinch in with a belt :).
I love the Marianne dress from Christine Haynes. It is universally flattering, sewn with almost any knit including ponte, and goes great with leggings in the winter. Stretch fabrics for the win!
How I wish I had known or thought of cutting two of the wider pieces in my first Appleton dress! I can’t get the fabric anymore, and the bottom gapes too much for me to wear it. I gifted it to a friend on the condition that if I get back to wearing size, I get it back. At least I know it’s getting some love in the meantime! Thanks for the tip, though; It will come in handy in the future 🙂
My grandmother sewed my dresses when I was young. She always used wider seams and larger hems. When the hem had to be lowered, often she sewed a piece of lace of some decorate edging over the worn line where the previous hem ended! Somehow, nobody ever paid attention to either the hems or the seams when I was wearing the garment!
Great tips! I’ve been contemplating patterns that allow for weight fluctuation. I recently saw a Pinterest pin that gave me a nice idea for making an adjustable waist for the Deer & Doe Chardon skirt, which has inverted pleats. I will leave one pleat unstitched and attach a ribbon to the two unstitched pleat edges and tie the ends together – volia expand-a-waist. 🙂 I’ll blog about it when I finally sew it together.
Knits are a good way to deal with it. My fluctuation is about 10 lbs which is easier to deal with. Sandra Betzina has a really good tailored waistband with elastic that looks like a regular tailored waistband when on. I have a bladder condition that makes it impossible for me to wear tight pants, so I also mostly use stretch woven fabrics or ponte for pants these days. I also always use a full inch for side seams which also helps. I have never understood why the experts tell women we have to use industry techniques, especially the 3/8″ sas. Sure, it makes sense for enclosed seams but not fitting seams. We are making custom clothing. An inch isn’t going to cost us a whole lot, if anything. In rtw sure it makes a difference, but that’s multiplied by a lot of garments.
I also find that the clothes I make for myself, custom fit to my body, can handle a lot more fluctuation in weight than rtw can. I’ve been amazed at the dresses I have made that have looked perfectly reasonable on me when I was 20 lb. lighter and 20 lb. heavier.
Dresses with ties, which basically falls into the wrap dress category! Sew House 7 Tea Dress fits up and down sizes with just a change of how tight you pull the tie (or not tight).
You forgot about SACK DRESSES! Ha. My weight has been fluctuating, too. I couldn’t zip 2 of the pairs of pants I brought on vacation to Sri Lanka over the holidays. Sigh.
In addition to the extra wide seam allowances and deep hems to drop to accommodate changes in hem-line fashion, I’ve seen dresses sewn with a different order of assembly. Instead of sewing the bodice and skirt separately then attaching. She’d sew/attach the bodice and skirt fronts and backs together. Then the final side seams (which was always about 2 inches of S/A) sewn were sewn and could easily be taken out and re-added to accommodate growth — this would allow for potentially a 7 inch expansion!
This was one of the main ways my grandmother handled her pregnancies — especially when she was still teaching during the 1930s and 1940s when it was barely OK to be a married working professional, let alone a pregnant one.
All good things. I learned about the wide seam allowance trick from costuming. I’ve taken that a step further by finishing the sections separately – the edges are individually serged, and then sewn together. And I don’t cut darts anymore. Mrs Mole’s Fit for a Queen blog deals with altering for weight/size differences, and has some fine workarounds for adding more to a treasured item.
Nice ideas here, thanks for sharing! I want to point out two of my favorite and flexible sewing patterns by Liesl and Co.: the Everyday Skirt has an elastic back waist that has a LOT of gathering (I had to size down) which would be super easy to adjust looser by replacing the elastic in that one area only. It also has very flattering flat side panels and minimal gathering in front which work together to give a sleeker look than most gathered skirts. Even my mom, who normally would stay away from this style (and is a few sizes larger and even curvier than I am) likes the fit. And second, the Gallery Tunic/Dress, which for me (a sewing C/D cup) requires no full bust adjustment and is the most flattering no-waist dress I know of. Easiest of all “adjustments” is simply adding a belt for more waist definition when wanted, no alternations necessary.
Thank you SO MUCH for addressing this issue! I’m very new to sewing, and one of the biggest things that was putting me off the idea of (attempting to) making my own clothes was the idea of all my work being for nought once my weight invariably fluctuated as it does between seasons.
This post and the ideas that follow are single-handedly responsible for helping the ‘me-made’ penny drop for me 😀
I usually trade about 15-20 pounds around during the year. My favorite quick fixes on knit t-shirts: To go down a size or two, turn the shirt inside out and take a half inch seam at the sides, from cuff to hem. Try on, and repeat if it’s still to large. You can take these seams out as needed. To go up a size or two, cut off the seams from cuff to hem, and add a one or two inch wide strips in black or a contrasting color knit, leaving a little extra at either end. (Just a tiny zig/zag stitch on a regular machine with a ball point needle works.) Fold over and hem the extra at the edges. Surprisingly I get many compliments on my “racing stripe” shirts. The strips also add ease to the sleeves and under the arms…
I’ve invested in great scarves, jewelry, shoes and sandals, which I can use no matter what my size. It’s somewhat reassuring that my accessories are reliable, even if my body isn’t.
Thanks for all the tips and pattern recommendations!
These are really great tips! I’ve lost weight over the years and sadly can’t wear many of them anymore.
This comment is late to the game, but I’ve always wanted to try the expandable/movable waist that David Page Coffin recommends in Threads #144 (and on his blog). My waist measurement fluctuates from day to day and some days my trousers look fantastic, and others the same pair looks terrible.
I like the idea of wide seams, also with a fitted bodice l may put a panel in the side seam under the arm. Can’t be seen but gives me more room
Perfect post. I’m about 10 lbs up (and changes my size in waist 2 sizes) — so I’m trying to not have new outfits but make things with SA that might be altered. Great tips and I’m right there with you now.
This is a great post with useful comments. Thank you for sharing. I’ve never actually finished an item of clothing yet due to my weight fluctuating. It has really put me off sewing clothes. Maybe it is time to have another go using some of these ideas.