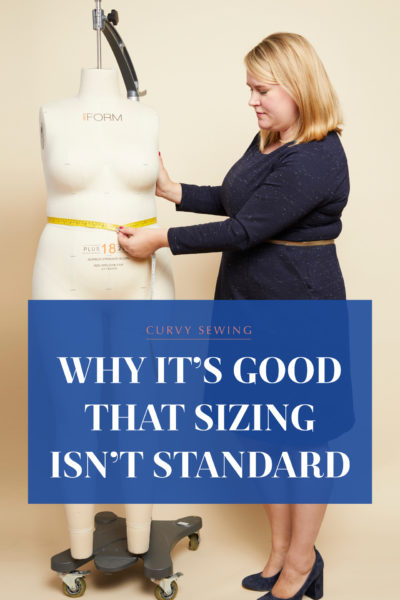
Taking accurate measurements of your body is crucial when you’re picking which size of sewing pattern to use – get it wrong, and there’s a really high chance your garment won’t fit! I always recommend taking measurements before every project – it only takes a minute, and you’ll be surprised by how often you fluctuate. Make sure you wear the same bra that you’ll be wearing in the final garment, and also sit down for the waist and hip measurements because if you’re curvy, you likely spread out a little bit when you’re sitting, and you need to be able to still wear the garment comfortably when you’re on the couch.
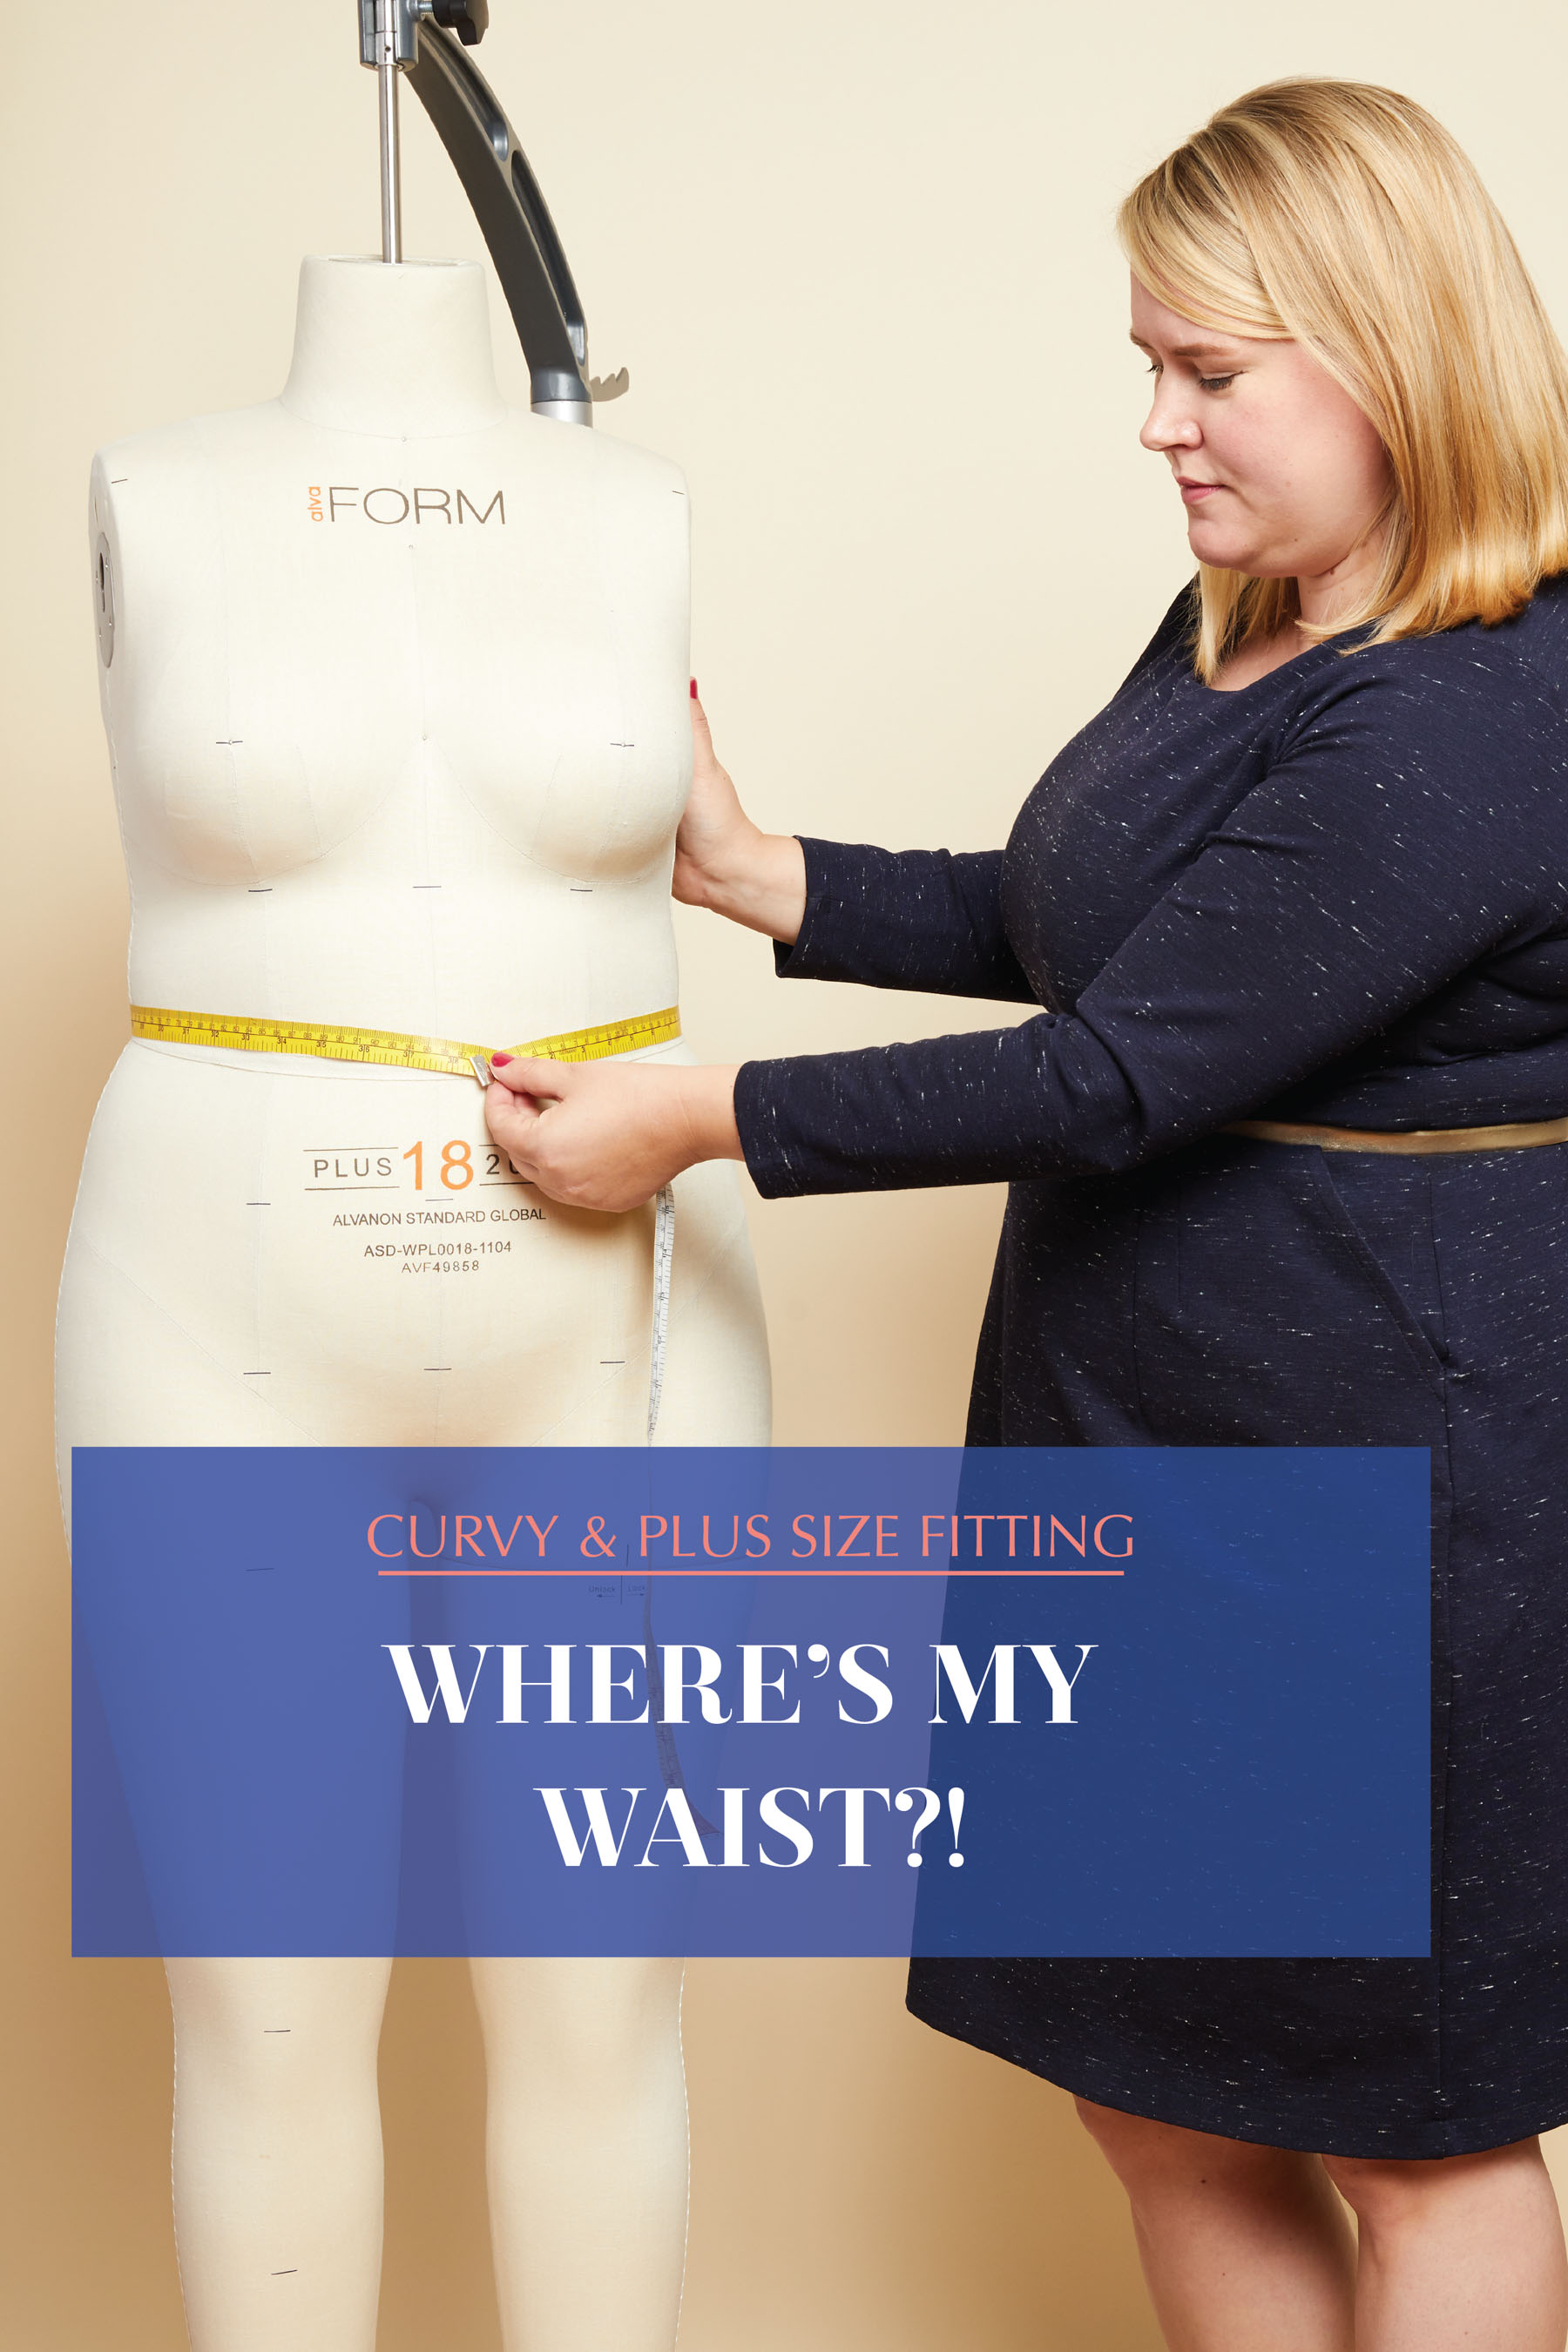
But what do you do if you’re not sure WHERE to take the measurement? The bust and hip are fairly easy: take them where you’re biggest. For the bust specifically, measure at your apex, which is the most protruding part – bear in mind, it may not be your nipple! (especially if you’re bountiful of bust). For hips, it’s best to take wherever your hip/bum circumference is biggest, which might be higher or lower depending on your proportions (and you may have to alter the pattern for that – but that’s a post for another day).
However, figuring out how to find and measure your waist for sewing can be harder – especially if you’re plus size, and/or not an hourglass shape with an obviously defined waist. I think many people assume there’s a “correct” waist location, and somehow you have to find it, but in fact, in my opinion, that’s not true!
There’s lots of guidance about this topic, and I have to admit that I have a different opinion than a lot of the standard advice you’ll find in fitting books which are intended for women of all sizes, but predominantly written for slim and classically regular figures. My approach is based on years of designing and fitting for plus size bodies, and it’s worked well for me, and for the women in classes I’ve taught. But as always, there aren’t many absolutes in sewing, so see what you think – and if there’s a different approach that works for you, use that!
Here’s what you need to know about the Cashmerette approach…
1. There isn’t an absolute rule
You may have read that your waist is always where you angle when you bend over, or at the height of your belly button, or where your hips start going out, or X inches above your belly button. But here’s the secret: there is in fact no absolute rule.
We all have such different proportions and dimensions that there isn’t a one size fits all approach. Personally when I lean over I’m more of a bumpy curve than a sharp angle with a defined waist! So, the question is less “where is my waist?” than “where do I want the intended waist on my garment to hit me?”. Don’t worry about finding the “true” location of your waist – in reality, there isn’t one, and it doesn’t matter when you’re sewing anyway because you’re going to be altering your pattern accordingly.
2. If you want to look smaller, choose your narrowest point – which is likely high up if you’re plus size.
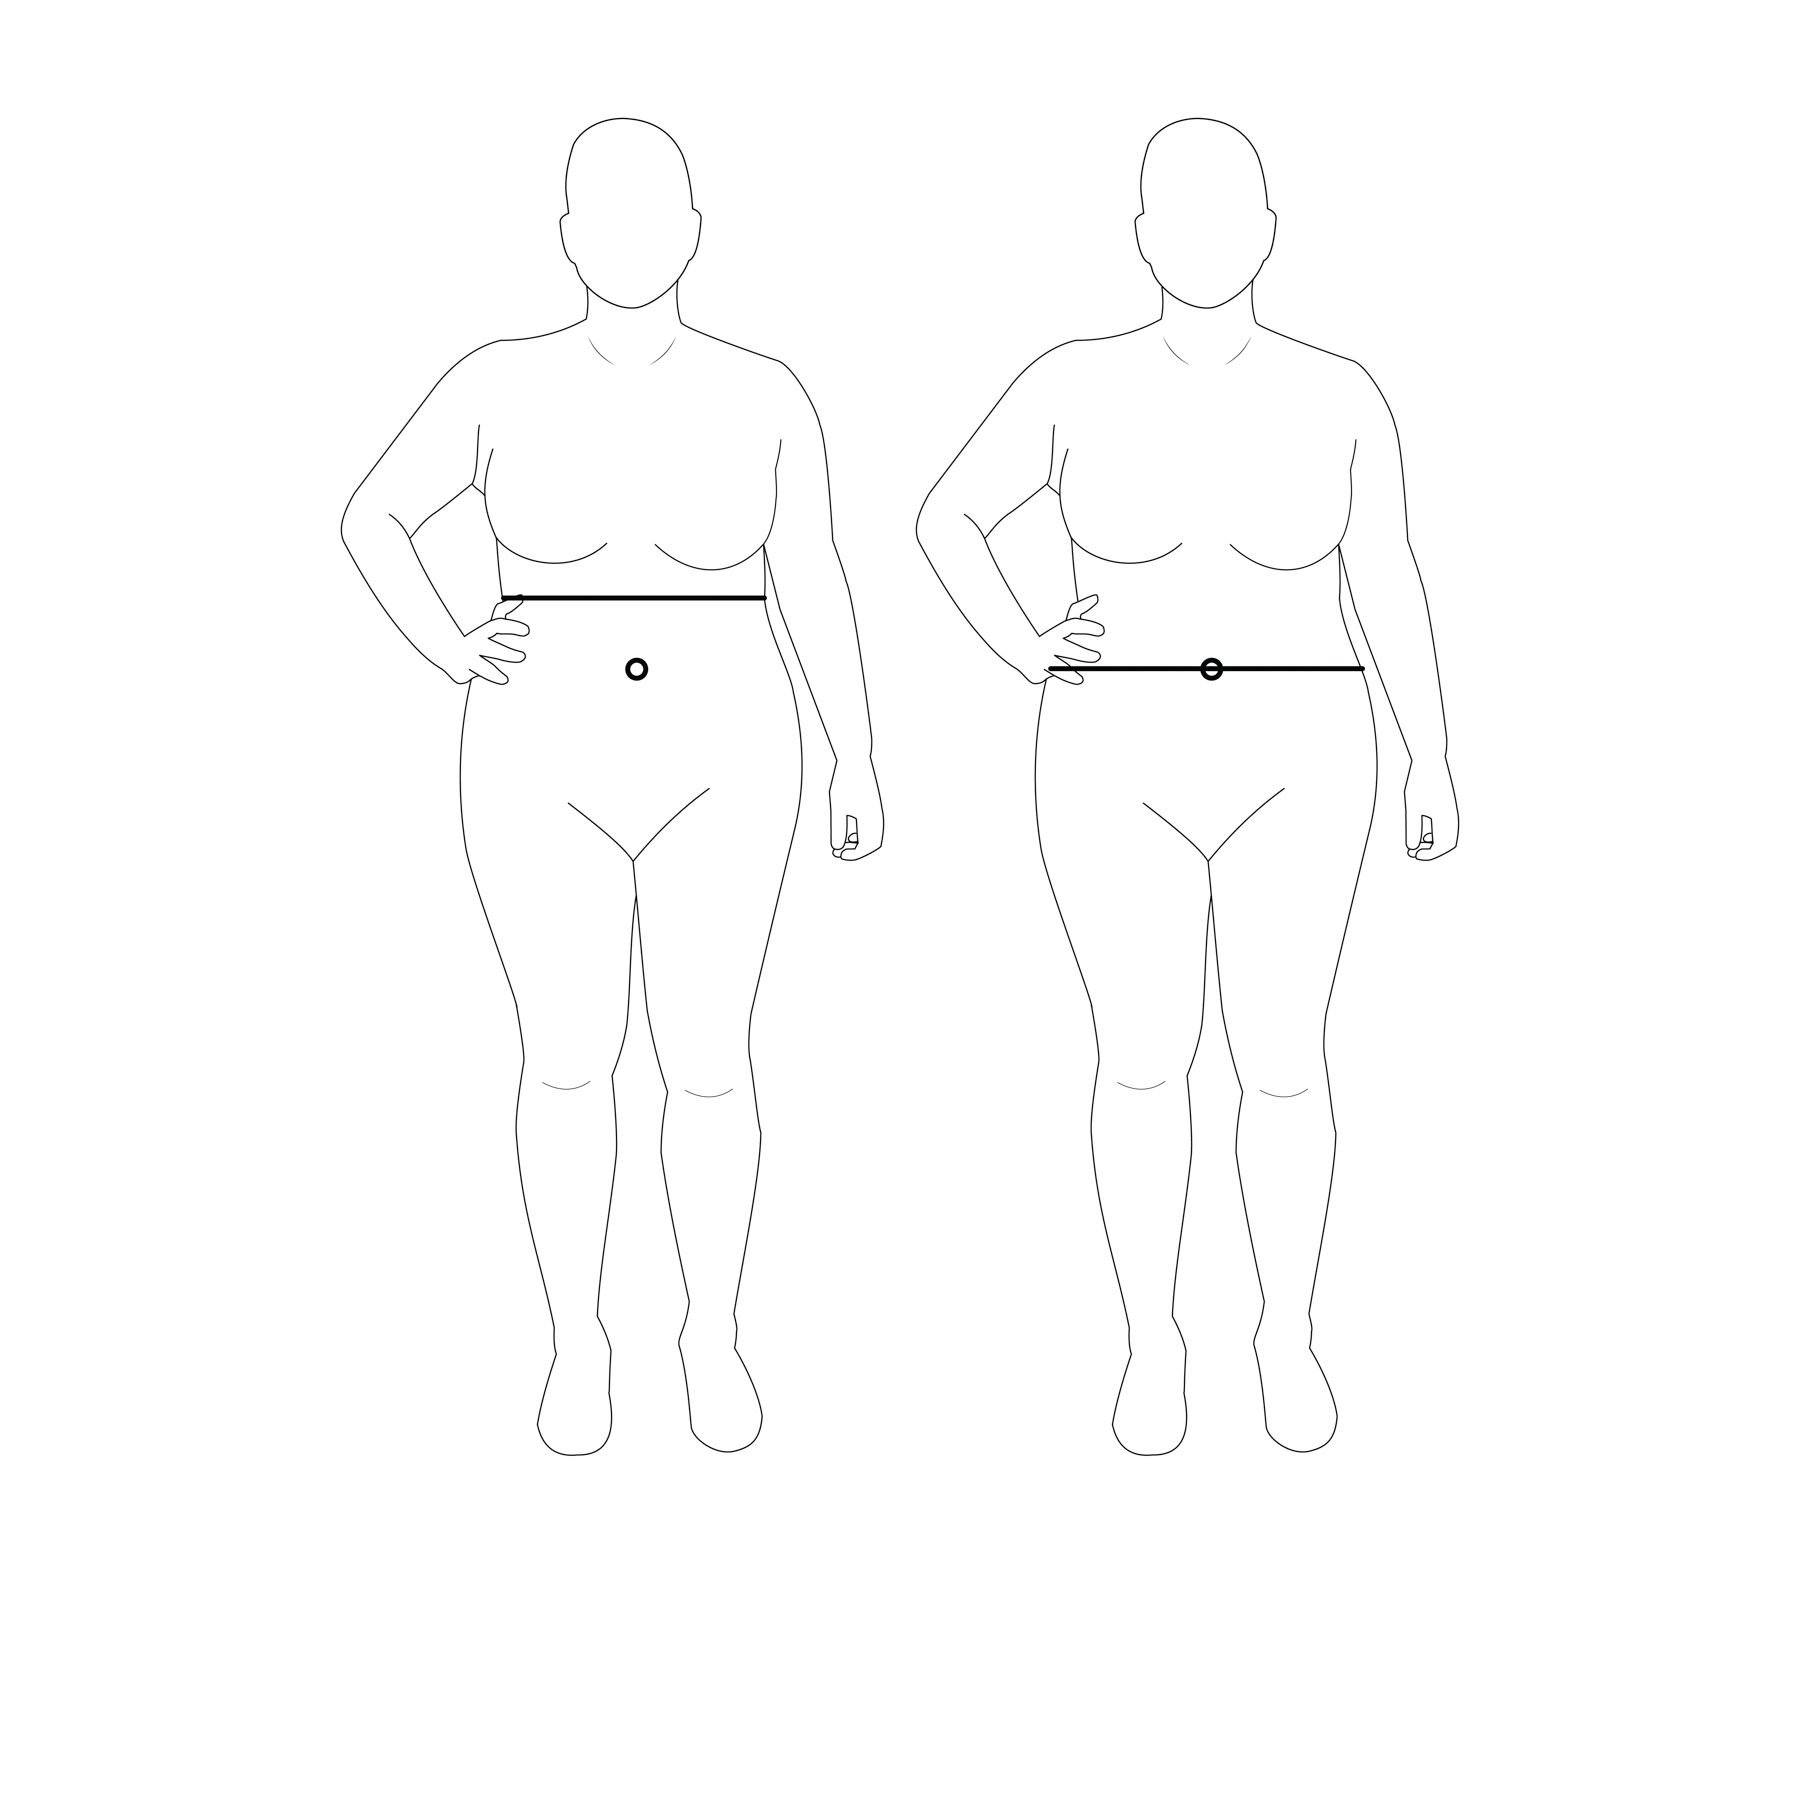
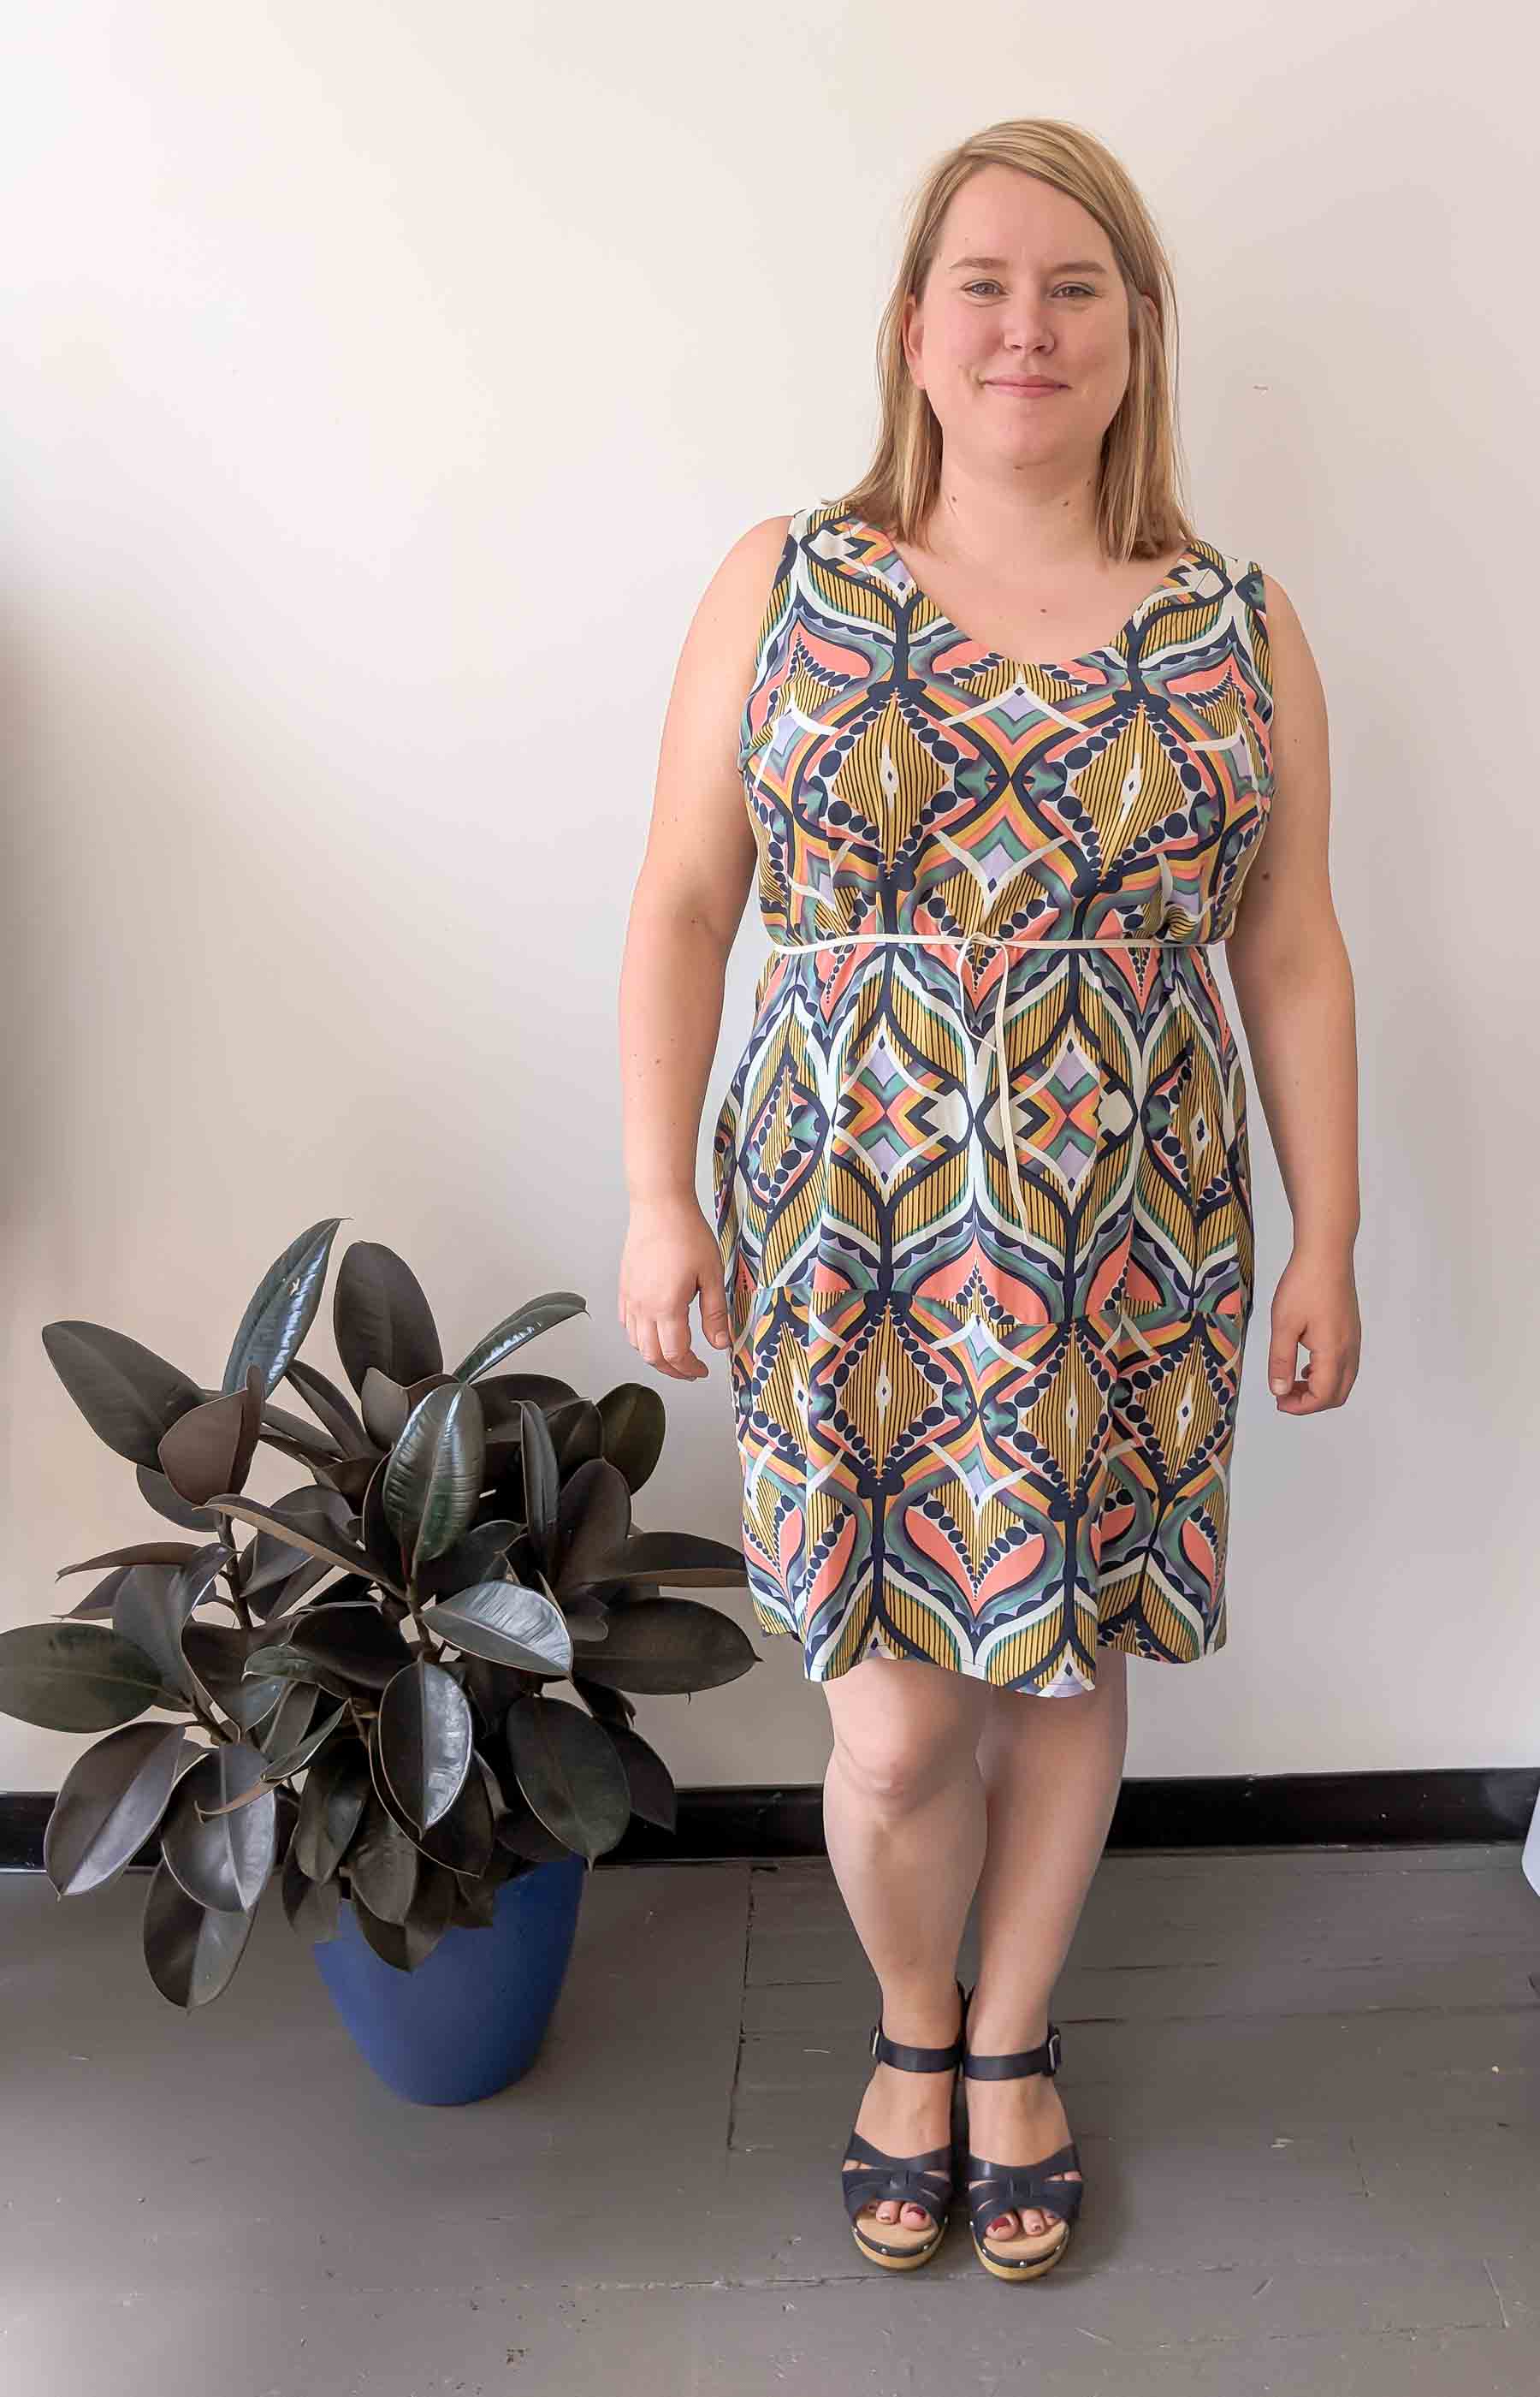
Now we know that your waist is wherever you want it to be for the purpose of sewing garments, you have a choice. IF you want to look smaller (and of course, you don’t have to!), the best bet is to pick your narrowest point, which in my experience is usually around mid-rib cage on most women – which is much higher than typically taught. For me, it’s about 4 inches below my bra band.
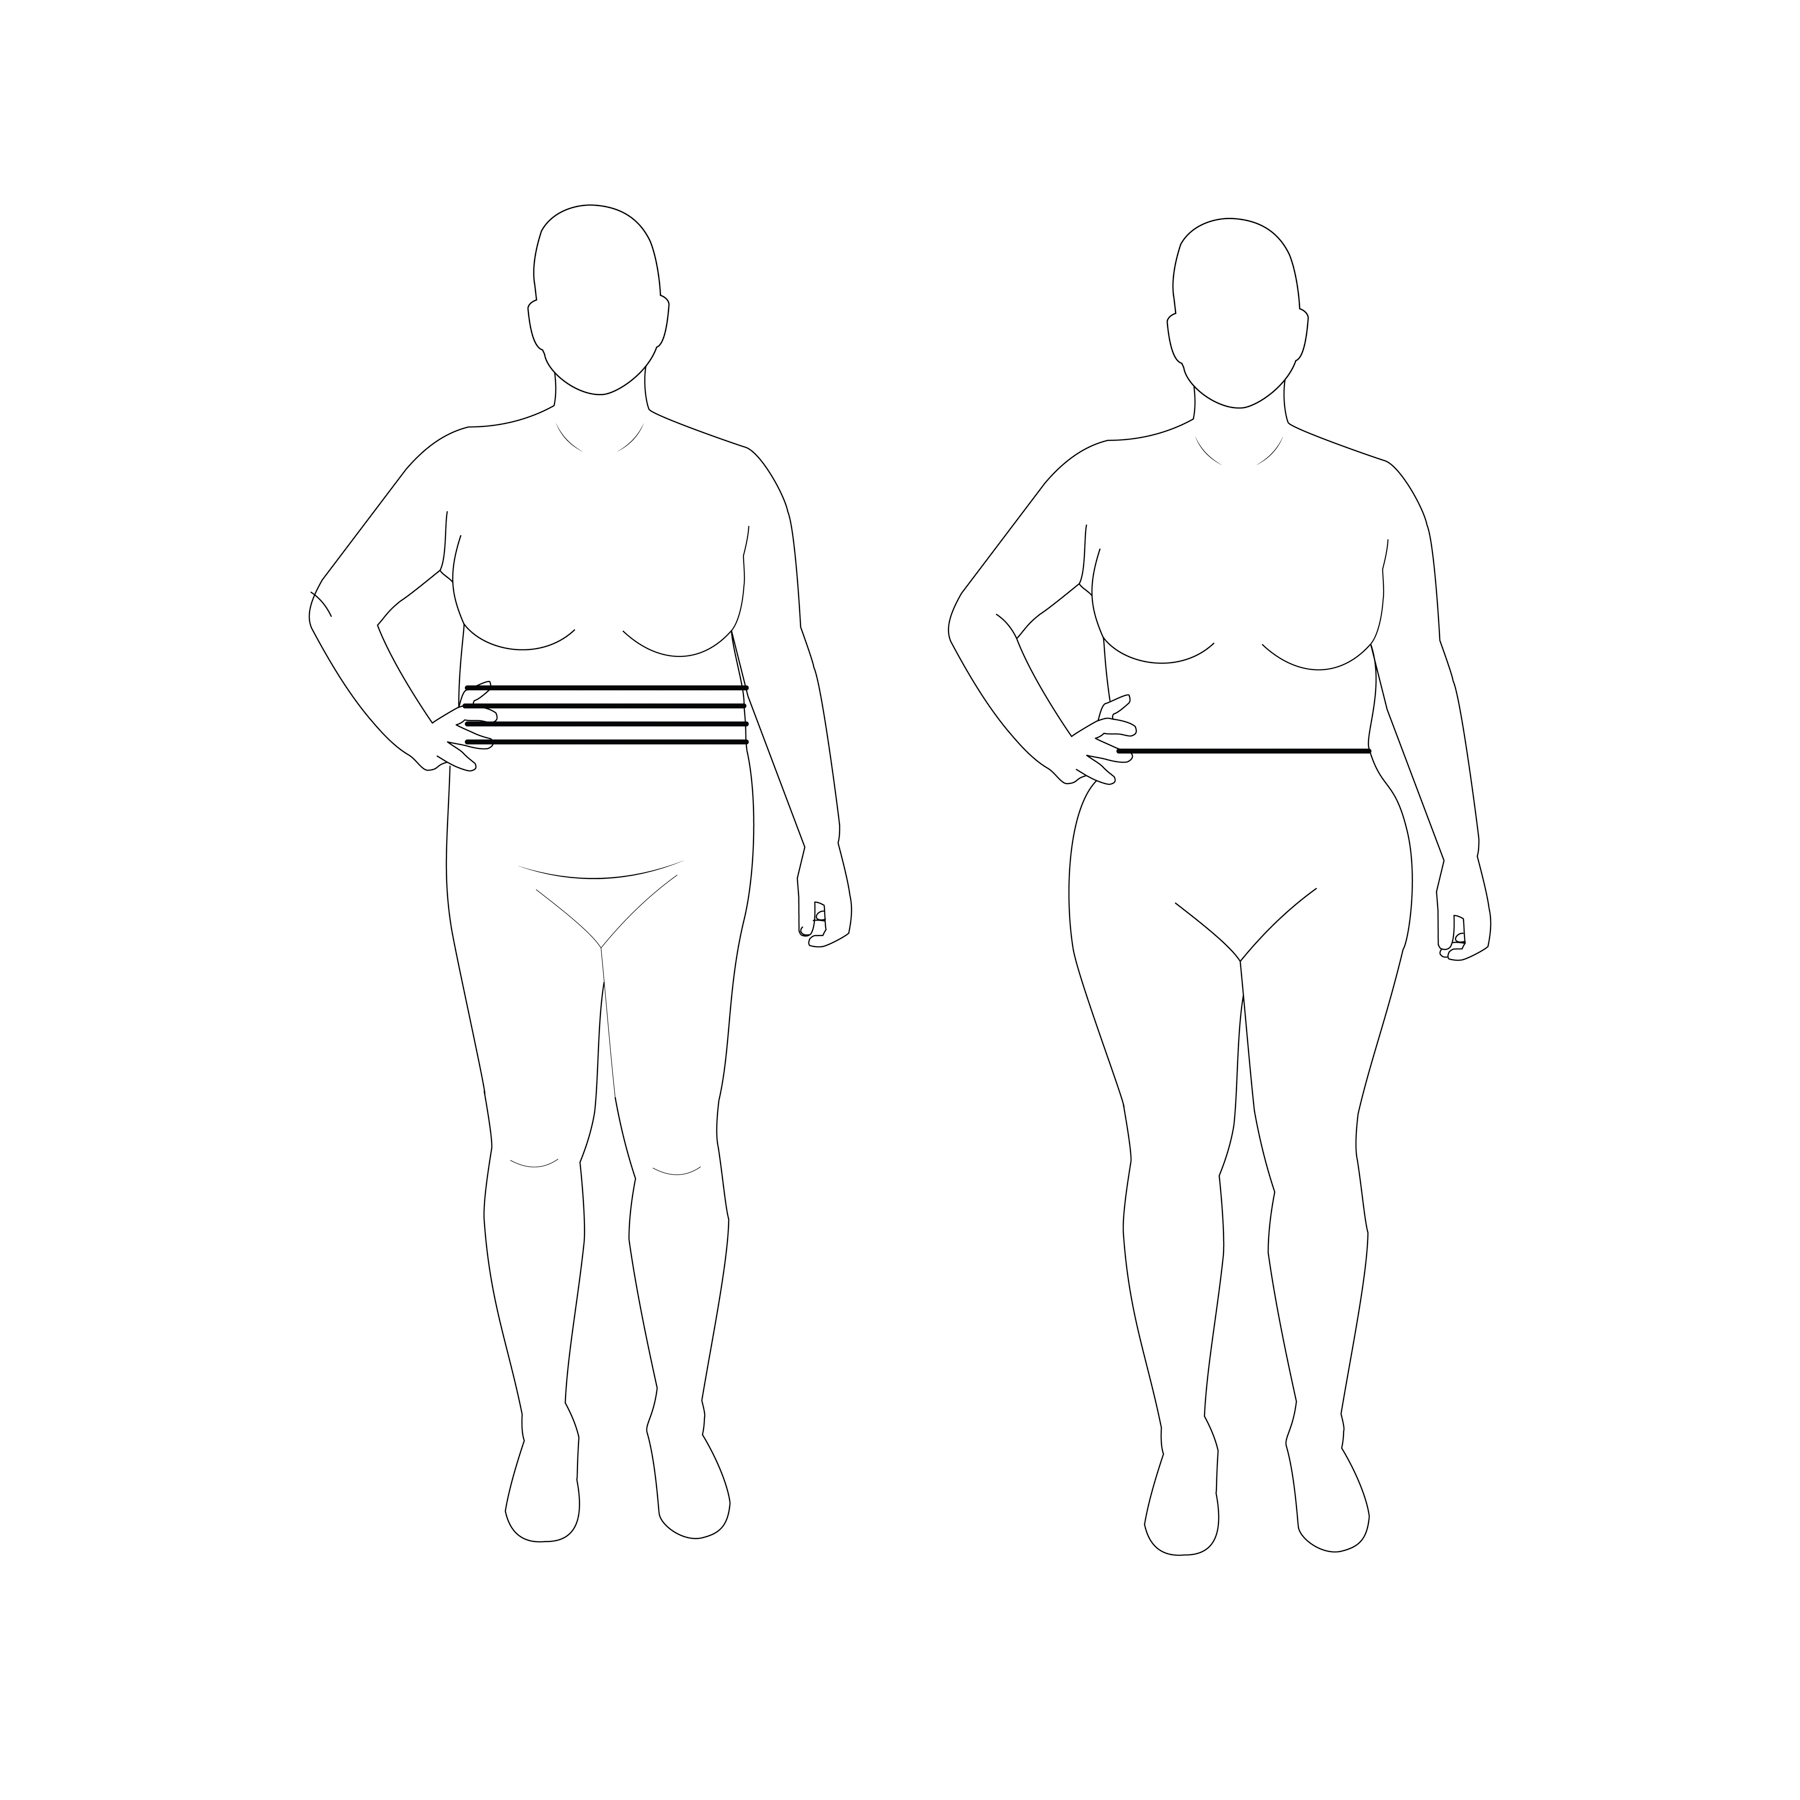
As it happens, the croquis in our Curvy Sketchbooks is based on me (SURPRISE!) so you can easily see here that I’m narrowest high up (belly button added to the image for proportion! It’s not in the sketchbook ;)). I included the belly button comparison because that’s a place a lot of women automatically go to measure, but it’s almost always too far down.
Here’s where that lies on me:
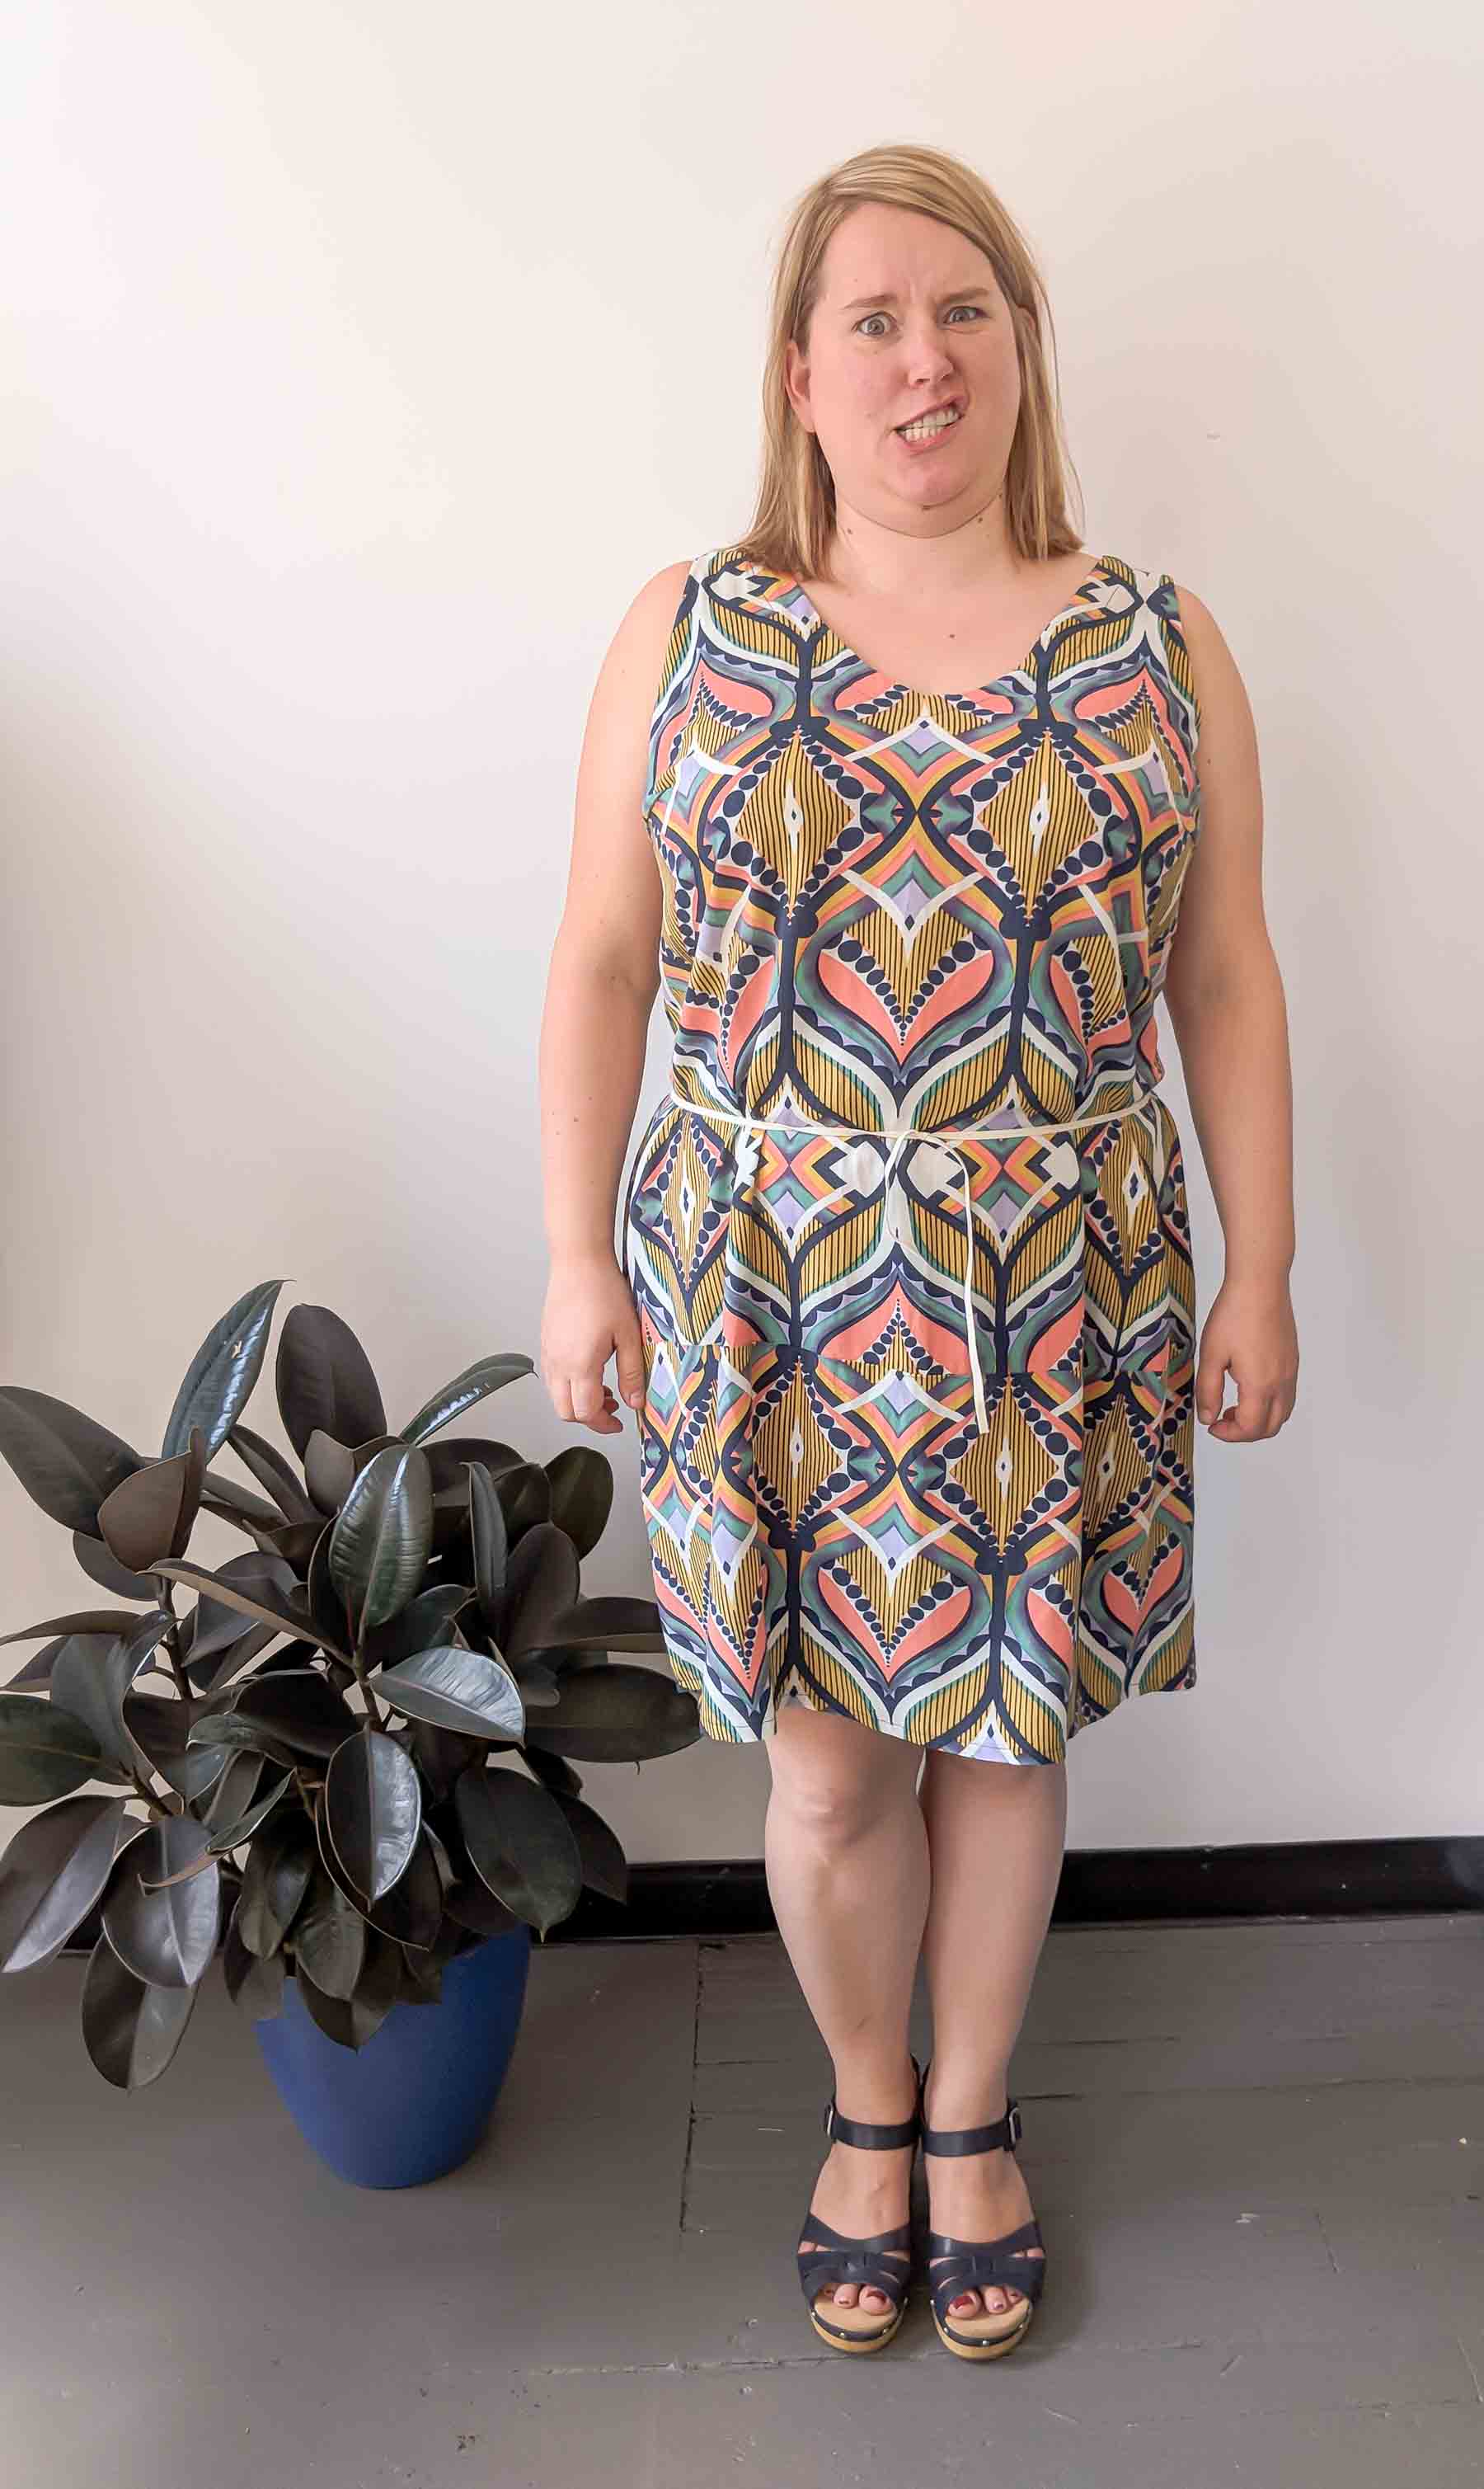
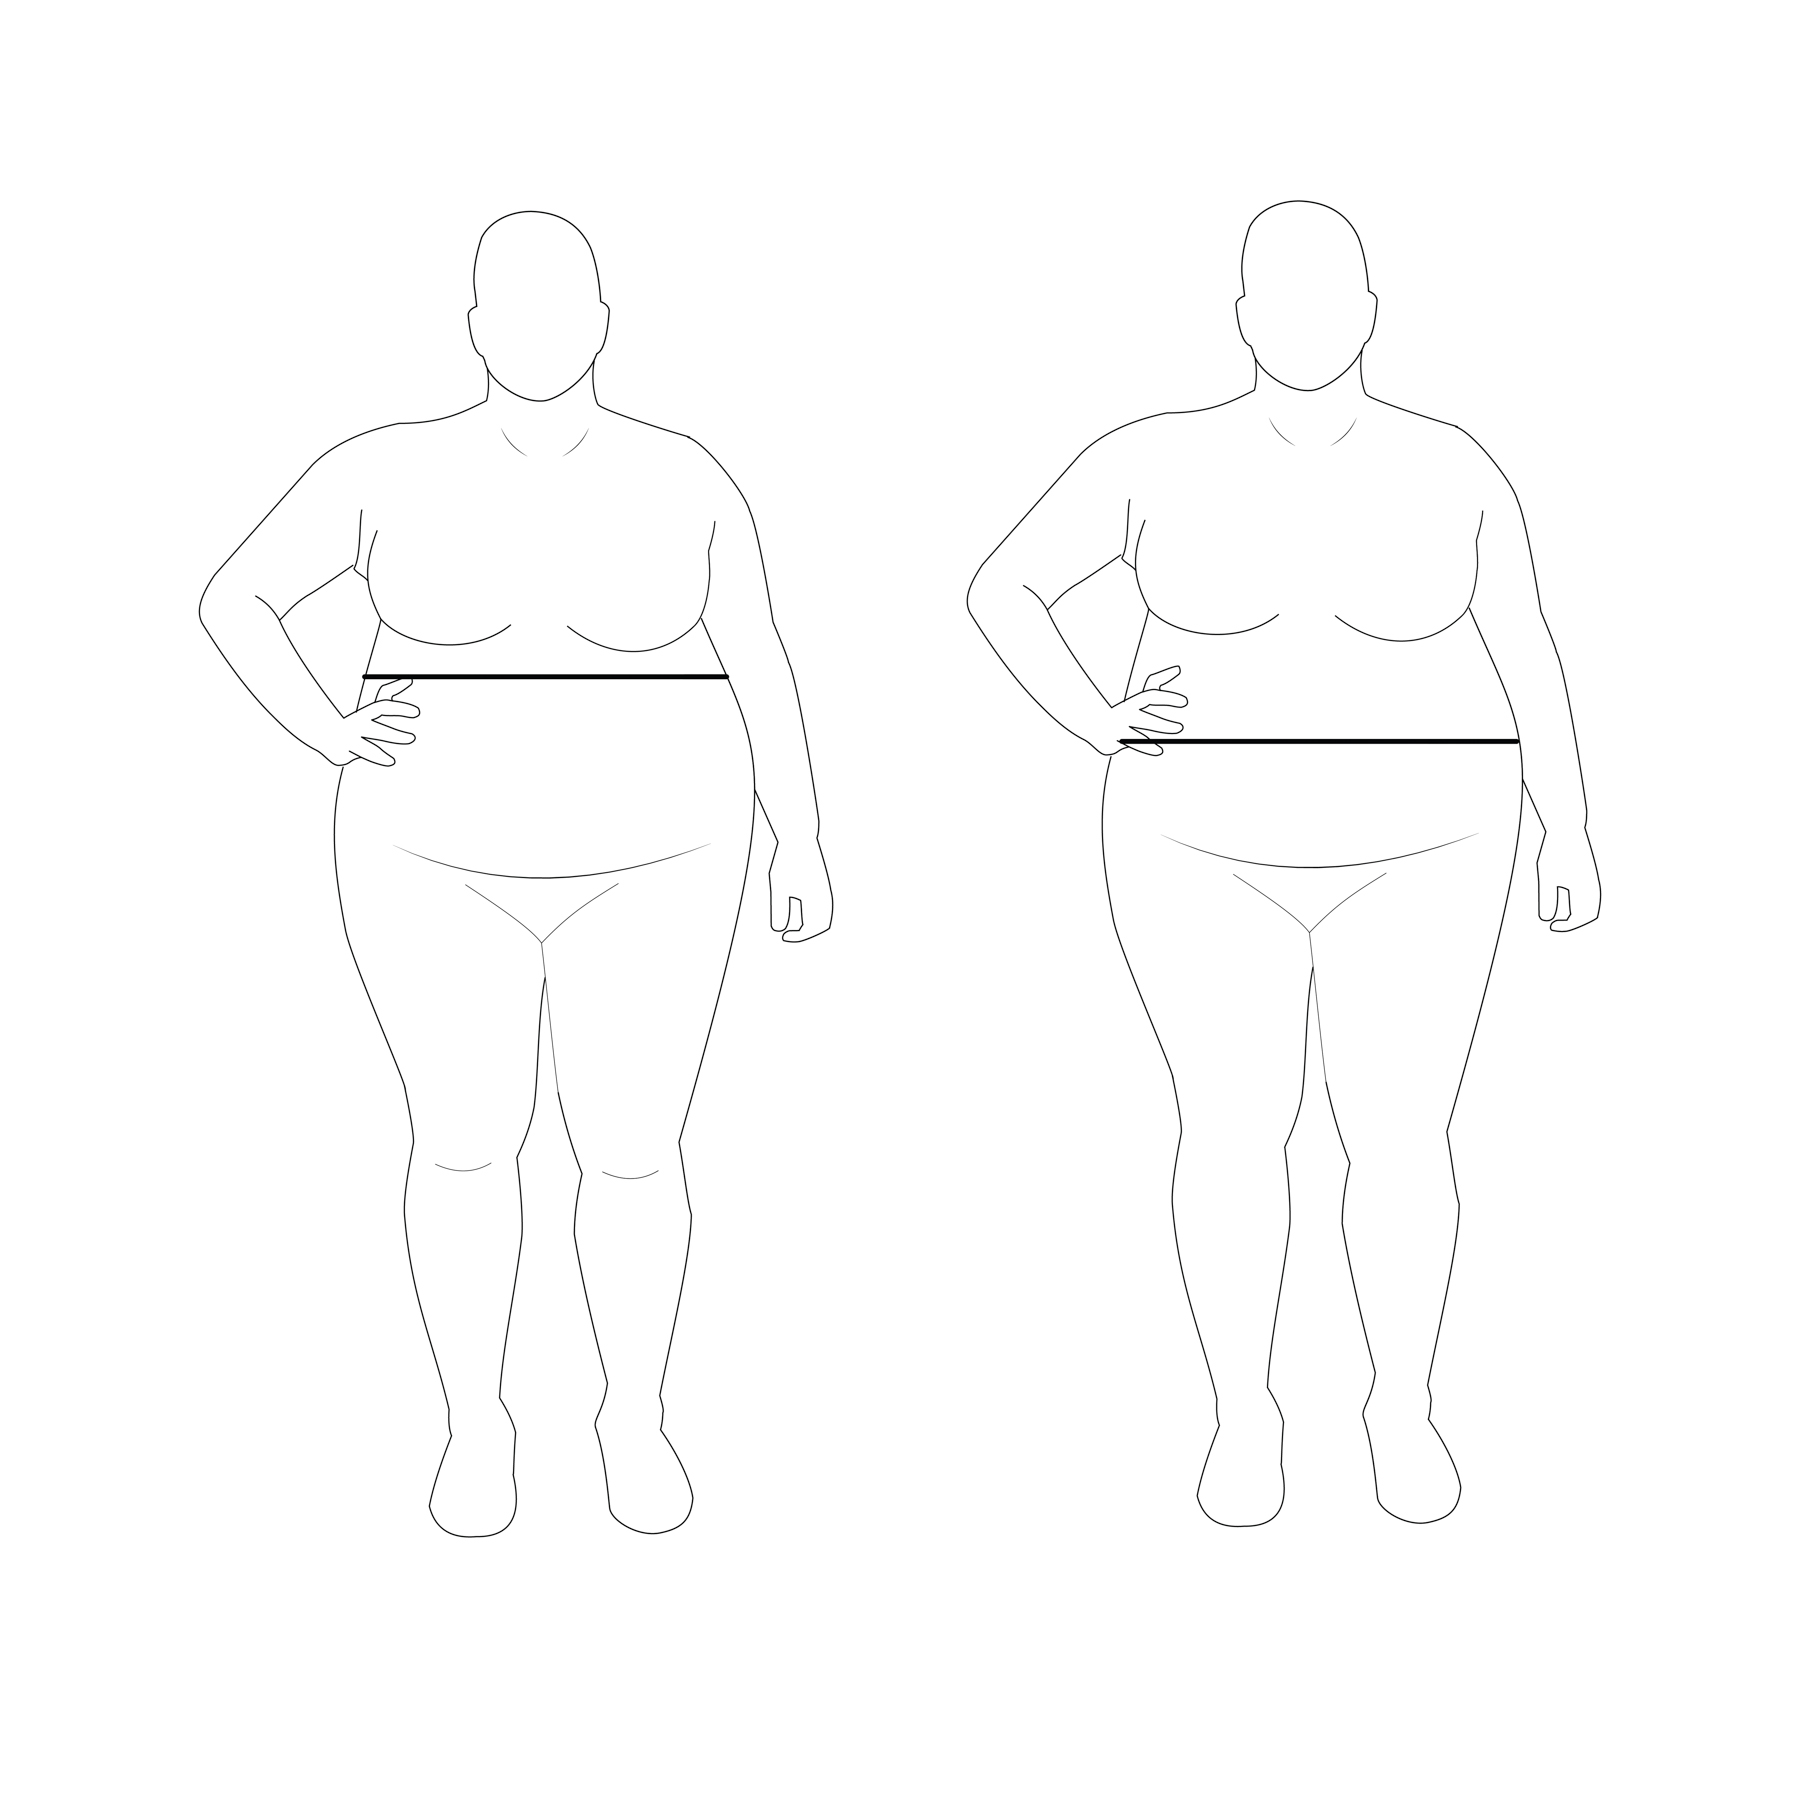
And, you can see how different I look if I go with the “traditional” waist height (RUH ROH). Much less good on me.
As this is a really common narrowest point, it’s also why most Cashmerette Patterns have a “high” waist! I often hear from women who lengthen our bodices, only to realize that it actually looks much better at the original, higher waist placement!
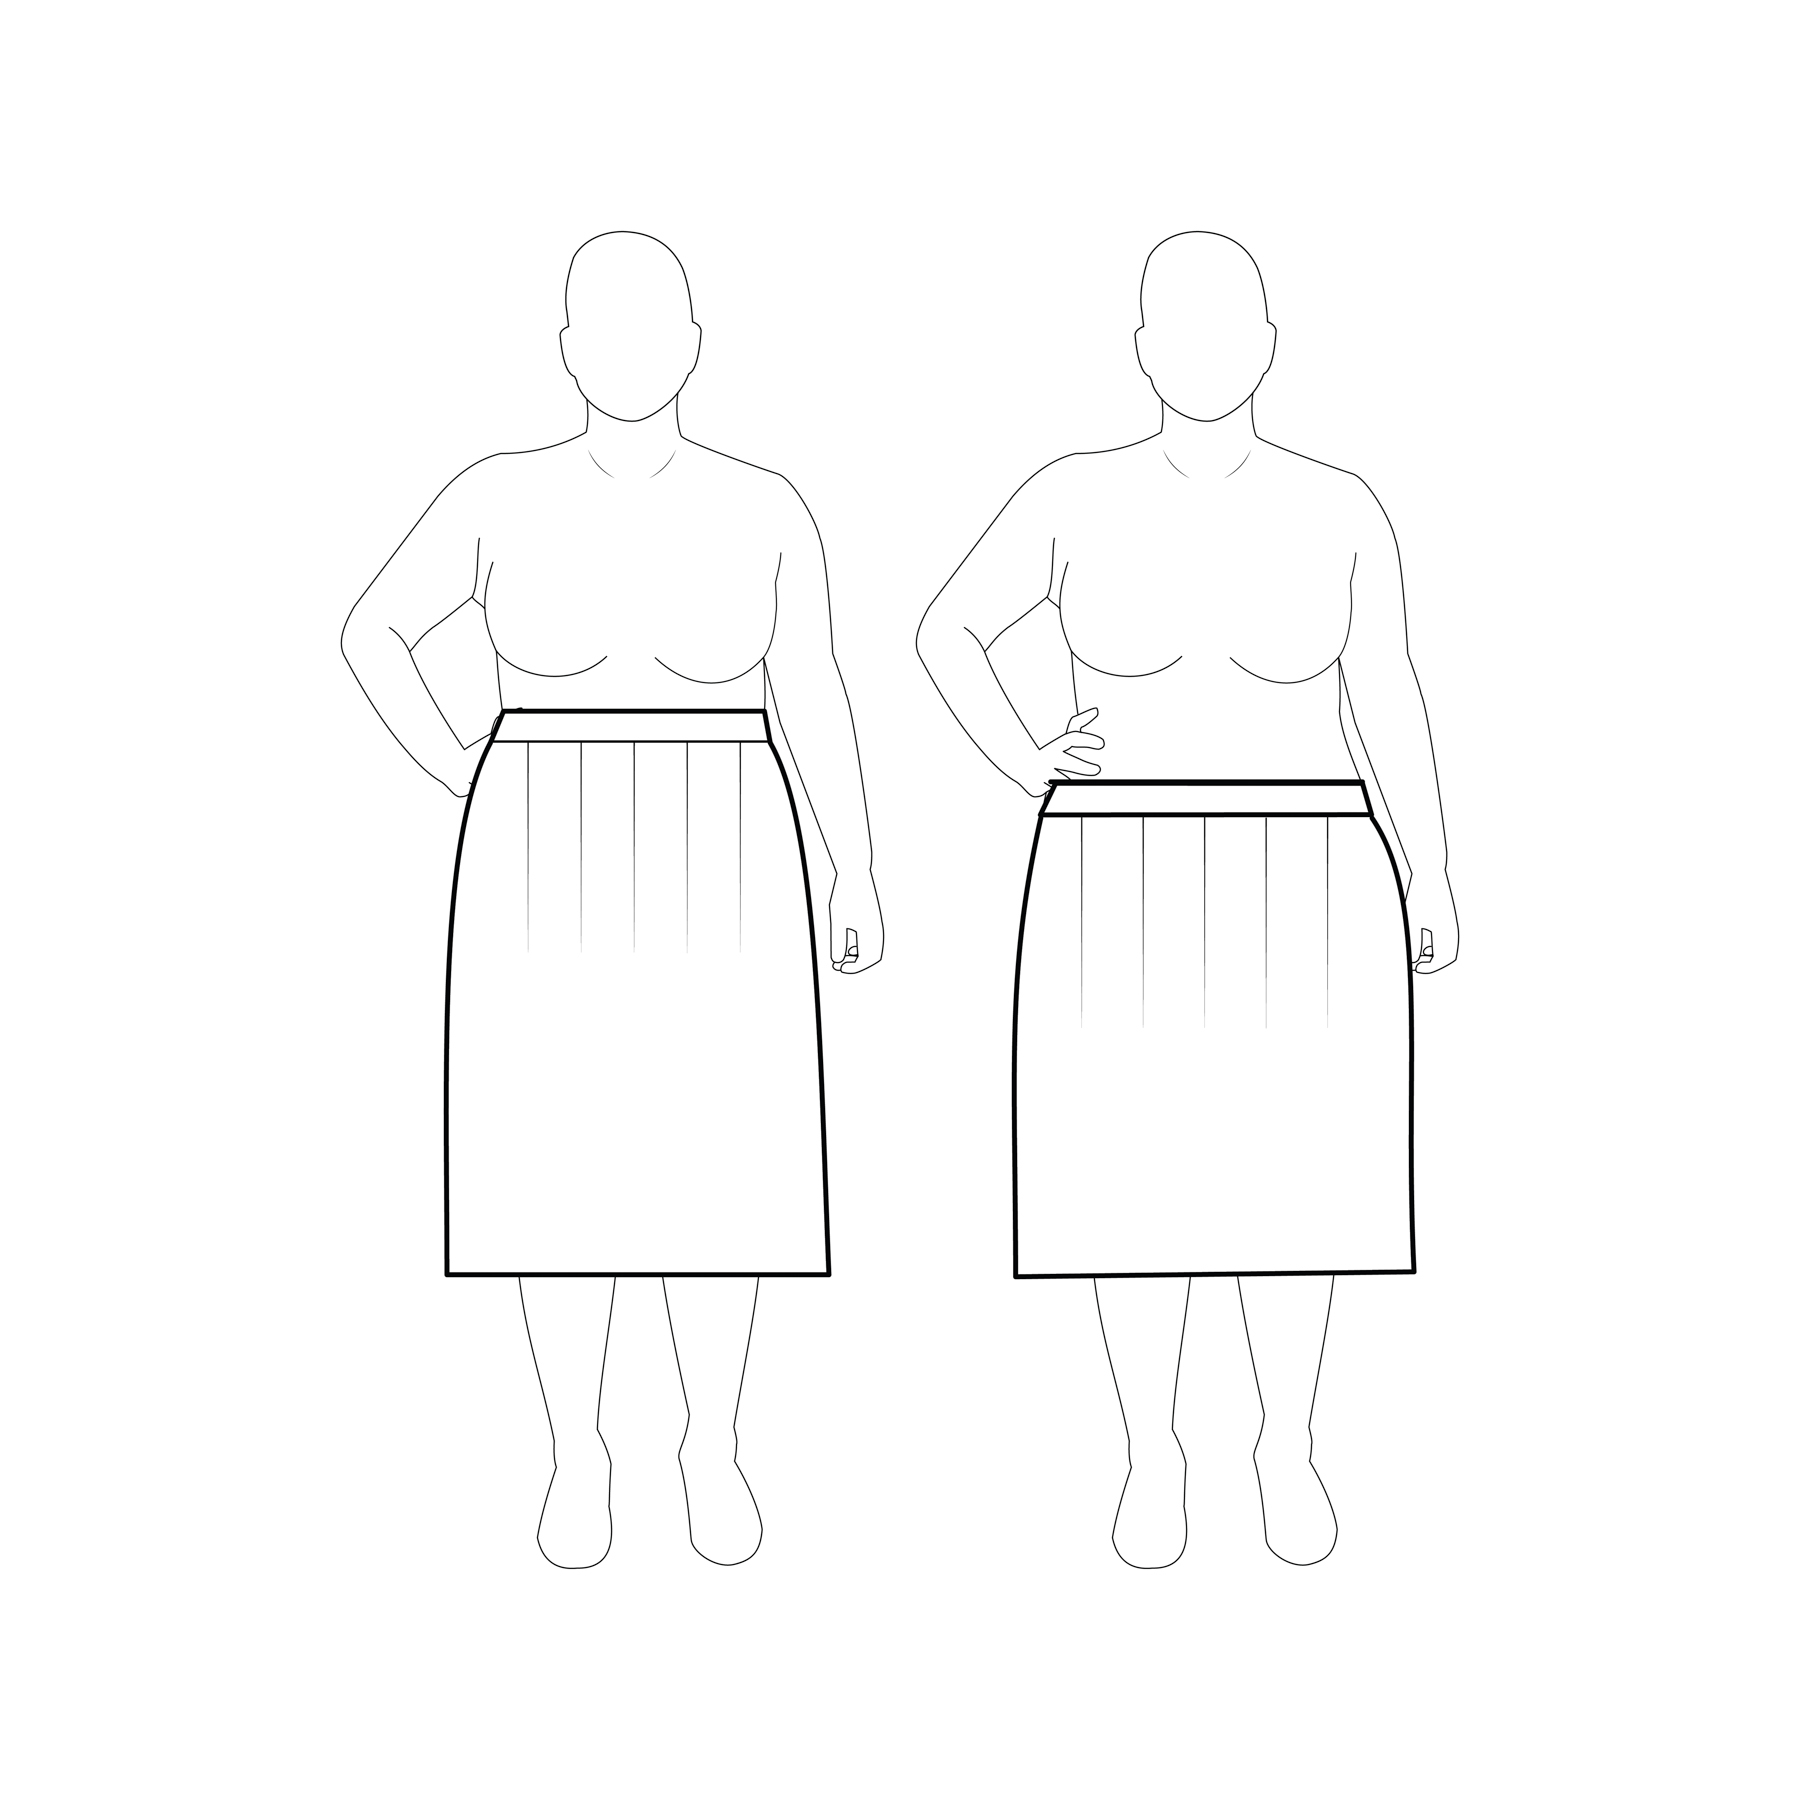
Let’s look at some other common body shapes:
- If you’re pretty straight up and down (left), the world is your oyster! You can pick wherever you want, and it becomes more about the proportion of upper: lower body in a garment that you prefer
- If you DO have a defined waist (right), feel free to use that point! (but you’re probably not having as much trouble finding it in the first place)
- If you’re an apple shape and your waist is a similar size or bigger than your bust or waist, then commonly putting the waist a few inches below your bra band looks best (shown on the left). Don’t feel like you have to pick the largest size of your tummy (shown on the right).
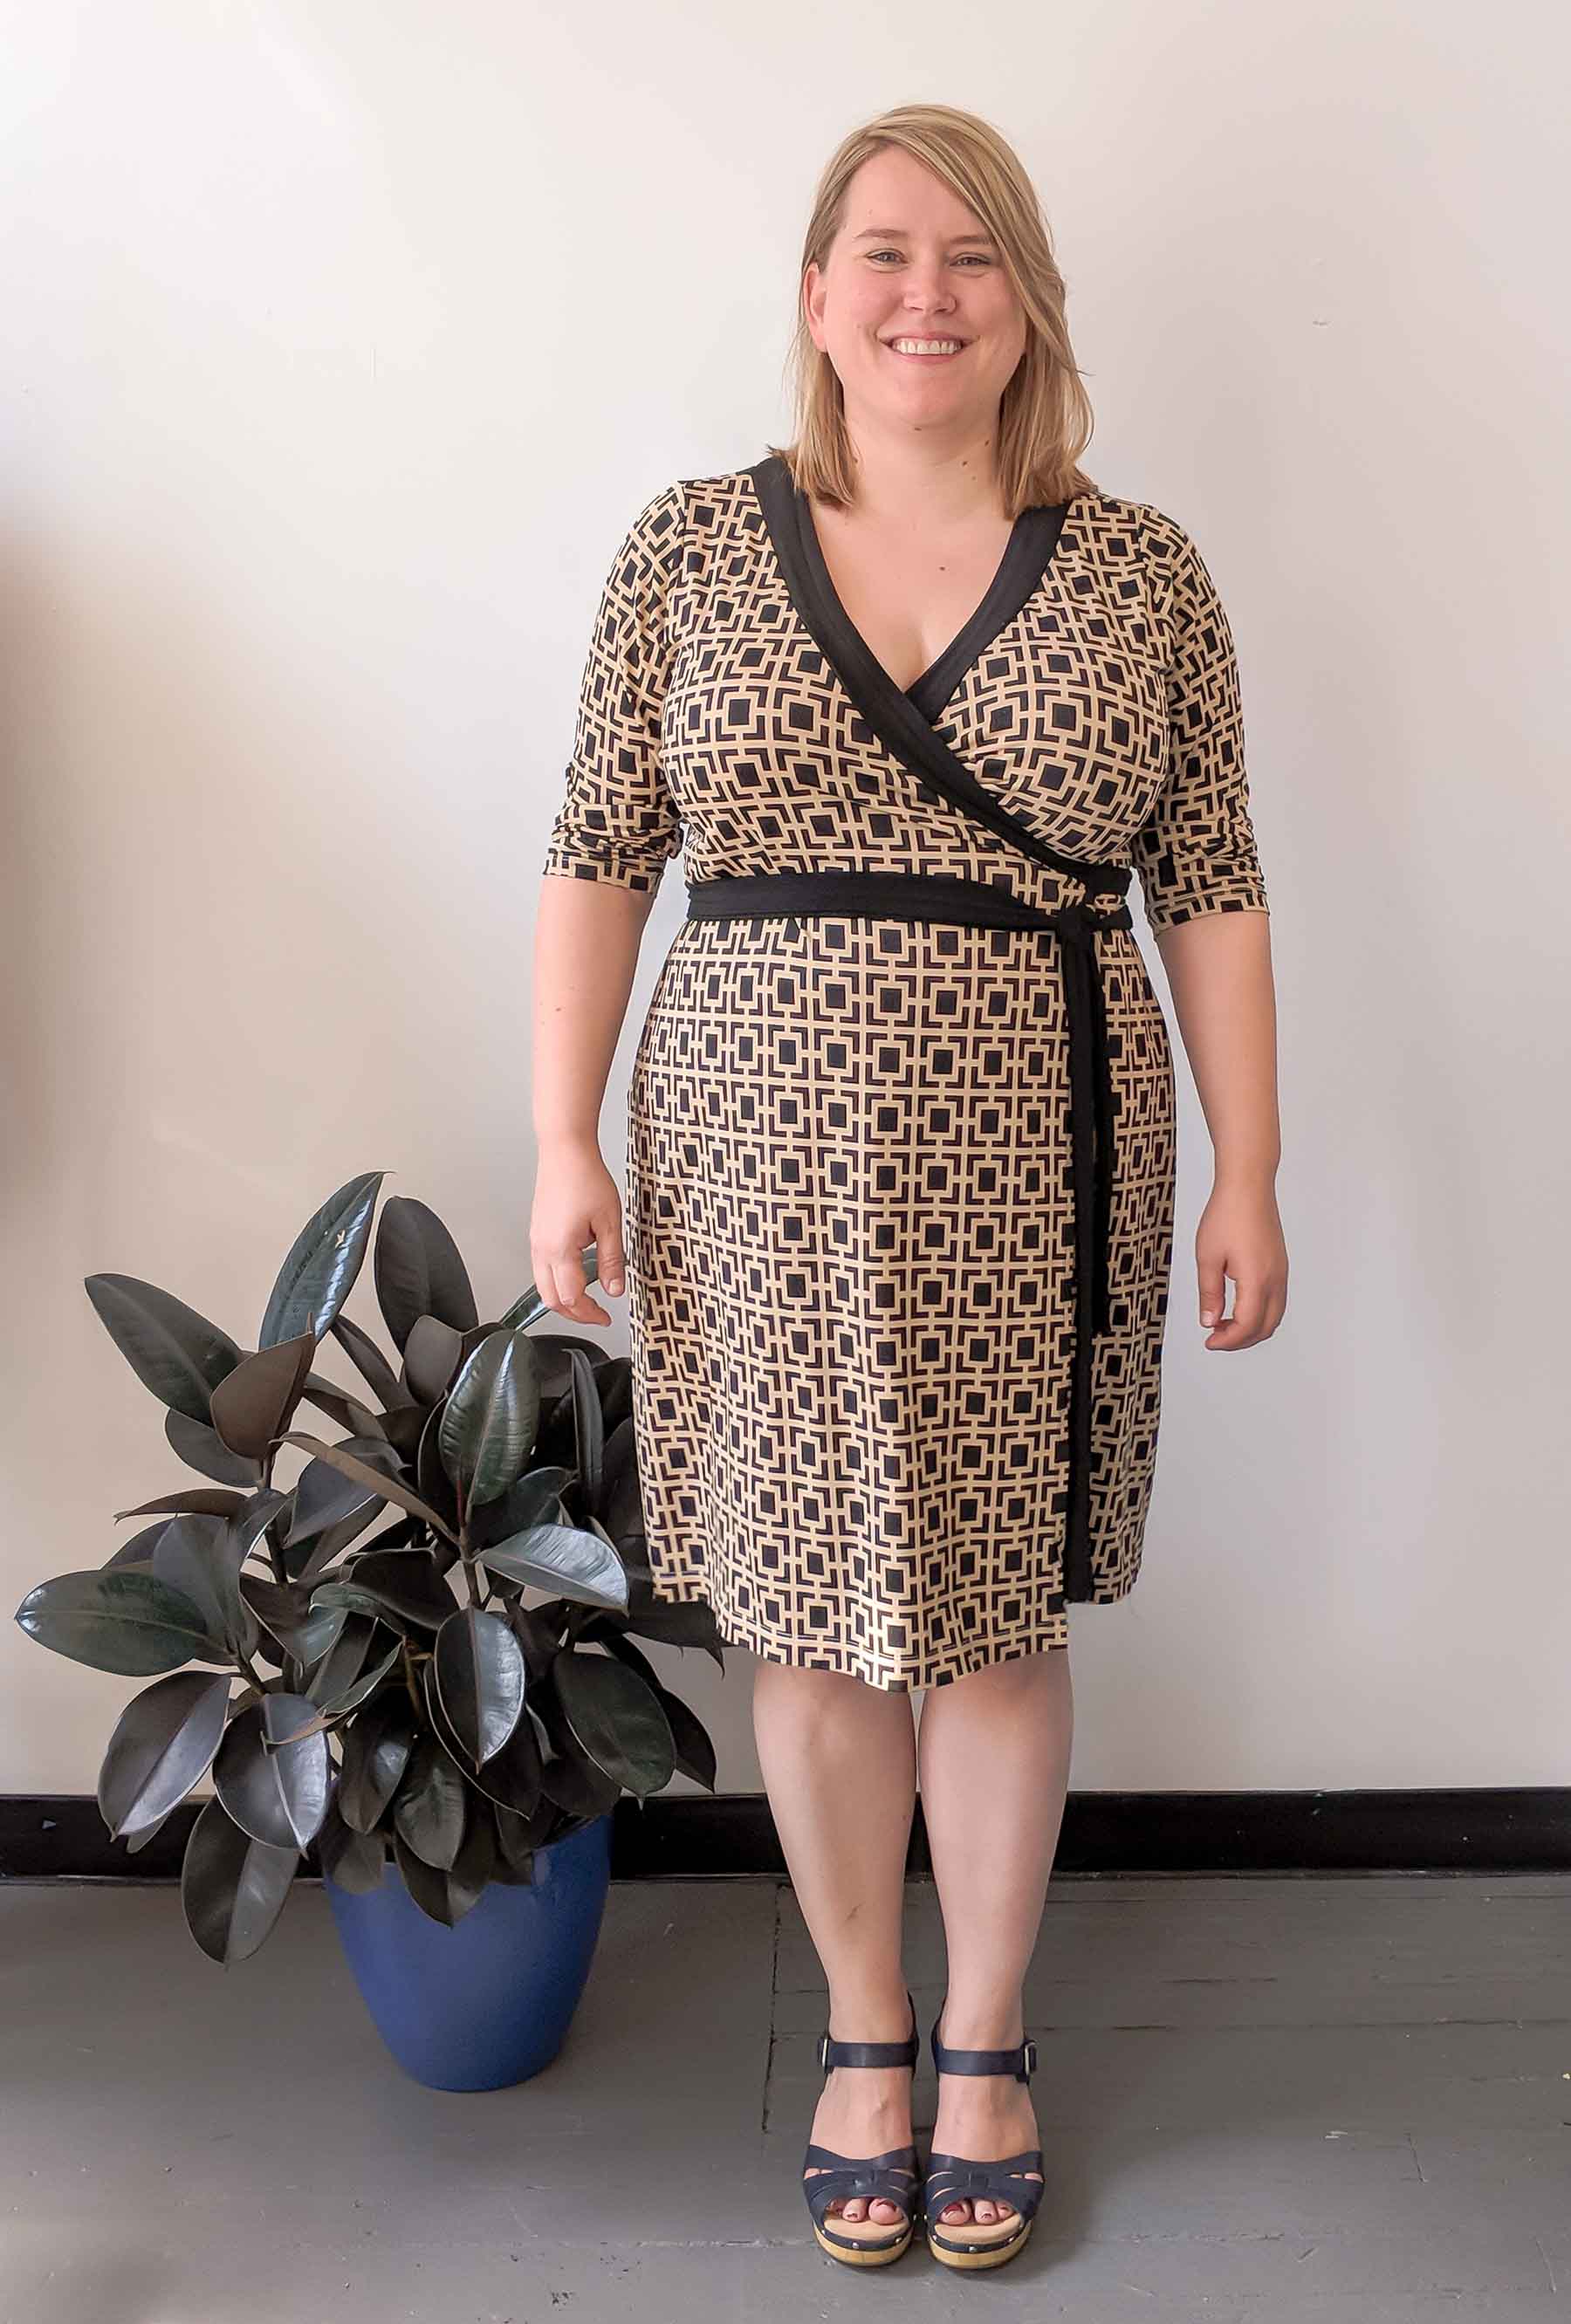
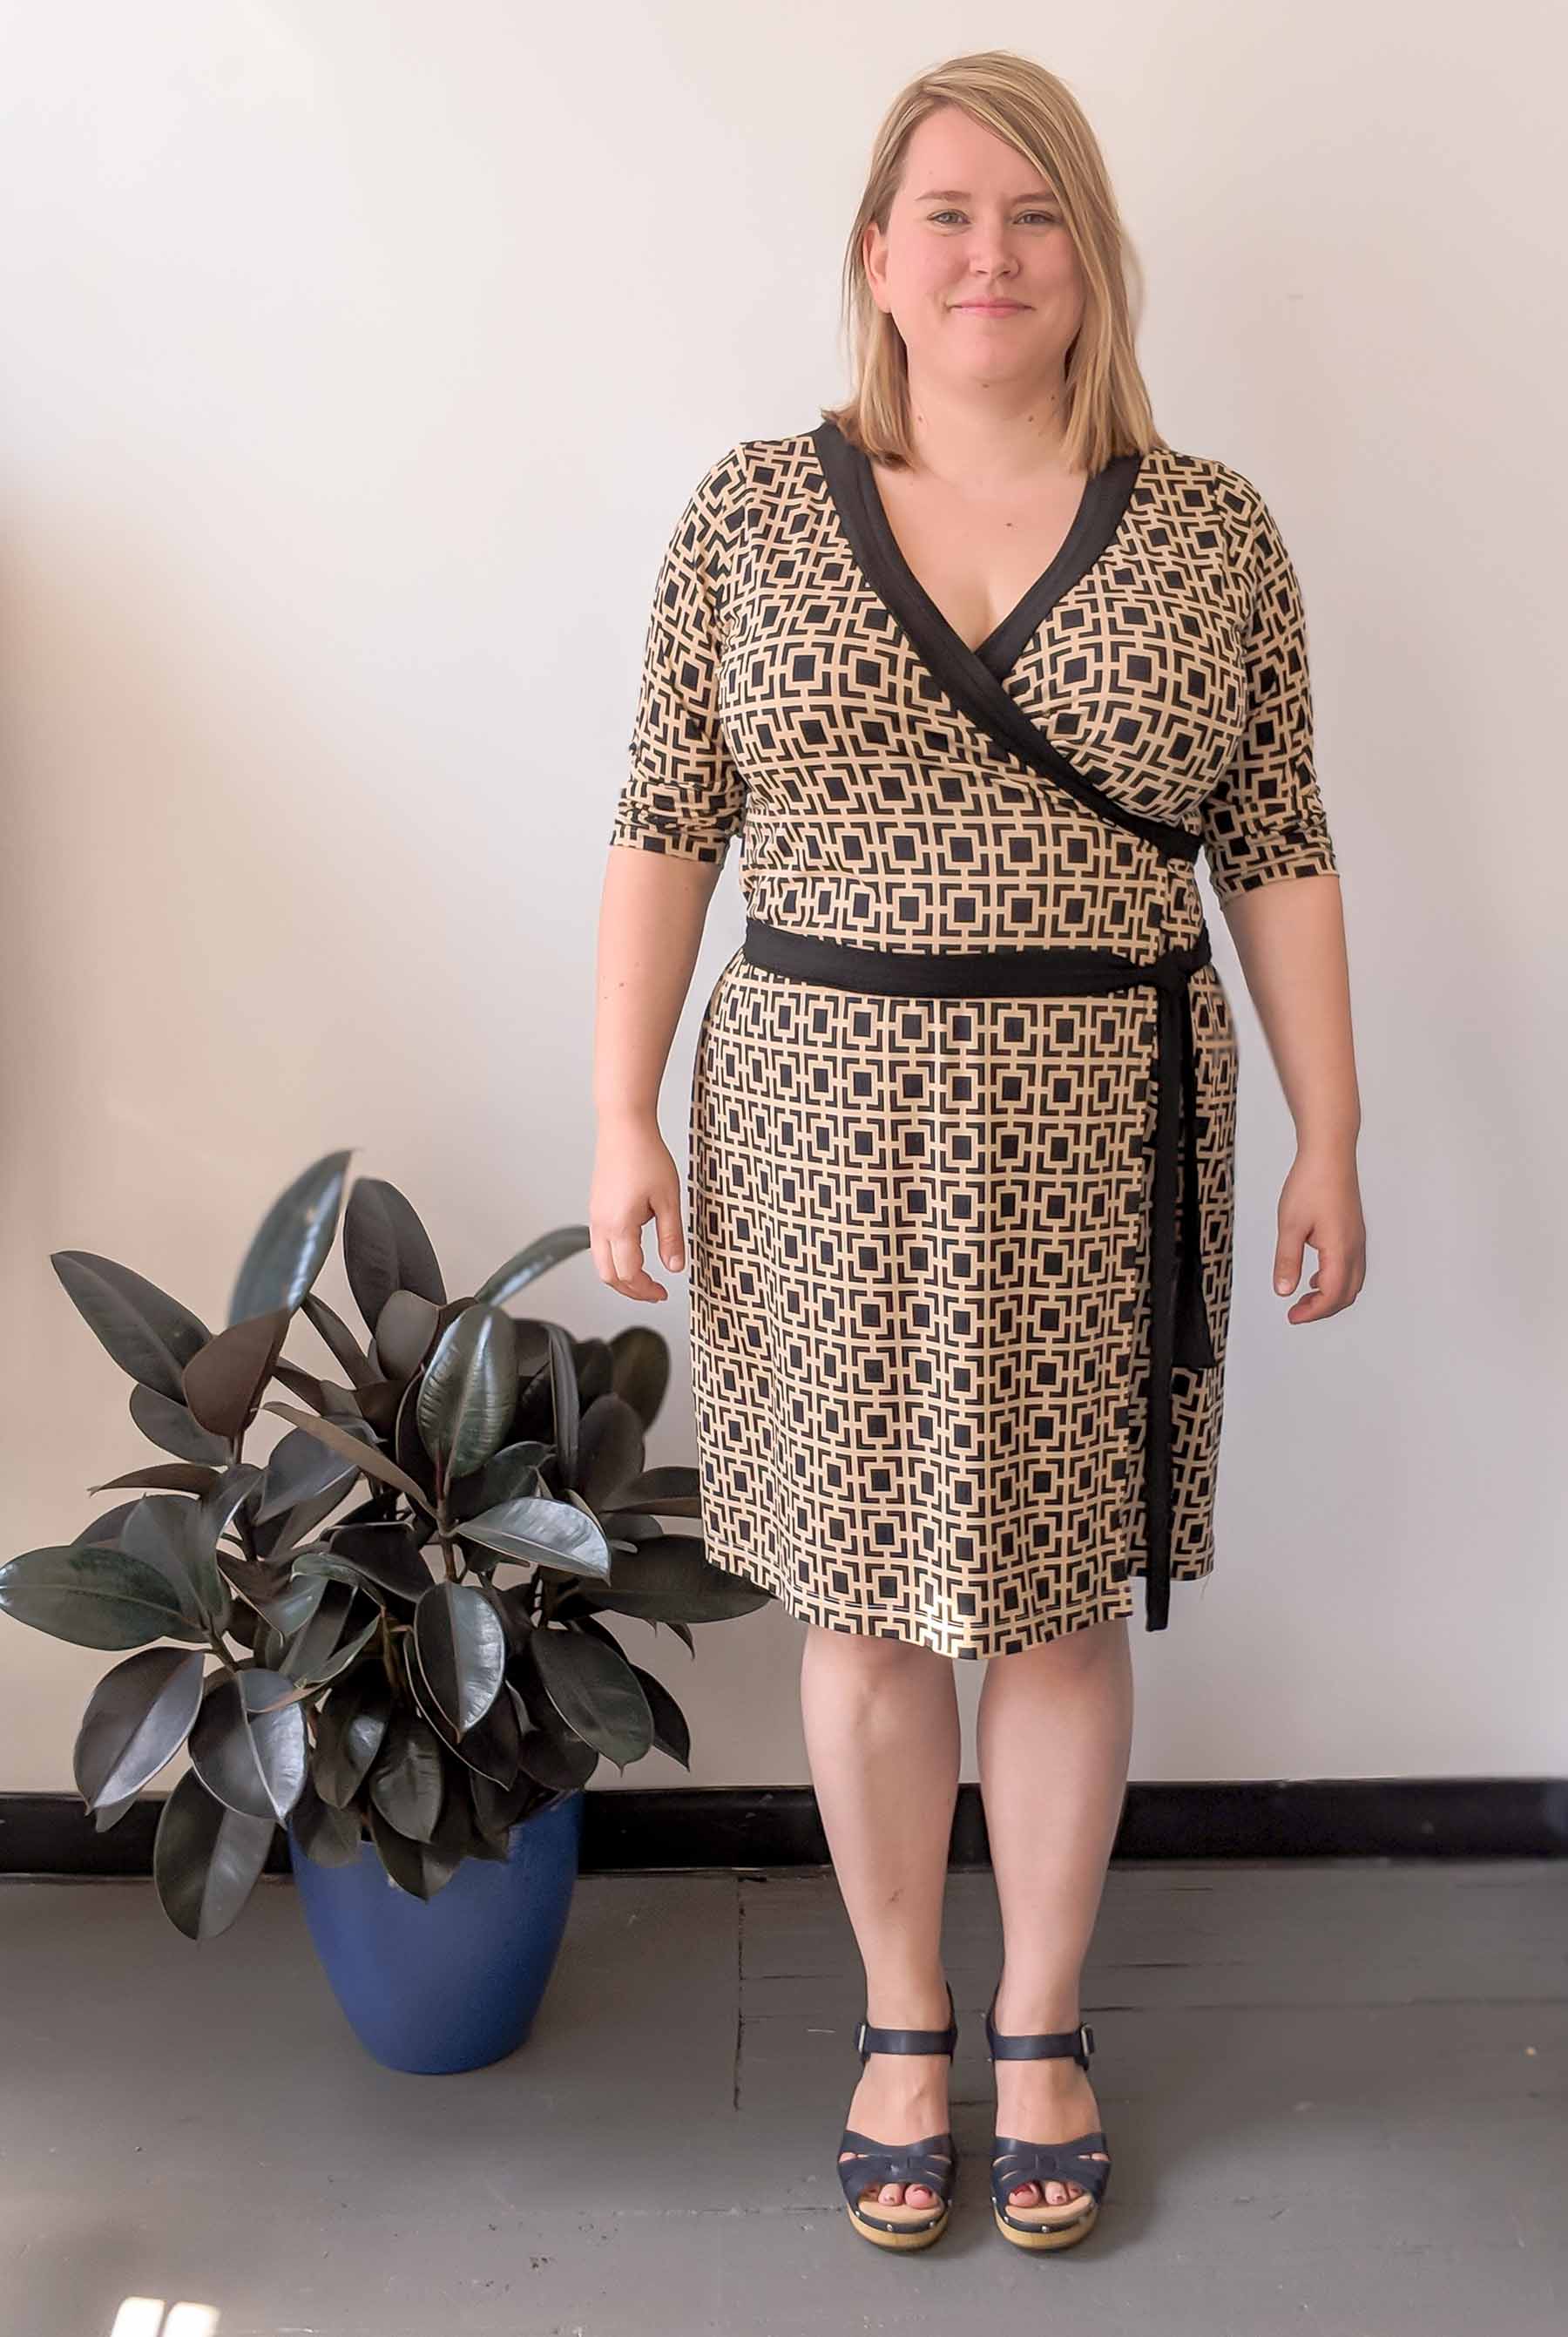
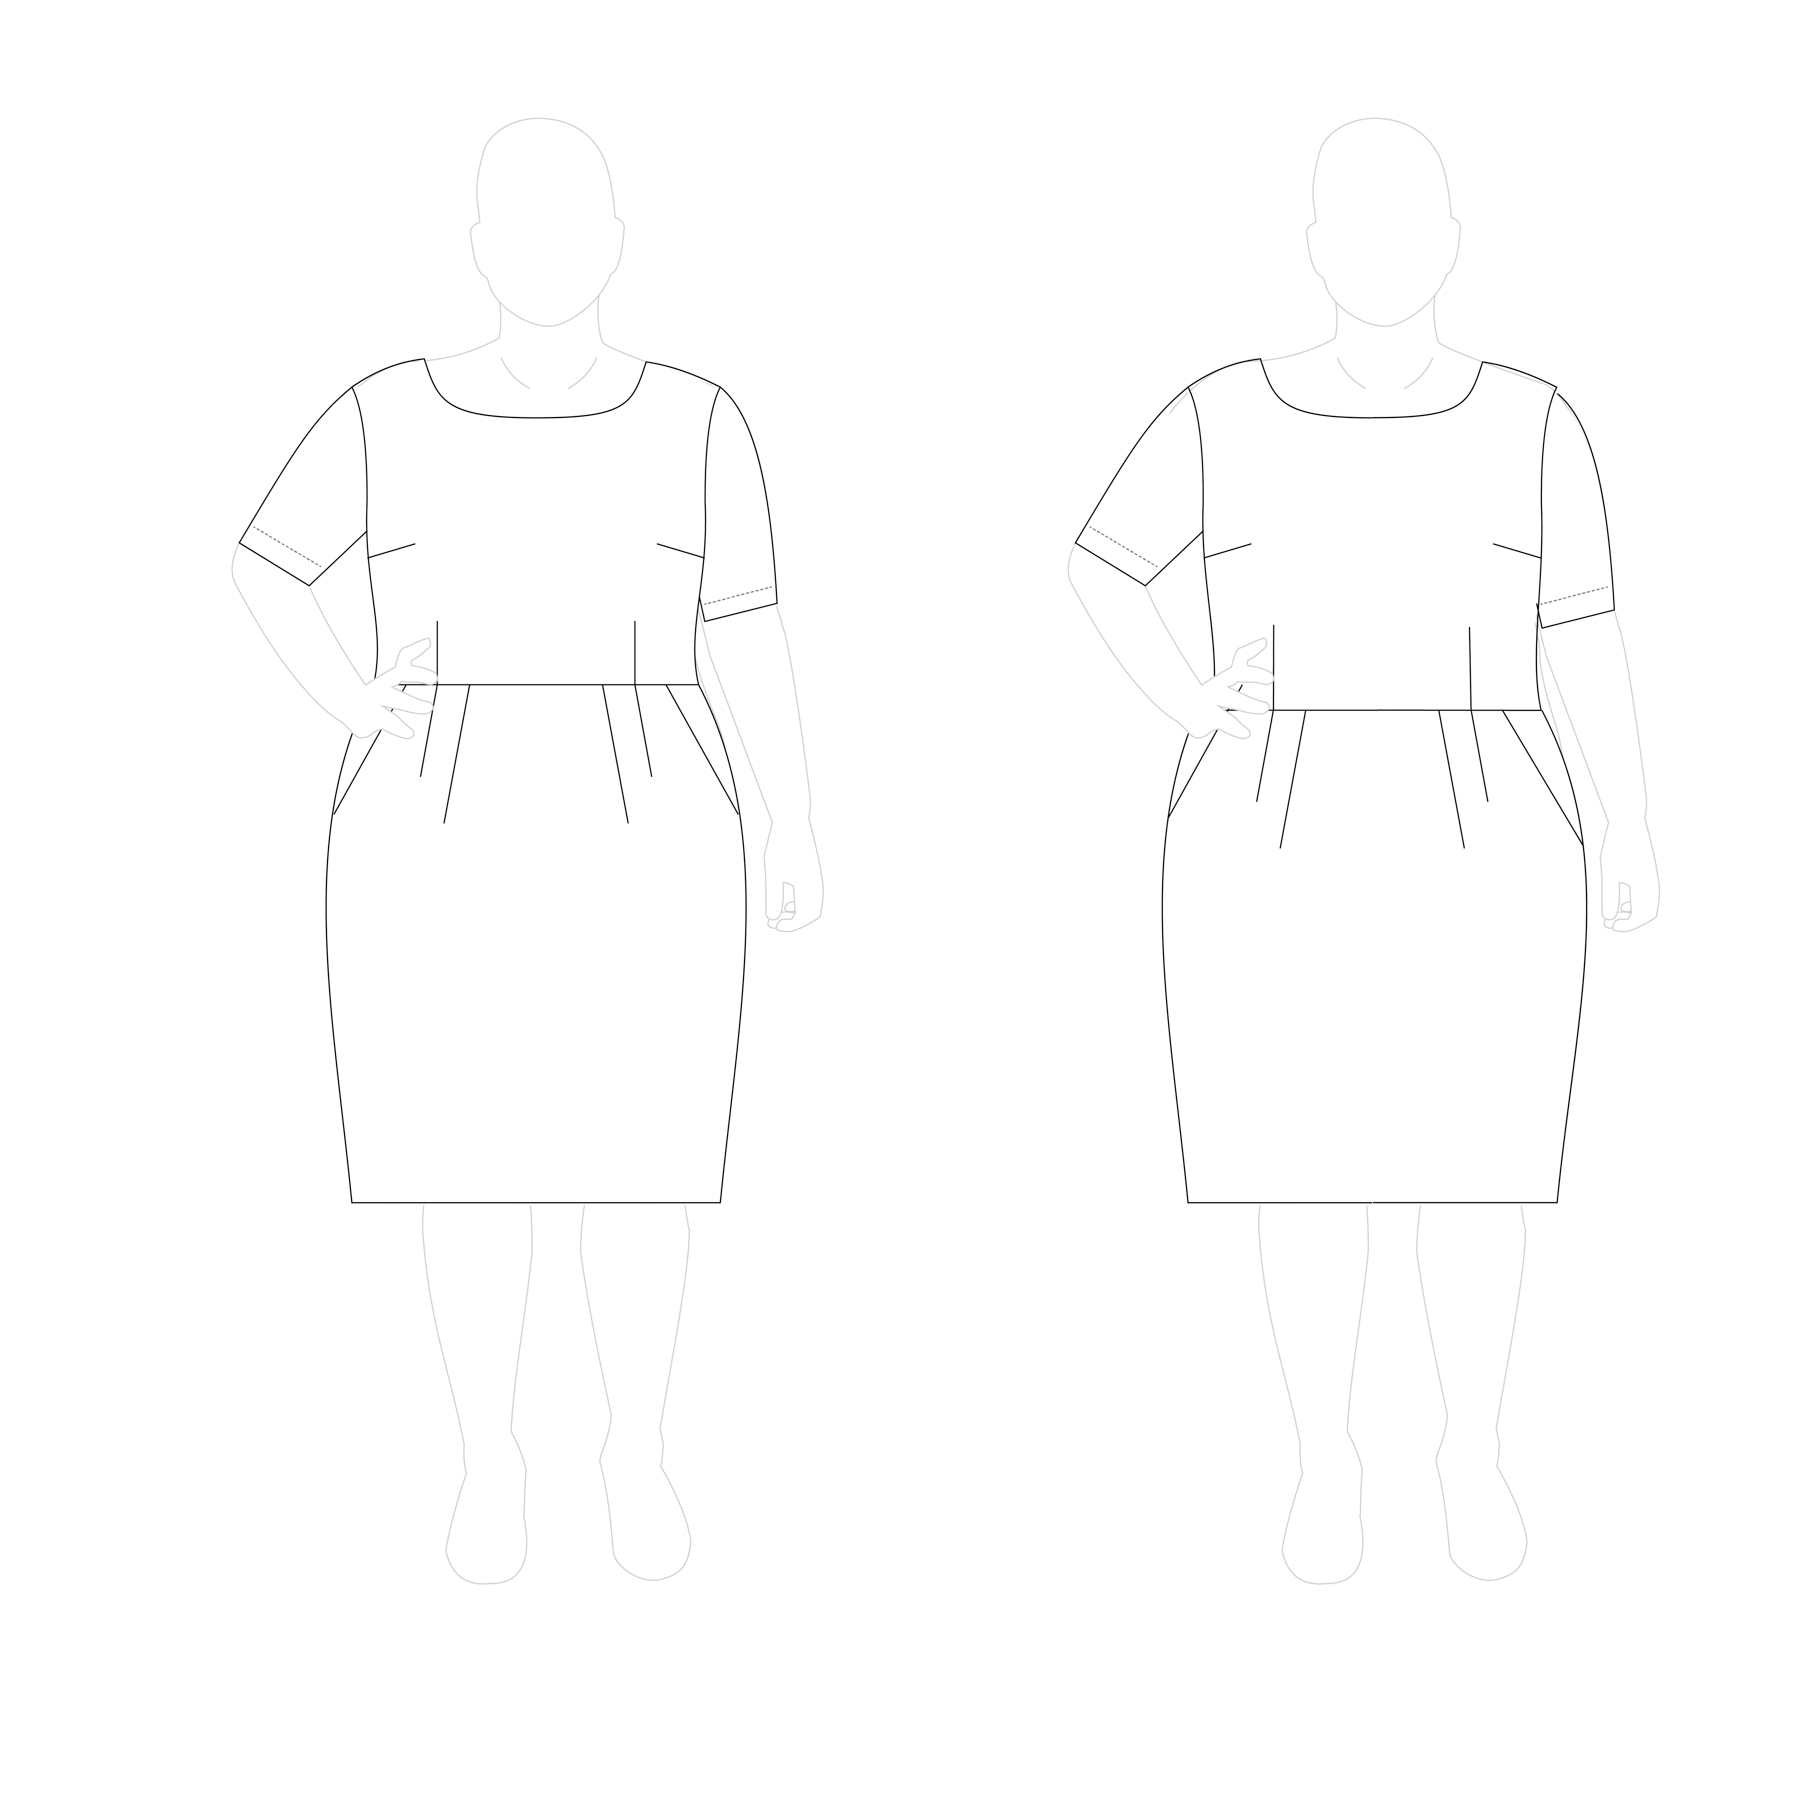
- Here’s a comparison of what a dress with a waistline would look like at the higher and lower points. As you can see, the higher waistline allows the garment to go in at the waist, whereas the lower waistline changes the silhouette so there’s no defined waist (and personally I also think these proportions look a bit old-fashioned, but that is more down to personal taste).

Here’s the comparison on the Appleton Dress on me:
Finally, another benefit of a high waist is that it often helps skirts fall straight down and skim your tummy, unlike a lower waist where you tend to protrude out much more quickly.
3. If you’re making a non-fitted skirt, you can choose to put the waist wherever you want, and just alter the length of the skirt accordingly.
For skirts, picking your waist is really just picking where you want the skirt to start on your body. The only thing you need to bear in mind is if you’re wearing it a few inches higher than the designer intended, you might have to lengthen it then to restore the original hem length. You can observe again how much better a higher waist looks here, proportionally:
4. If you’re making a dress, fitted garment, or something with a waistline seam, you may need to alter the height of the waist on the garment after you decide where you want your waist location to be.
Unlike with skirts, dresses or other garments with a waistline seam will have to be altered, depending on the location of your waist.
First of all, bear in mind this can be true of anyone, regardless! Just because the designer thinks your waist is X inches from your shoulder, doesn’t mean many people actually have that proportion.
Second, it’s usually a pretty easy alteration, especially if the designer has lengthen/shorten lines (which we do on all Cashmerette Patterns!). If you need to raise a waistline, you’re going to cut at that line, overlap the pieces until you’ve eliminated the length you want, then tape them back together, and true the sides (make them smooth again). To length, do the same, but spread the pieces apart and fill in with tissue. Again, bear in mind that moving the waistline will change the bottom portion of the garment too, so you may need to shorten or lengthen the bottom accordingly.
Here’s what moving the waist down on the Rivermont Dress looks like – you’d have to lengthen the bodice and shorten the skirt:
I hope this was a helpful post on how to find your waist! Are there any other measuring or fitting topics you’d like me to cover here on the blog?
Thanks so much for this post. This is something I have struggled with because my waist also sits fairly high.,and not very far below my bust. I’m always uncertain whether to highlight my actual waist because I fear it will make my already large bust appear even larger.
When I was buying mostly RTW, I also thought that high waists were bad for me with my large bust. But in my experience with sewing, that doesn’t actually turn out to be the case – if you look at the photos of me, I don’t think my bust looks any bigger with a higher waist. Maybe the secret is having it at exactly the right place?
I agree. The photos of you prove the point and are really helpful! Thank you!
This is essentially how it works on my body. I am shaped similarly with a short torso and full bust. (I have been raising the waist point on sewing patterns since my teens (regardless of size).)
As for the overall silhouette created by a higher waist, I have found over many years, that the neckline plays an equally important role in the appeal of this combination: a lower scoop, “V”, or other open shape, will provide balance, along with skirt length, to make a proportional silhouette. It is trickier with a top vs. a dress.
One comment on point #3, if your waist is defined at all, a skirt will not stay in place if it’s been made to sit below your narrowest point (as Jenny, and I, define it here).
Lastly, on the common misnomer that the waist is at the belly button, I have a theory that the notion came about in the mid-to-late 90’s when low-rise jeans took over as the dominant rise. As a result, people started thinking that because their belly button was above the top of their jeans, that “must” be their waist. What do you think?
Addie, I’m a lot older than I look. So I can speak to your theory. The waist = belly button was around as far back as the 1960’s! Nothing new under the sun. Also, low-rise jeans were the hippie style back then. Made a come back in the 90’s.
I too am from the ‘old school’ learning in the late 60’s where belly button = waist. While this works somewhat for pants and skirts, my dresses, more often than not would end up RUH ROH!
THANK YOU for opening my eyes to this information!!!!!
I have the same problem! This actually helped measure the loss in my waist
Really helpful post Jenny, thanks! I’d love some advice on how to find/measure/adjust for your hips when they’re smaller than your large, round tummy! 🤔
That’s me too!
Any fitting help for a protruding belly would be amazing and so very appreciated!!!
Hi Jennifer, this tutorial on a full tummy adjustment might be useful: https://www.sewalongs.com/sorbetto/full-abdomen-adjustment
-Ayelet at Cashmerette
Jenny, I don’t want to come off sounding all preachy or critical, but I feel like I need to point out some things. Thank you for indulging me.
First, the term bust “apex” is commonly used instead of “nipple” precisely because nipple does not always equal apex. The terms are not interchangeable. Apex is the actual definition of where one should measure, dart to, etc. So, the phrase from above of “you should actually measure at the most protruding bit, which let’s face it, might not actually be your apex if you’re bountiful of bust” is actually wrong because “the most protruding bit” IS the apex. The phrase should read “you should actually measure at the most protruding bit (the apex), which let’s face it, might not actually be your nipple if you’re bountiful of bust.”
Next, it does indeed matter where your true waist is because waistline seams and waistbands will naturally navigate toward and settle there and too little or too much length will affect how a garment fits overall, as well as comfort factor. This is why better instructions on how to find your waist don’t tell you to bend to the side and guess. Instead, they tell you to fasten a length of narrow-width elastic firmly, but not tightly, around your middle and go about your business for an hour to let the elastic settle, which is then more likely your actual waist. You can choose a *visual* waist but better to do this *after* you’ve adjusted a pattern based on where your actual waist is so you can allow for where the fabric wants to settle and, importantly, also for back length. Remember, waists go all around the body so a too-short or too-long *front* waist placement, if run around the body parallel to the floor, will affect how the garment fits from *back* neck to actual waist and down to back hem. (Side note: So many “sway back” adjustments out in the blogosphere really should be back length adjustments that aren’t being diagnosed properly, and I haven’t even touched on tilted front waists which is common among plus size waists/bellies…)
On the croquis in your example, with the added belly button … its true waist IS the figure on the left. That’s where she is indented and where the elastic mentioned above would settle. The figure on the right is using her high hip as the waist. The belly button doesn’t indicate where a “traditional” waist is. I’m not sure where that info is coming from? But, as you’ve said indicated, it’s wrong … belly button placement isn’t universal, just as no one has universal measurements.
Hi Debbie – I knew this would be controversial so I was expecting it 🙂
– On the bust apex point – you’re right, I used some bad wording there (I intended to say what you’re saying), I’ll change it.
– On your waist point – here’s where I don’t fully agree, because in my experience that method doesn’t work for everyone – it only works for people who have some defined narrowest part of their torso (personally I do, but not everyone does). It’s definitely worth giving it a go, because it will work for a lot of people, but it’s not a foolproof approach, especially for women who effectively only go out and have no indent or “narrowest part” – for example if you’re very apple, very triangular from the bust down or very straight (I’ve met a lot of women in classes like this).
If they use the elastic method, the elastic wouldn’t be finding their narrowest point, it would either slide around or just “stick” wherever the body is bigger than the elastic which just reflects how big the elastic is rather than finding a “waist”. If you look at the croquis of the apple shape, you can see the elastic approach would be problematic because it would entirely depend on where you started with the elastic/how long the elastic was, and it would simply slip a bit up from its starting point. Again, if you look at the straight shape, the elastic could effectively sit anywhere because there isn’t a dent or a big slope.
As I explain in the post, I’m not saying that you can pick your waist and not make any pattern changes – my point is that you can choose where you’d like it to be (i.e. your narrowest point, or if you don’t have a narrowest point, where you want it to lie), and then alter the pattern appropriately.
– On the croquis, I’ve had many people telling me they’ve learned the belly button is their waist, and using that to measure, so that’s why I was using that as an example.
Thanks for the conversation. 🙂
I’m not saying the elastic method finds your narrowest point or is foolproof. What I’m saying is it usually finds where your clothing will settle, which is often the natural waist. Yes, for some that’s not always their actual natural waist, but it’s still where clothing is going to settle when worn on that body. Finding that point can be an important consideration in making clothing that not only fits/flatters (that word!), but is comfortable to wear. For example, with skirts and pants that will ride up or down (or both!), you usually can’t just look in the mirror and decide that Point A is where you want your waist to be without some knowledge of how Point A is going to behave (vs. look) in particular clothing/style lines.
Making those decisions, and pattern alterations to achieve them, is what sewists have been doing for years. We’ve all got a bit of that rebel streak in us!
Green eyes.
Thank you for taking the time to share this. I will definately save this and apply these techniques.
Wow! That is amazing info. It’s going to take me a few readings to digest all this. Thanks for sharing Debbie. Would love to hear what you have to share about tilted front waists.
Thank you Jenny for this post. I found the photos of you, comparing wearing the garment a different points the most helpful. My waist is very high as well – as it happens just where yours is! No wonder I always find Cashmerette patterns such a great fit right out of the package 🙂
I’ve found it’s an extremely common placement! And I suspect that’s why so many of our patterns fit women “out of the packet” 🙂
Amen!!!!
This is the most sensible explaination of waists, busts and fitting for a specific body I’ve read. I’m fairly new to sewing garments and appreciate the great pictures and the croquis ,those are the drawn figures I’m guessing. They made your topic immediately understandable. Thank you, it was a lightbulb moment for me.
Very informative. “sit down for the waist and hip measurements” –never heard this before–makes sense. With a large belly, I’ve always preferred (and look better in) high waist/empire type styles. Depending on body type/shape, raising the waistline on the pattern makes it more flattering for your figure.
Makes complete sense to me, thanks Jenny. I’ve always had a problem with RTW clothes, because the ‘waist’ is in the wrong place. In RTW terms, waist seems to mean 2″ below the belly button, but mine is 2″ above my BB!
Great post! Such good explanations and examples, and also a good translation of ‘standard’ body measurement practices for a range of bodies. I especially liked the sit down to measure idea, because I’ve thought about doing that before, but I wasn’t sure if it would work out well in the final garment.
One small other thought… You have done an amazing job of being body positive so consistently in all the writing I’ve read of yours, but I’m worried that one of the lower waist photos and descriptions in this article (the one where you’re wearing the webster dress) could be experienced as a little bit body shaming, if that was a look someone really liked on themselves or if that was their normal body shape.
The photo with the lower waist isn’t about body shape (evidently, my body shape is the same in both the photos!) – it’s about proportions. If you prefer these proportions, then go for it!
“evidently, my body shape is the same in both the photos!”
See … that’s how important proportions are … even your own body is mistaken for two. Hehehe
Thank you for this post. It is really an eye opener.
I have several Cashmerette dresspatterns, Turner, Appleton and so on. They have a higher waistline. That is also what I want to higlight on my body, narrowest point being under my bustline. But how silly I have been measuring my waist on traditional spot, at bellybutton and I have chosen the waistline size according to it. And I have ended up with too big waistline. And now I understand why :-D. So that stuck I have been in traditional measuring….
You did such a great job with this topic that I’d love to see you tackle the front-to-back drop for waists. My natural waistline in the front is several inches lower than it is in the back. Yes, I ‘could’ hem my skirts level, but the drape of the garment would be all wrong. I know how I adjust this for my sewing, but I’d love to see how you would tackle it.
I would love to see this topic addressed also.
OMG, yes, please! I have always struggled with this (and is the the #1 reason I don’t wear skirts). I’m currently working on my first pair of pants and I’ve had to take out over two inches in the front rise and could still sneak out a bit more if I was so inclined. It’s been enlightening.
Oh please, I would really appreciate this also! Several instructors I have seen really believe that you should keep the line “level” around the body even if your waist isn’t made like that. That doesn’t work for me because my “bend” in front is lower than in back & my waistbands, etc. will settle in that lower spot no matter how high I make them.
I would also love to see how you would tackle the front to back drop, but for the opposite reason – my natural waist in front (as found with the elastic method, and all skirts) is higher than in back, raising the front hem significantly.
Thank you for this post, Jenny. The illustrations and photos REALLY helped me wrap my head around the difference waistline placement can make. (Your facial expression in the “RUH ROH” photo was hilarious!) The more I work with your patterns, the more I appreciate the thought process that goes into your designs.
Extremely helpful! So glad you included the photos for comparison. Now I know why I look so “dumpy” in dresses! I gave up on making (or buying) them long ago. This post has got me thinking about giving dresses another try!
Hi Judy, your comments echoed exactly how I thought! I was lucky enough to attend Jenny’s workshop and I made the Upton dress. OMG, its amazing the difference raising the waist makes. Please do give it a go, you’ll be amazed.
Most of us never really knew where our waistlines were. That point seemed to change depending on who was in charge of clothing purchases. My mother was a big fan of the dumpy look. When I put on a belt at the point where it was comfortable, Mother would yank it down to the waist/BB thus always creating the dumpy look. I stopped wearing belts. The invention of elastic waist bands was a gift to all of us under strict dress codes. The elastic gave us the freedom to move up and down multiple times during the day to flirt or to ward off the evil, ruler-bearing teacher or parent! And I mean MULTIPLE times! Oh, the good old days.
I have always felt dumpy in dresses too Judy! The photos told me so much and I too will try a dress again—-with a higher waist
Good explanation, and I was not confused about the whole nipple/apex issue. I get it.
I have a pretty straight middle from the front, and in side view, my tummy sticks out (meno-pot) I can’t STAND any waist as high as it would be if I went with right at the narrowest spot as that would be right over my diaphragm.And frankly I don’t personally like the look of a high waist on anyone, no matter their shape or size. For me pants go at or below the navel. Skirts barely higher and I avoid waist seams, preferring to pretend I have hips, by adding a peplum, or a flared skirt.
On others I prefer to see the waist seam between the high waist and the belly button, to avoid an “empire waist” (meant to accommodate constant pregnancy, or willingness to procreate!).
But that’s what I like. You all don’t have to. And I’m glad I have MY unique shape!
<3
Thank you!! I’m a rectangle! I now see that I can actually lift my “waist” higher to make it more flattering!! This is fantastic! I’m a visual learner so this post helped me a lot!
Thanks so much for this post! It now makes sense why the waist is sooooo high on me. I thought it was just because I’m 6′ tall and I have to adjust lengths quite often, but not necessarily where the waist hits. I appreciate all that you do for us!
Jenny, this is awesome, especially the tip to measure hips and waistline while seated to accommodate “spread.” Your drawings and photos showing higher and lower waistlines on the same body type was also very enlightening. Thank you so much !!
Thank you for the great article on finding the waist. I work with a group of people on fitting, none of us are experts, so I have seen a few different waist heights. I, myself, have a very defined waist (10″ smaller than bust or hips) so finding my waist is no problem. But I have a friend whose natural waist is slanted – yes that can happen, high in back and lower in front. She generally goes with the back because it is more comfortable to her. We have very low waisted and high waisted people in the group. My waist level is, unfortunately, just above where my high hip (or buttocks) flares out in the back, so it is sometimes difficult to get a good fit. However, I have figured out that, if there is a waistline, ie: skirt or pants, using an elastic waist works wonders to disguise that. And, being 71 years old, I am all about comfort, so elastic works for me.
Thanks again for the excellent post.
I’m 61 and my waist is exactly like your friends!
Waist not, want not. For most of us at a certain age, the tummy sticks out beyond the belly button. So this is a challenging topic. I like the waist on pants to sit at or below the belly button. If I use the same waist spot for a dress, then I look like Steve Urkel in a dress. Not a pretty look. If I use the dress waist for pants, again, the Steve Urkel look. Nice to finally have permission to move the waist!
You are so dang cute! This article with the illustrations is helpful.
Three points to add to this great discussion:
1. Bust apex: Yes, it’s very important to establish the location of your bust apex, but for some of us…where EXACTLY is that high spot? With modern (non-bullet) bras, that rounded mound can make it hard to determine. Here’s a tip – face a wall or other flat vertical surface and press forward until your breast touches the wall (try to keep your body as upright, i.e., vertical, as possible). The place your breast first touches the wall is your apex. Note that you might, like me, have to press hard to smoosh your belly flat, and also note that you might want to do this in private. Whenever I demonstrate this in my fitting classes, it gets a huge laugh!
2. Natural waist vs “design” waistline: I agree with Debbie about the importance of finding your natural waist, i.e., where pants or skirt fabric would naturally settle on your body. My agreement is partially because that factor of “settling” is important for pants and skirts, but mostly I establish the natural waist because it is one of the few landmarks on the body that can be solidly nailed down and, at the side seam and center back, won’t change with weight gain/loss. In my experience, establishing your unchanging body landmarks is golden when it comes to measurements and making a pattern block.
That being said, I very much ALSO agree with Jenny that knowing where your natural waist is should be regarded as informative ONLY. Where the garment design’s waist is located is totally up to us, the sewists. Yay for having the freedom and ability to do this!
3. Tilted waist: My natural waist is level from center back to side seam, but then tilts downward 3.5 inches. When making tops or dresses, however, I keep the garment waistline level by carrying the side seam waist horizontally to center front (the garment waist appears level to the eye – and obviously no tucked in tops!). To my eye, this looks more balanced and it also preserves the design lines of the pattern.
On the other hand, when making pants or skirts, I set the garment waistline to follow my natural waist so the fabric will hang straight off my body, on grain. That is, the garment’s front waistline is carved downward from side seam to center front. Yes, the pattern looks weird, but it works and fits. This works regardless of the waist tilt angle. One of my clients has an upward tilted waistline, so her skirt and pant pattern blocks have a waistline that curves upward from side seam to center front.
Great article!
Love this so much. I’ve been trying measure my waist at my belly button for patterns with unflattering results. This opens up a whole new world. Why did I not consider Thai before? Great post.
~ Thank you so much for the photo and picture examples ~ Lately (with almost everything that I’ve tried to sew) I’ve had difficulty with actually getting my waist measurement right. What keeps happening is when I’ve been sizing up or down patterns nothing seems to work out until I make actually adjustments with the project garment worn on my body. I go back and forth to the mirror for what feels like 45 times trying to get the waist to feel most comfortable. Usually I accidentally gave myself too much fabric, just about everywhere, and I end up making temporary darts to get the shape just right. It’s been challenging trying to figure out my waist proportions after my size changed. It’s just all wonky everywhere. Cute, but wonky. 😛
The other trouble has been with elastic waistbands inside of the dress or skirt. How much extra fabric would you need in order to account for the elastic? So that it stretches enough to get over your hips, but stays secure around the waist? I’ve tried, successfully, but with uncomfortable results. Thank you so much for your wonderful and inspiring work ~ 🙂
Can the information on the waist placement be included in your dress pattern instructions? I just made a Turner, which I love. But the whole process would have been a lot easier if the pattern had indicated where you feel the waist should lie to make the dress fit correctly. I am only 5 feet tall. A raised waist cam look like a maternity smock on me. I need to carefully decide where to place the waistband on my bdy.
Jenny,
This was a very useful article. I’ve been fighting with this issue for years and your explanations and pictures are so helpful! Trouble is, my bust is now at my waist level! Thanks.
Very informative. Seeing the drawings makes me realize why clothing looks better with a higher waist line, it divides the dress into thirds almost which in the art and decorating world you should always have odd numbers. I had never thought about it in sewing as I had always been taught to use the natural waist. Very excellent drawings to really see how much better the clothes work. I can now understand why some clothes look better on me. I am a slow learner as I have been sewing my own clothes for over 50 years.
thank you for the great info. a picture is worth a thousand words and yours really prove your point!
I love this article. Now I need one for the hips. I have a tummy that hangs. Do I include that in the hip measurement?
That was so helpful, and very insightful!
I first read this article a few days ago because I was trying to find out how difficult it would be to lower the waist on a bridesmaids dress. They were all custom made for our measurements, but the waist seemed so high (despite the fact that I always get compliments on it)! I came back to say that this article totally flipped my thinking, and I’m going to leave the waist where it is. I’m pear-shaped, and the waist is at my narrowest part. Also, this helped me understand why the same dress looked so dumpy on my fellow tall, curvy bridesmaid; I think she used her navel as her waist measurement.
Thanks for the insight!
Thank you so much for the detailed explanation with the critical visual references and the helpful photos. I really appreciate your (so so so often lacking pretty much everywhere else in everything else anymore, it seems) thoroughness and respect for the readers and subjects 🙂 That’s my take on it at least.
It’s articles like this one that make me LOVE Cashmerette and Jenny SOOOOOO much!
thank you for including pears ;___; Most of the time when I see articles for plus-size women, it’s all about pears and hourglass who naturally have a very flattering silhouette so as an apple I just end up feeling like nothing can make me look nice. Btw, you are SO cute!
god dammit, I’m at idiot. It’s 3 am and I just can’t think anymore. I meant to say, thank you for including apples, not pears. thank you for including apples because everything I see is always about pears and hourglass figures.
Thank you for your insights. I’ve become aware of the need to find my true waist through an interest in creating my own custom corsets. It’s imperative to find that “where you bend” location for the garments waist tape. Putting it elsewhere will result in wrong fit. We makers have found due to belly rolls the best way to locate that spot is to bend not forward but to the right and the left. Curvature of the spine can mean the right side is different that the left. You might be surprised how many women have never been assessed for spinal curvature because it usually isn’t addressed until it’s severe enough to cause health concerns. Patterns with a tailored fit need to be adjusted for the wearers curvature if their asymmetry is pronounced enough.
I’m a new member, so read this for the first time. Thanks for the great information. It really helped to see the visuals – both pix and sketches. I can see where a number of fitting issues in the past were because of this issue and starting from this perspective would have made adjustments so much easier. Thanks again.
So very helpful! Thank you for the clear example and the great croquet examples. I’m a short, curvy woman just getting back to sewing for myself and have been avoiding dress styles with waists because of my shape—my waist is only a couple inches below my bra. Now I know what my next dress project will be! Thanks so much!
Thanks for sharing this.
I’ve had this problem for so many years no matter my weight. And to be honest I just figured I had to put up with the weird advice I got from others since there seemed to be very little clothes that looked nice on me. In fact I ended up in a shitstorm created by a person I knew for having an apple shaped body and low height and trying to find clothes. Even strangers suddenly made fun of me for trying to find clothes that actually looked nice on my particular type of body.
Of course now I know for a fact that so many women have this issue so it’s even more odd why I would be singled out like that.
Anyway. Thank you. This helps tremendously.
I’m so glad to hear it helps! People can say really inappropriate things sometimes, through ignorance (or worse!) but we definitely understand curvy and plus size bodies here, so let us know if you ever need any more help 🙂