I’m back today with another simple hack idea to transform the 5 patterns from my book “Ahead of the Curve: Learn to Fit and Sew Amazing Clothes for Curves”!
Today we’re going to cover lengthening (or shortening) your pattern. There are two types of lengthening/shortening: the first type is for fit purposes, and that’s covered in “Ahead of the Curve”. In that case, you’re adjusting the length of the sewing pattern to fit your body, whether that’s making sure the waist is at the right point, or trouser legs are hitting you where you want them to. But the second type is what we’re covering today, which is adjusting for style!
Whether it’s the length of your skirt, trousers or sleeves, it’s easy to alter the length for a different look, whether that’s turning pants into shorts, a knee-length dress into a maxi dress, or even a dress into a peplum top.
There are several ways to go about it. The first one, if you’re just making a small change, is to cut across the ‘lengthen/shorten’ line on the pattern piece, and then spread or overlap the pieces until you achieve your desired length (the same technique covered in “Ahead of the Curve”, just being used for a different purpose). The second, if you’re making a bigger change, but not HUGE (so this excludes making maxi dresses), is to draw on the new shape at the hem. The final approach, which is essential if you’re making something a maxi length but still want it to fit, is to both lengthen and widen using the “slash and spread” method, which will give you swoosh rather than a tight-fitting column (WANT a tight-fitting column? Use methods 1 or 2 instead).
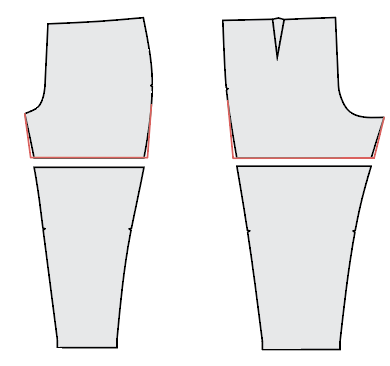
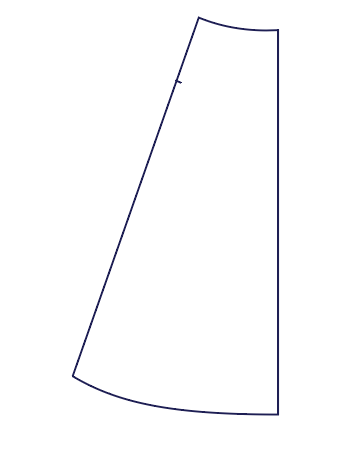
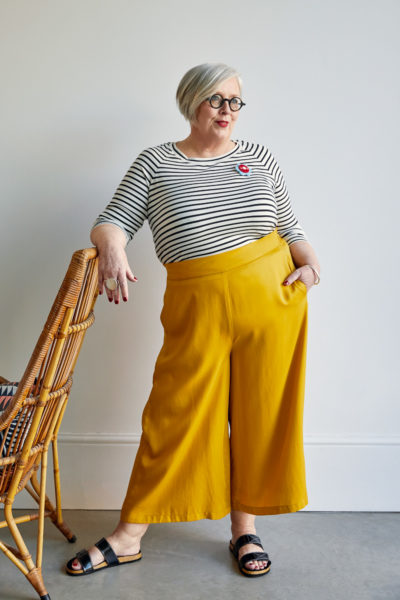
Approach 1: Creating Magna Pants shorts
Love the Magna Pants but craving some elastic-back shorts? It’s easy! For this method, simply draw across the pattern piece at the length you want. Then, in the case of the Magna Pants, I have extended the hem a little at both sides, to give you a more “classic” shorts silhouette (without doing this, they would be very slim-fitting shorts).
Approach 2: Extending the hem to make a Stanway T-Shirt Dress
The Stanway T-Shirt is an amazingly fitting raglan t-shirt for curves (if you’ve got big boobs you’ll know that’s no mean feat!), and if you love the bust fit, you can get even more use out of the pattern by transforming it into a dress! This approach will result in a semi-fitted t-shirt dress.
In this instance, first extend the center front line on the front piece down to the length you want. Measure yourself at the hip when you’re sitting down to help decide how much width you’ll need to add at the hip level to be comfortable (typically a dress will be bigger than a t-shirt at the hip). If you make the dress exactly the same size as your hip sitting down it will be a fitted dress; if it’s a little smaller it will stretch as you sit; if it’s a bit bigger, it will be on the looser side.
Divide the amount you need to add by 4 (e.g. if you need to add 4 inches, then 4/4 = 1 inch) and mark that distance out at the hip. Now, draw a line down the side seam that gently curves from the waist to your new hip mark, and then extends down the same length as the center front (measure from the waist point). This new line will end slightly higher than the center front due to the side seam curve, so simply join up the lines at the hem in a gentle curve (this will not be visible when worn).
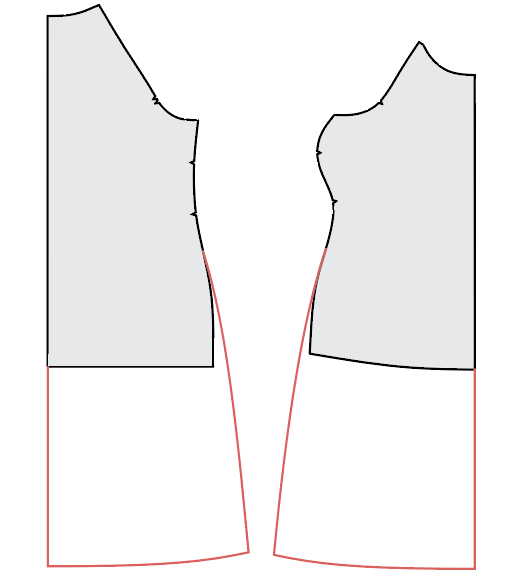
Finally, make the same changes to the back piece, following the same curve on the side seam as the front piece (I often trace on the front side seam to get it precisely accurate!).
Approach 3: “Slash and Spread”
Drawing a line extending down will give you a nice semi-fitted dress for the Stanway, but what if you want more swoosh? This is particularly important if you want to lengthen a skirt to maxi length – if you simply extend the skirt seams down, you’ll end up with a column you can’t walk in! So, for maxi/long skirts, or anything where you want more swoosh, you’ll need to use the “slash and spread” method to get a fuller shape at the bottom of your skirt.
This is also a great fitting adjustment, which didn’t make it into “Ahead of the Curve” but was in the 40% of the text I wrote that got cut out (I need to be less loquacious, ha!). This technique adds fullness in width in a specific area, as well as some additional length that you need to go over a curve – for instance, you can use it to add more room to the back of a t-shirt for your bum, or you could do it below the bust on a dress to add more room for a tummy, or even as a maternity adjustment. Notably, it changes the “look” of the garment in a way that traditional full bum or full tummy adjustment doesn’t, and you’ll end up with a wider hem and flowier garment. However, it’s an easy adjustment and many people like the swooshier end result!
Here I’ll demonstrate on the Foxhill Dress, using the central panel – you’d then repeat this on the side panel piece.
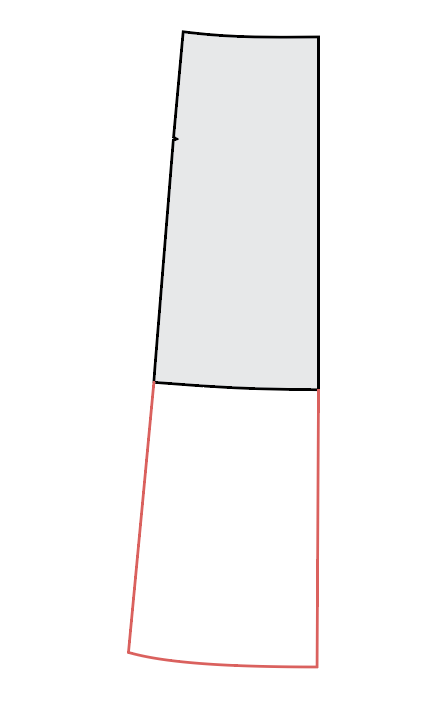
- Extend the center front down to the length you’d like your maxi skirt to be. Then extend the side seam down the same amount, following the angle of the existing piece. Join the two lines up at the bottom in a gentle curve.
2. Draw three lines down the piece, parallel to the center front, and evenly spaced across the width of the top of the piece. The exact number of lines isn’t important, and will depend a bit on the size of the pattern piece, but you generally want around 2 – 4 inches between each line. Mark the seam allowance along the top of the piece.
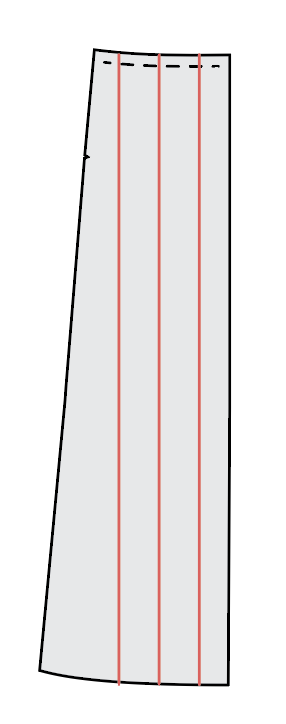
3. Starting at the hem, cut up each line, ending at the marked seam allowance. Then snip into the seam allowance from the other side, keeping a small hinge. Now, spread the pieces apart until you have the fullness you’re after – it’s up to you! Make sure the gaps between the pieces at the hem are even. As you do this, the paper will overlap a little in the seam allowance – that’s fine, as the seam allowance itself (the line) isn’t changing length.

4. Trace the pattern piece, creating a smooth curve at the hem
5. Repeat with any other skirt pieces
And that’s it! A simple, but very effective, technique to multiplying the power of the patterns in your wardrobe!
Thank you this is so awesome and helpful. Definitely going to hive it a try. Loving your book!
I am loving these hacks!! (and would love to see that other 40%!!)
I love your book! It’s beautiful, inspiring, very detailed and well thought out. Amazing work!!! My only regret is that the patterns start just above my size. Not sure how to tweak down a size, especially on bodice…my struggle to fit my clothes to my body continues alas! Any plans to provide more sizes in future?
Okay, this was super scary
.I pulled out the book, tracing paper, fabric before I went to bed last night to start the Magna pants and the Stanway top.
These are the two standard “hacks” I always consider for my first go after initial adjustment figuring I can wear them around the house. I usually start any new pants pattern by making shorts but had pretty much decided to make a “wearable muslin” pants
I have been leaning to making my “wearable muslin” Stanway as a knee length dress to wear around the house.over leggings.
I recently purchase Ahead of the Curves, what a fabulous sewing bible for beginners and the patterns are amazing for the big bust girls, fit to perfection. Many thanks.