Once upon a time, a wise woman said “sure I can make clothes, but there’s no way I can make a bra. I’m a 38 H for pete’s sake!”.
Any guesses? Yes, that wise woman was me. I’m not sure why after 6 years of sewing and quitting my day job to focus on it full time I still have categories in my head of “thing I can sew” – that now includes jeans and swimsuits – and “things I can’t”. It makes no sense! And yet, until recently, the prospect of sewing a bra seemed ludicrous. Part of it was undoubtedly my not insignificant bra needs. Unlike clothing, which mostly just has to encapsulate you and hang on the right bits, bras actually have engineering work to do. And in the case of my Mighty Bosom, pretty advanced level engineering at that. Probably PhD structural engineering at MIT, let’s be honest.
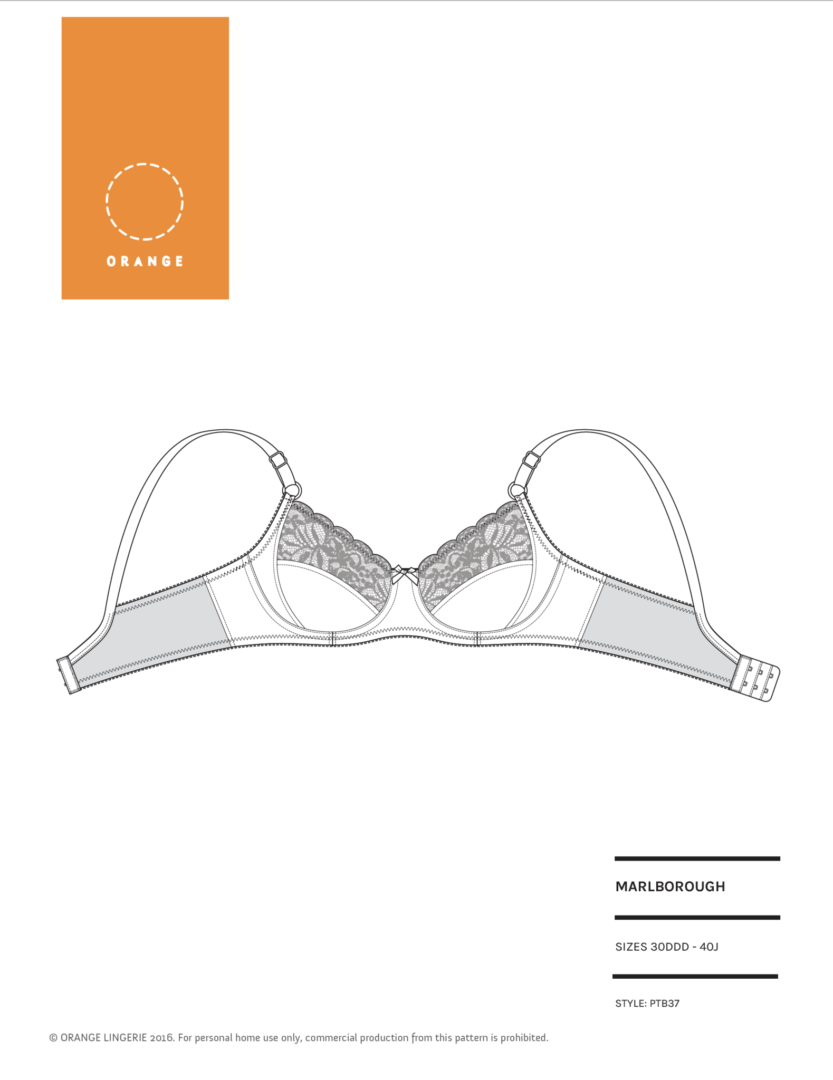
And yet, bras are just sewn garments, with an added metal bit in them. So, when Norma at Orange Lingerie let me know, over one of our regular tasty dinners out in Boston, that she’d be expanding her size range to go up to a J, I knew that my excuses had run out. And when Norma then asked if I’d be the fit model for the 38H, I was officially on board!
First up, Norma developed the Marlborough bra extended sizes, and I spent some amusing evenings standing in restaurant bathrooms in the greater Boston area trying on samples. So, I decided to tackle it first, too.
There are two big things to learn when you start sewing bras: construction and fit. I decided to focus on construction first, especially as being the fit model would probably minimize the fit issues (HA! more on that later).
Anyhow, when you’re trying to sew something brand new, I think the “first pancake” philosophy is a good one to go with: the first bra/pancake is going to be tossed in the bin, and that’s OK. It’s best to just give it a go and see how far you’ll make it – and learn lots for next time.
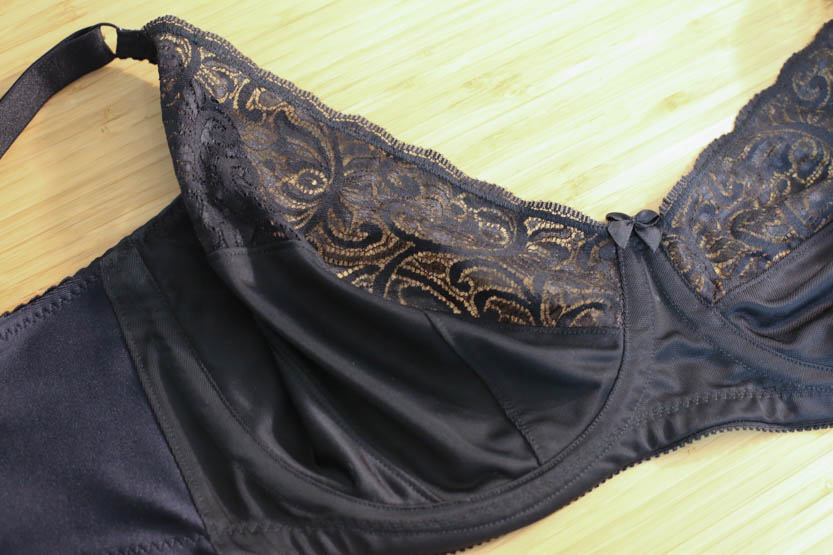
So, here’s my first pancake bra. Not too bad, eh!
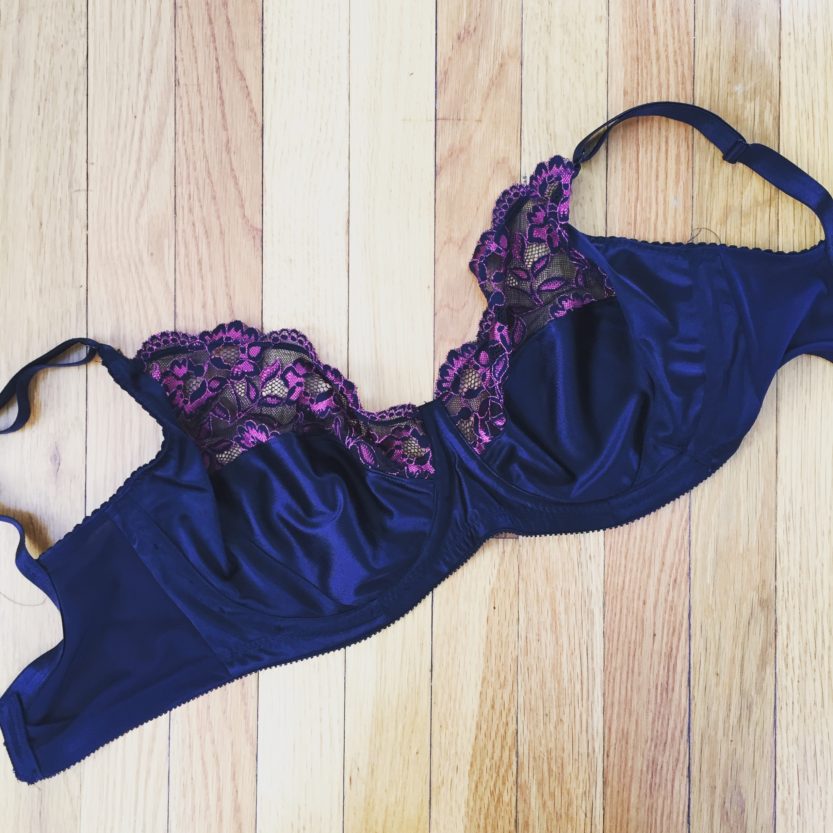
OK, so it *looks* pretty good. But trust me, it’s not awesome. I used a kit from Bra Makers Supply but unfortunately the lace was quite shoddy – it has very fragile areas where it is extremely easy to poke holes during the construction process. Hence, this bra is full of holes (and not just the lace ones that are meant to be there, smartypants). Second, when I tried it on, it really flattened the bottom half of my bust, rather than being rounded which is the shape I prefer under my clothes. Quite why it had this effect when none of Norma’s samples did, I know not. Such is the Mystery Of Bras.
Anyhow, undeterred I galloped on to a second version. Having received some wise counsel from Norma on the flat underboob situation, I added in a vertical seam on the bottom half of the cup – here’s a tutorial on how to do that.
The good news is, that helped a lot with shape – it still isn’t *quite* as rounded as the RTW bras I get from Bravissimo, but totally workable.
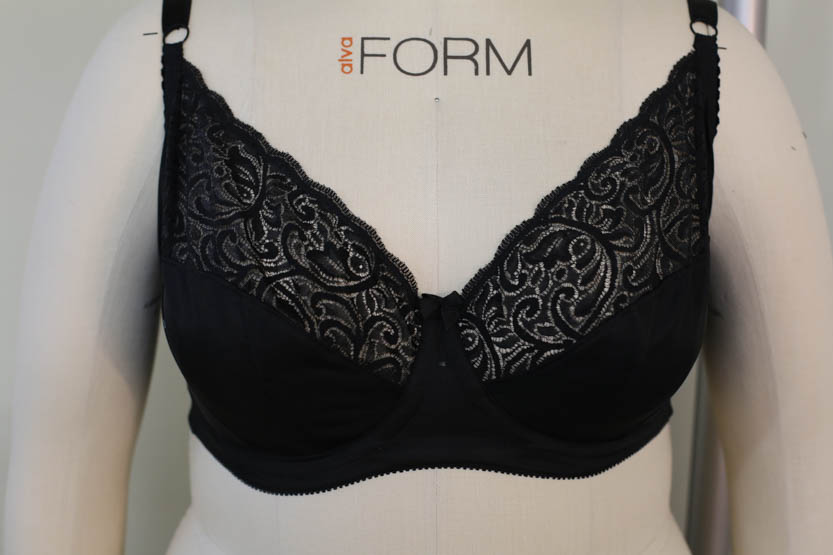
As modeled on my Alvaform, sparing my blushes and also the Google Searches of future employees and internet dates.

Unfortunately… it still didn’t fit. This is the point at which I got very confused, because I’d tried Norma’s samples on many times and they’d always fitted me. What I didn’t account for is… my bust got bigger. Bigger! Blimey days. Yep, recent weight gain has apparently added about 1.5 inches to my bust-line. Gah. So this bra *almost* fits… but not quite. I will however hold onto it because not only is it my first real bra, but I may well fit into it again at some point.
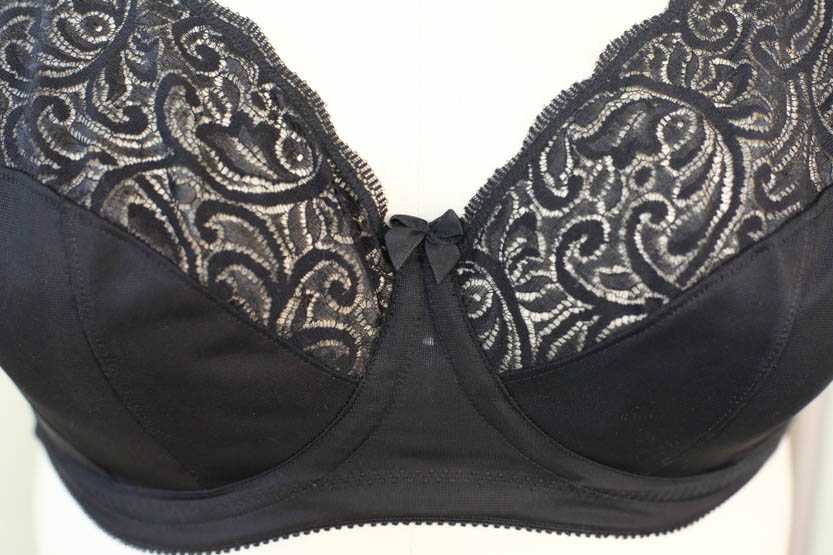
Construction wise, I was pretty pleased with my second attempt – the instructions are great, and it really is much faster than sewing clothes. I used more fabrics from Bra Makers Supply including the Large Notions Kit (for larger bra sizes), and a much more robust lace which doesn’t have big holes in it.
So my journey to bra-making started… not too badly! I may not have quite made it yet, but clearly there’s a learning curve (BA DA BOOM), and I’m looking forward to figuring out my size at last and then making ALL the pretty bras (mostly I just want to copy this one from Heather 1,000 times).
Any other mega-busty sisters making bras these days? Any tips for me as I dive headfirst into the fray?
I bought an Orange Lingerie pattern in the extended range. I haven’t made it up yet though as am I’m still working through rediscovered UFO bras from the summer! Sorry they don’t fit. But, they are sewn beautifully.
I have dipped my feet in these waters too…with not much success either, but my motto: some lace cannot beat me….I shall keep on trying even if it takes me a lifetime LOL
I have a bra in mind that nobody makes in my FF size, so I think I’m going to have to put on my big girl pants and sew it for myself. I’ll freely admit that the prospect scares me silly, despite sewing for a living, but I can picture my ideal bra and it won’t get out of my head. Those sort of projects just need to be done, I have found.
You should definitely try! As I always remind myself: the only way to learn something is to try it for the first time.
I am, but have been lucky to have local classes that gave me custom drafted patterns. So much more comfortable that RTW for me, because all the the bras in my size (32 G) use a smaller underwire than I need, and the bridge is too wide (wide root and close set).
That sounds great! I’m hoping I can figure this out myself, but if not, good to know there’s another option.
Classes ? Where?
I think that’s a big fear of mine with learning to make bras – the known fact that the first one (or 30) will be wadders. It kills me to think that all that work will be “wasted”, although I know that’s part of the learning experience!
Does a local shop have bra making classes? I teach at a store near me. I do a private custom fitting for each student, then create their custom pattern. Patterns and already cut and marked fabric is distributed at class. We have a fitting day at least two weeks before the actual class, and no more than six students attend any one class. The two weeks gives me time to draft and cut out each pattern, then package everything in the correct order.
I laughed reading how (as a wise woman) you said you would try almost anything but a bra 🙂 That’s me alright. My exactly words – never a bra! I still feel that way but seeing yours I was amazed – it looks perfect to me and I loved Heather’s too. Gorgeous in that lovely cotton print. Hats off to you Jenny! Brilliant first 2 jobs I would say.
When I realized that I’d pay any amount of money for a bra that would fit well, I broke down and took a class with Norma. She suggested lining the top lace part with the same fabric you use for the other front panels. It worked really well and was more supportive. And I felt like a superhero once I was done. I figure if I can sew a bra, I can sew anything!
Yes, that’s a good tip! I actually used it for the bra I made after this one 🙂 And yes, total superhero!
I gave bra making a whirl a few months ago, but never finished that bra….because I got pregnant. Now my boobs are almost ridiculously large and I really need to give it another go. I loathe maternity / nursing bras. They give me the most unflattering uniboob.
A lot of them are super ugly! Do you read Monserratt’s blog? She’s tried sewing maternity and nursing bras quite successfully! https://monserrattlopez.wordpress.com/
You may no longer be nursing, but other women are, or will be. For all of these women, please read Beverly Johnson’s blog on how to make a nursing bra.
I am trying not to hang onto clothes that are too small, because chasing that weight loss logic is detrimental to my health and my closet.
That said, a bra is small, and our breasts change size and shape more often than any other part (feet, don’t get ideas). And good bra hardware is expensive (I’m paying $10.66US shipping for a $2.66 bra clasp. Really didn’t need or could rationalize anything else on a first order – and thanks for the lace review) so I strip it and save it for repairs and new builds.
Yes totally agree – my bust goes up and down more than the rest of my body, so I’m not going to throw them away quite yet – they may still fit!
Having similar issues trying to get a Boylston to fit. Have decided to put it to one side and try the new Harriet instead, as I love the Watson as a sleeping bra and I like Amy’s sizing. Worth a go? I also learned the hard way to make sure it’s decent quality fabric…
I’m definitely intrigued by the Harriet – I’ll give it a go. Interesting that she uses UK sizing, though I’m not sure whether it’ll make a tangible difference.
Aww that blue is so pretty! Sucks it didn’t turn out. PS Have you watched Beverly Johnson’s craftsy videos? I binge-watched all three of them (I think she may be coming out with a fourth?) recently and they were really helpful for figuring out how to fix fit issues.
I’m excited to make bras and use bra structures inside strappy dresses to support my 32Gs. So far I’ve made a bustier top that worked out pretty well, less a few easy improvements I could have made to the construction. I based the pattern on one of my favorite bras that had gotten ratty enough for me to cut apart. I’d recommend to anyone trying to figure out their size/new pattern to compare the pattern to a RTW bra that fits you well.
I’m intimated by the sewing techniques required for lingerie. However, I just found out about Bravo Bella (http://bravobellabras.com/), who seem to offer bra making classes in the Seattle area. No more excuses for me!
The bras I like are ridiculously expensive but the lift and fit is so fabulous that I am finally tempted to make my own. I am a 36 F in my bras, so pretty large and I need lots of support! I figure that I’ve had enough wadders over the years but full garments are so much more expensive to make that going through a few kits isn’t anywhere near as bad.
That’s what I think, too: the learning process for making your own is necessarily quite expensive, but in the long term, I’m sure it would be cheaper! Particularly because you can’t even get beautiful silk or lace bras in my size.
It is so much fun and frustration making my own bras. Between weight flux (thanks hormones) and fabrics making a once fitting pattern now not fit, to how many different styles of underwires (verticals are my faves, I think) it’s like treasure hunting for the ta ta’s. The vertical seam with an added curve helped my volume issue in the Marlborough. Each new pattern takes almost five tries to get a TNT, I have begun gathering fabrics from thrifting excursions for the fit/toile/muslin versions.
I haven’t even ventured into the whole wire styles thing… I’ll have to try the vertical one!
Your bra looks great. I took the Craftsy class and have been working with the Classic bra pattern. It took me 7!!! BRAS tinkering away with each before I finally got what I think is a good fit. Then I read that some people who have had the same problem as me switched to Beverley’s Shelley bra and it was nirvana. I have the pattern and some new fabric and will be making one shortly. I can’t seem to stand under wires no matter what I do so cut and sew foam is on my radar to try as well. I’m always amazed at how much coverage other people seem to get with their bras. Yours looks like a nice coverage and yet the pattern itself looks low. I’ve seen the same thing on the class. Not sure what I’m doing wrong but I’m a DD and I would feel better with more coverage. I like sewing these luckily so back to the drawing board right after I finish up another Harrison shirt. :o)
That’s perserverance, well done! The Marlborough is definitely designed to be fairly low cut, and on me (vs. the form) it is. I like that, so all good for me 😉
after many, many many failed attempts to make my own bras, i finally gave up. i acknowledge that there are some truths i have to learn to handle in this life: i will never again weigh 125 lbs, i will forevermore have laughlines, and i need a 36/38 L bra. i have cannabalized well-fitting bras for patterns and tried enlarging the largest patterns available. the result was always the same – phooey! good craftmanship, terrible fit. i buy my bras from Bravissimo and have them shipped to the USA (shipping be damned) because there aren’t any bra makers in the US who make underwire bras unless they’re minimizers. (Hello, Goddess!!) who wants to look squashed? and ugly, too. so i was much poorer and the charity stores were much fuller and i continued to buy from the UK. thank you, Bravissimo and England.
i seriously wish you and everyone else the best in your quest for the perfect bra. as for me? i was Don Quixote tilting at windmills. i’ll be following closely to see what happens here. hopefully you discover something i missed. please. 🙂 🙂
Bravissimo really is the pinnacle of awesome bras, there i no doubt! And surprisingly cheap shipping to the US, too. I’m hoping to figure out a way to make my own, but it’s good to know that if I don’t, they have my back 🙂
Here’s my thing… I don’t know what fabric to buy for testing and I don’t want to spend a complete fortune on the bra makers supply kits until I get the fit right.
Is this a chicken or egg thing, or is there a secret fount of bra fabric online that I don’t know about?
I’m afraid it is the chicken and the egg thing. The only way to know for sure if the thing will fit is to make one in the actual bra fabric. It really is worth it in the end but it can be costly to figure it out.
You don’t have to buy “kits” from BMS. The fabric and findings are sold individually also. You might buy 1 1/3 meters of duoplex and 2/3 meters of powernet, plus four meters of bottom band elastic, six meters of top band elastic, four meters of neckline trim, and three meters of strap elastic. Then get four sets of rings and sliders and four hooks and eyes. You’ll have enough to make four bras.
I forgot! You’ll need four meters of channeling also. If you don’t sew up the armhole edge of the channeling, you can interchange the wires. Just leave a tail of channeling and tuck it inside the bra.
I finally got into the bra-making scene when I took an in-person class with someone who trained with Beverly Johnson (everyone in that class was brave and showed off their bras with themselves as the models:). That gave me the confidence to keep at it. I have since taken several of the Fairy Bra Mother’s classes on line and have been tinkering with design changes to make a better fit. I use the Pin up Girls Classic, which I have modified by moving the apex and should strap location to the centre, split the lower cup and used a “gothic arch” on the middle frame to reduce the amount of fabric there which increases comfort.
Despite the fact that the fit isn’t perfect yet for my 40G in the front/38 in the back size and I still make at least one construction error on each bra, I’m pretty happy with what I am producing. RTW simply can’t deal with a large cup size on a frame with a relatively small rib cage and narrow shoulders. So my advice is try and try again. It also helps if you have a friend you can problem solve with.
Back in 2009, I took a bra-making class with Anne St. Clair (Needlenook Fabrics…her daughter runs http://bravobellabras.com/ and sells Anne’s patters as well as her own Bravo pattern). Anne customized the Elite pattern for every student (mine looks nothing like the original!).
When I finished that first bra, I realized that it was the first time that I had on a bra that not only fit, but actually supported my 36I girls. So, since then I threw away my store bought bras and have been making my own. What’s most pleasing about making my own bras is that I’m not stuck with just beige bras. I can have any color or any print that strikes my fancy. The hand-made ones cost me less than half of what I’d pay for a ready to wear one that doesn’t fit well.
Hurrah for you, Andrea! I’ve taken Anne’s class twice just for fitting (and focused time) purposes! I had the same experience – support + comfort and ability to make pretty bras of my own after leaving class 🙂
Yeeeeiiii!!!!
Fitting is a whole art. Be patient and practice, practice, practice!
Then you change pattern and it will again need adjustments. That’s just the way it goes.
Fabric has a lot to do with how the bra will fit, so if you do the modifications to one version, keep using the same materials so you don’t have new surprises!
Welcome to the bra world! :))
<3
M
Welcome to bra-making! I started many years ago (about 100 pounds greater in weight) when no RTW fit my small rib cage/shoulders and large bosom. There were no patterns that fit me, so I had to create my own, with the help of Lee-Ann Burgess’ “Making Beautiful Bras” book. I made my first pain-free,supportive and pretty bras and have been addicted ever since! Even after weight loss, I still struggle to find RTW that fit as well in 34H or I sizing.
The Pin Up Girls patterns go up to size 48H. You’ll find the 34H in the “yellow” size range in the Classic style. Use the large bra kit from BMS to get started. My advice is to pick a light neutral color to start with. One reason is because the lighter color is easier to see to sew on (and to “unsew”.) The second is because mistakes are made, especially the first time. It’s heartbreaking to have your wished-for bra fabric and find it doesn’t quite fit the first time.
I’ve been seriously considering making myself a bra for the first time because I have such a hard time finding ones that fit. When I have actually found a style that does fit it undoubtedly becomes discontinued by the time I have to buy new ones or they slide off my shoulders. I think I really need a bra that’s like a normal bra up front with under wires & separate cups but with a racer back. I have yet to find a pattern like this though & I feel like I am still too much of a beginner to hack one.
One of Beverley Johnsons Craftsy classes teaches how to draft a racer back from a normal bra pattern. I’m thinking it’s the second one but you could email Bra Makers Supply and ask. She also teaches how to add a piece of fabric from the strap to the back and that makes a bra a lot more comfy too. I can’t remember what she calls that adjustment but I’ve done it and it’s awesome.
I love the look of your bras and other patterns! Finally patterns my size! I have always wanted to make bras my only worry is finding the hardware, I have found some the underwire online but worry about finding the right size and shape and I also need something that will be as strong as the very expensive bras. Without the right supporting wire the bras will not hold me up properly
The underwires a Bra Makers Supply, and Sweetcups Bra Supply, are very sturdy. I had occasion to clone a bra from a high end lingerie shop. The BMS wires are superior to those. Some of my clients use size 60 wires, and the BMS wires do their job admirably.
I make bras professionally. Lace can be challenging to work with, but it makes a bra beautiful. You might try using some sheer cup lining under the lace, especially under a very gossamer type. It provides additional support but still looks sheer. It also tames the stretch, if you’re using stretch lace.
I am curently a 38 H and prefer the Sewy Isabell pattern, it is much like the Watson so I know the problem With the lace. I find that lining With mesh or other fabric does not give me the look I want so I always use two layers of lace. After cutting out the first layer use it as a pattern for cutting out the second layer. Lay it Down wrong side to wrong side and you`ll get a perfect result and much better “hold” than a single layer lace. I also always use two layers of powernet fr the band.