Many of us have breasts that are two different sizes—that’s totally common! Thankfully, it’s easy to adjust a bra pattern to accommodate asymmetry, and that’s what we’re showing you in this blog post.
Jump to another post in this series:
- Bra fitting guide overview
- How to choose your bra size
- How to make a test bra
- How to adjust the back band
- How to adjust the gore/bridge (Willowdale only)
- How to adjust the cups
- How to adjust the center insert (Loftus only)
- How to adjust the side seam angle
- How to adjust the straps
- How to adjust the underwires (Willowdale only)
- Adjusting the level of support and comfort
- How to make an asymmetrical bra
- Additional bra making resources
Cashmerette has two bra patterns designed to support and lift big boobs in band sizes 28-54 and cups C-J, all while looking absolutely fabulous (It’s a lot to ask of a bra, but they are up to the task!)
The Willowdale is a full frame, underwire bra sewing pattern while the Loftus is a non-underwire bralette sewing pattern.
In this post, we’re covering how to adjust a pattern for two differently sized breasts. Let’s get started!
How to tell if you need an asymmetrical bra
If you’ve made many bras before, you may already know if your breasts are different shapes. If you’re new to bra making, try on different bras you own and look to see: is one breast consistently spilling over while the other fits well, or conversely, does one cup always show wrinkles that indicate there’s excess room in the cup? Depending on your breasts, you may even be able to tell just by looking at them in the mirror.
The best way to tell if you need to adjust for asymmetry is to make a muslin (test version) in a single size and review it in the mirror. Does one side fit well while the other side is too small or too big? If so, you may want to make an asymmetrical bra.
Ultimately, it’s up to you whether you’d like to make this adjustment. Anyone who wears ready-made bras is stuck wearing a bra that’s a single size, and most of us don’t notice the asymmetry on others. But part of what makes sewing so amazing is that we can create custom garments that fit our exact shape, so if you’d like to give it a try as part of your bra-making journey, go for it!
How to measure your breasts separately
If your breasts are two different sizes, you’ll need to start by determining which cup size each breast is. To do this, measure each half of your full bust separately.
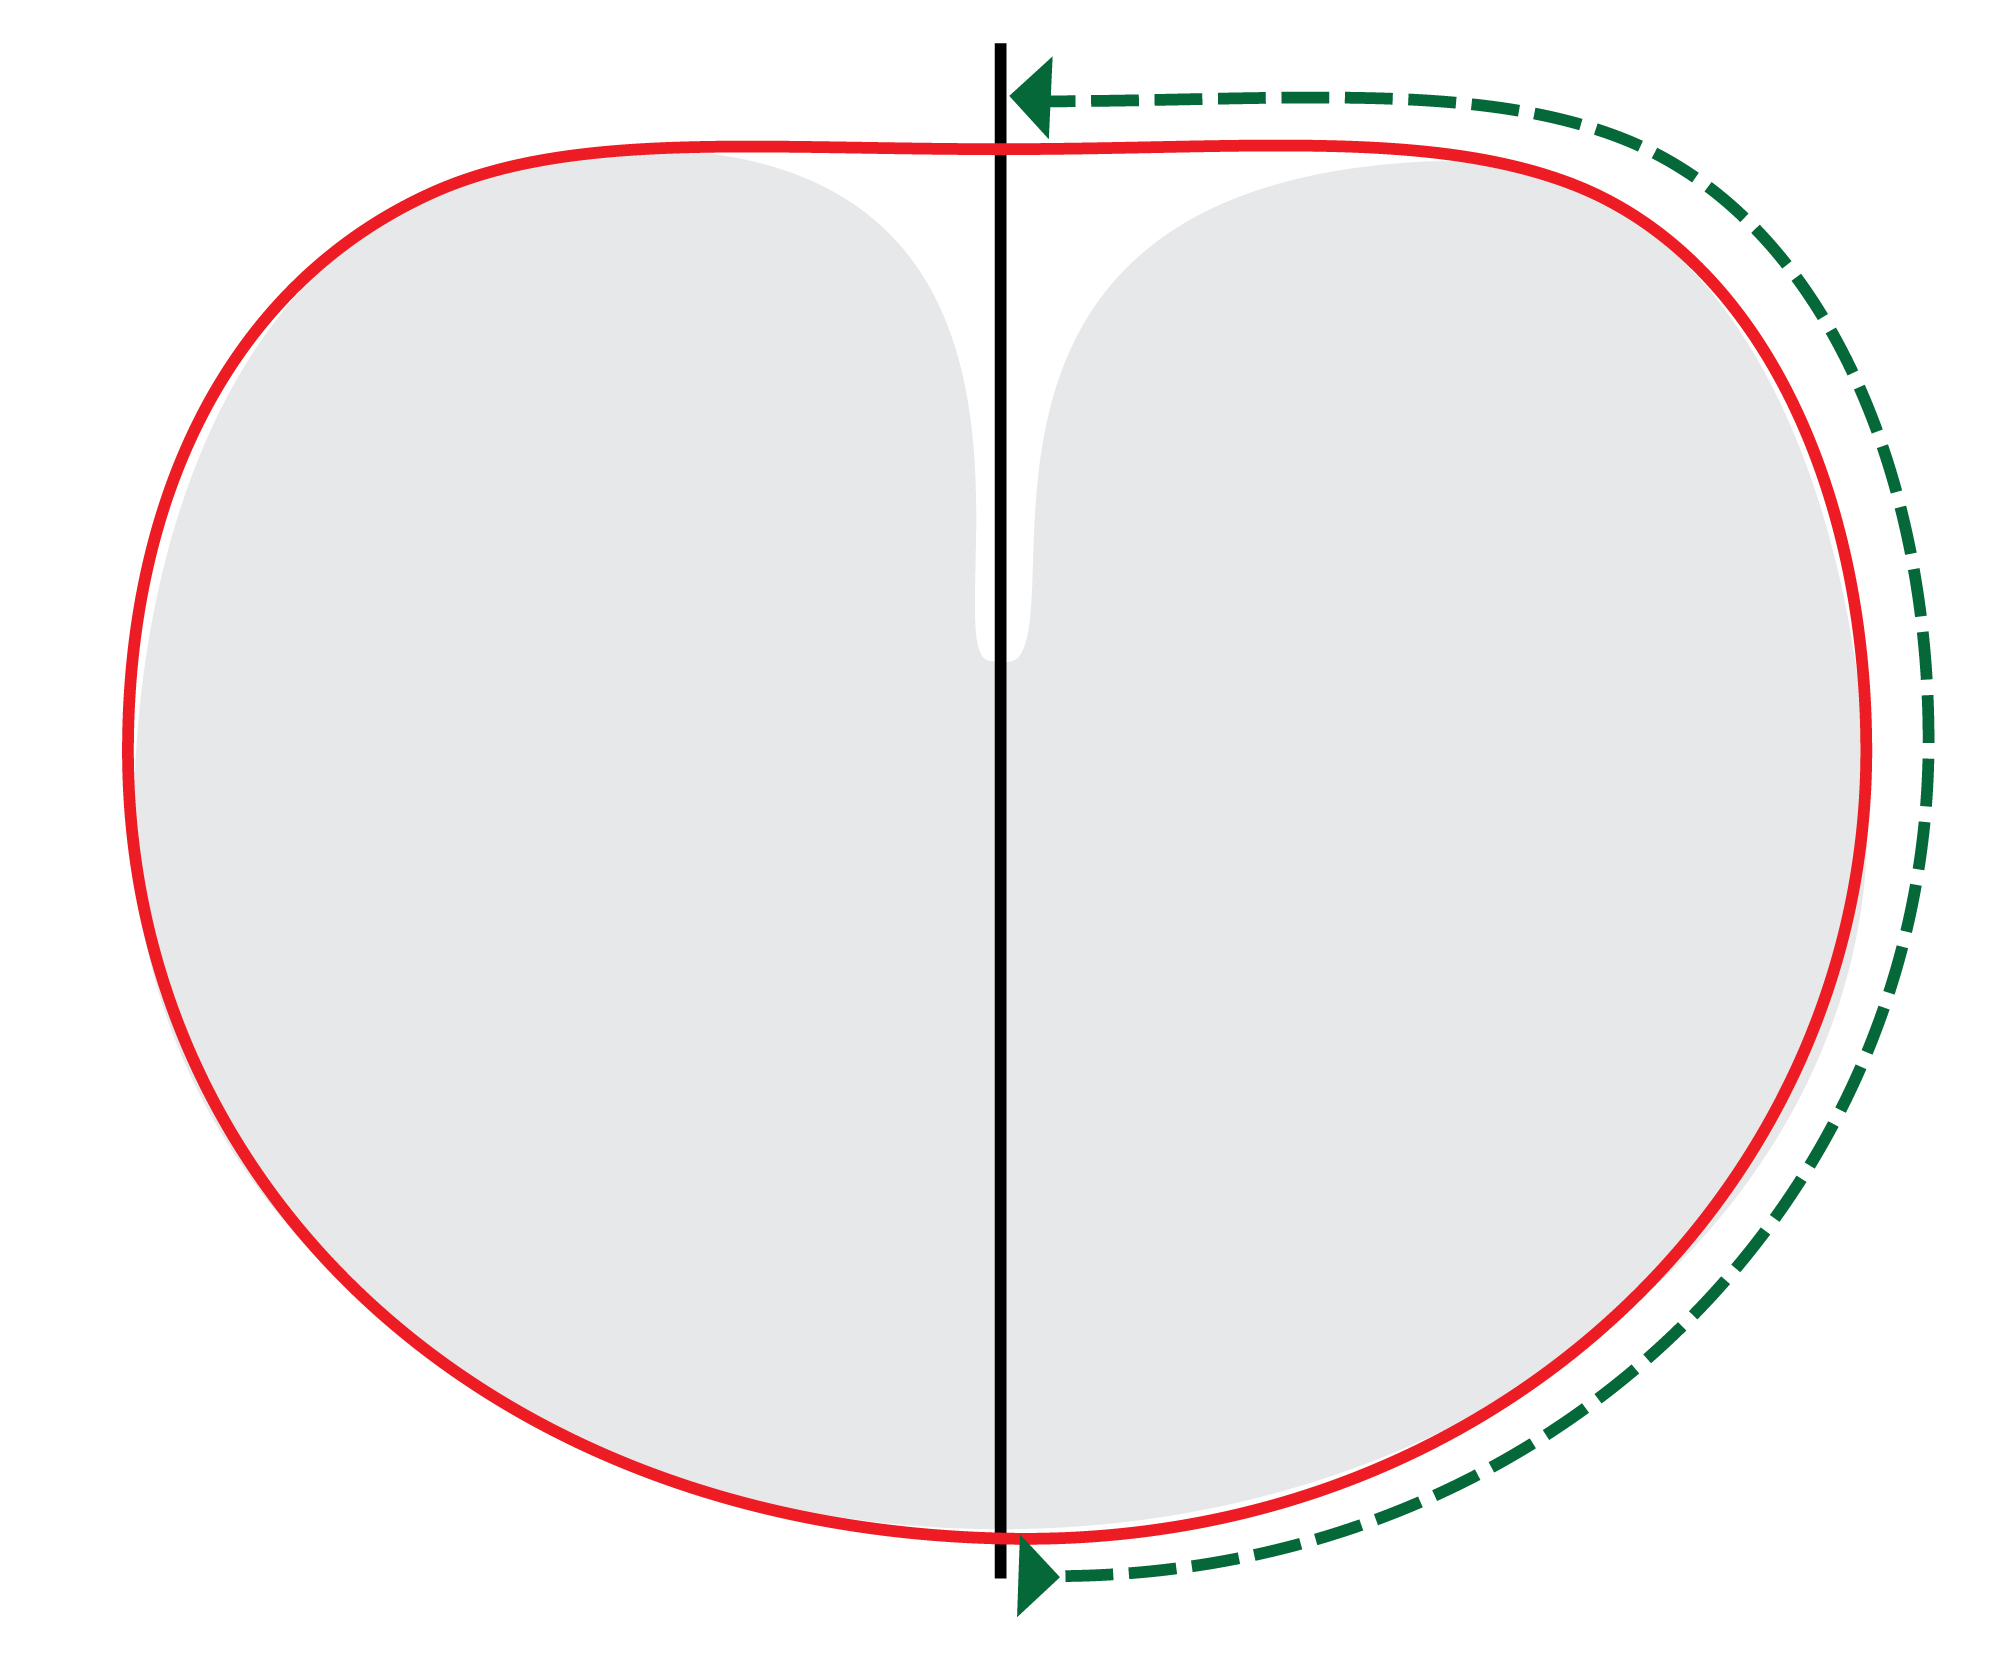
Generally, when you measure your full bust you do so at the red line shown on the diagram below. When you measure myself by halves, your first instinct may be to measure over one breast and into the gore—but we don’t want to do that. Instead, we want to measure from the center of the back to the center of the full bust measurement line (where the red and black lines intersect), as shown by the green arrow.
Here’s how we recommend taking this measurement:
- Place the tape measure right around the fullest part of your bust (while wearing your most supportive bra), parallel with the floor. Make sure the start of the tape and the final measurement are in line with the center of your bust at the front.
- Have someone mark the center back on the tape.
- From the start of the tape to the center back is your first half measurement.
- Your full bust measurement, minus the measurement at center back is your second half measurement.
For a person with symmetrical boobs, these measurements will be equal. For someone with asymmetrical boobs, this will be two different measurements.
Next, multiply those two measurements by two and use those numbers to calculator the size of your two breasts. For example, if your left half measures 20″ and your right half measures 21″, you would multiple those two measurements by two to get 40″ for the left and 42″ for the right. You’ll also need your underbust measurement—in this case, let’s say it’s 34″. Using the Cashmerette Bra size guide, that would be a 34E for the left breast and 34G for the right breast.
Once you have determined your new sizing there are a couple of different approaches you can take depending on the bra you are making:
For the Willowdale Bra:
There are two approaches you can take—one that uses different wire sizes for each breast and one that uses the same wire size for both breasts. Which option is right for you?
- If your breast root is the same on both sides but the volume of your breasts is different, use the same wire size for both sides
- If your breast root is different between the two sizes, use different wire sizes
How to make an asymmetrical bra with the same wire size
To make a 34E/34G bra with the same wire size, start by choosing which of the two sizes’ wire size is better for you. (We have a tutorial on how to do that here.)
In this example, the 34E goes with a 38 wire size, and the 34G goes with a 42 wire size.
Let’s say that the 42 wire size is a better fit. In this case, we would use the 34G front and band pieces, and the 34G cup pieces for the right breast. For the left breast, we would adapt the 34E cup pieces to fit a 42 wire using this tutorial.
Once you’ve made your pattern adjustments, you can proceed with sewing up a test version to check the fit.
How to make an asymmetrical bra with different wire sizes
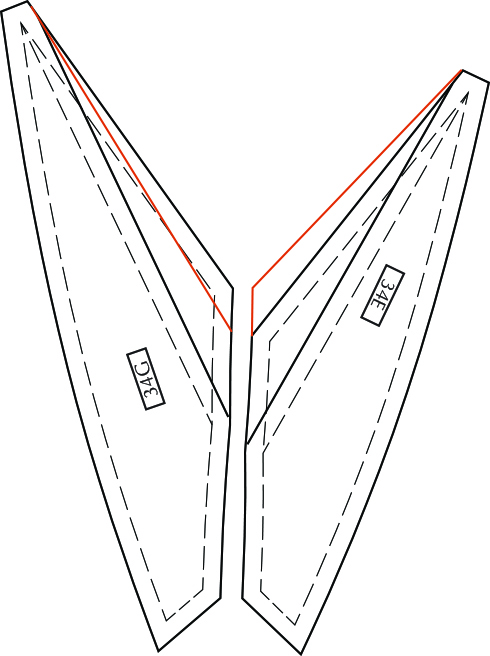
To make a 34E/34G bra with two different wire sizes, you would use one size for half of the bra and one size for the other half. To do this, you would print both the 34E pattern and the 34G pattern. Remember that each cup size also has different band pieces, so use the 34E band pieces with the 34E cup and the 34G band pieces with the 34G cup.
You may need to adjust the gore so that the two halves line up at the center fold/seam. Line up the two front band pieces at the top edge at the fold/seam line and blend them at the bottom edge like so:
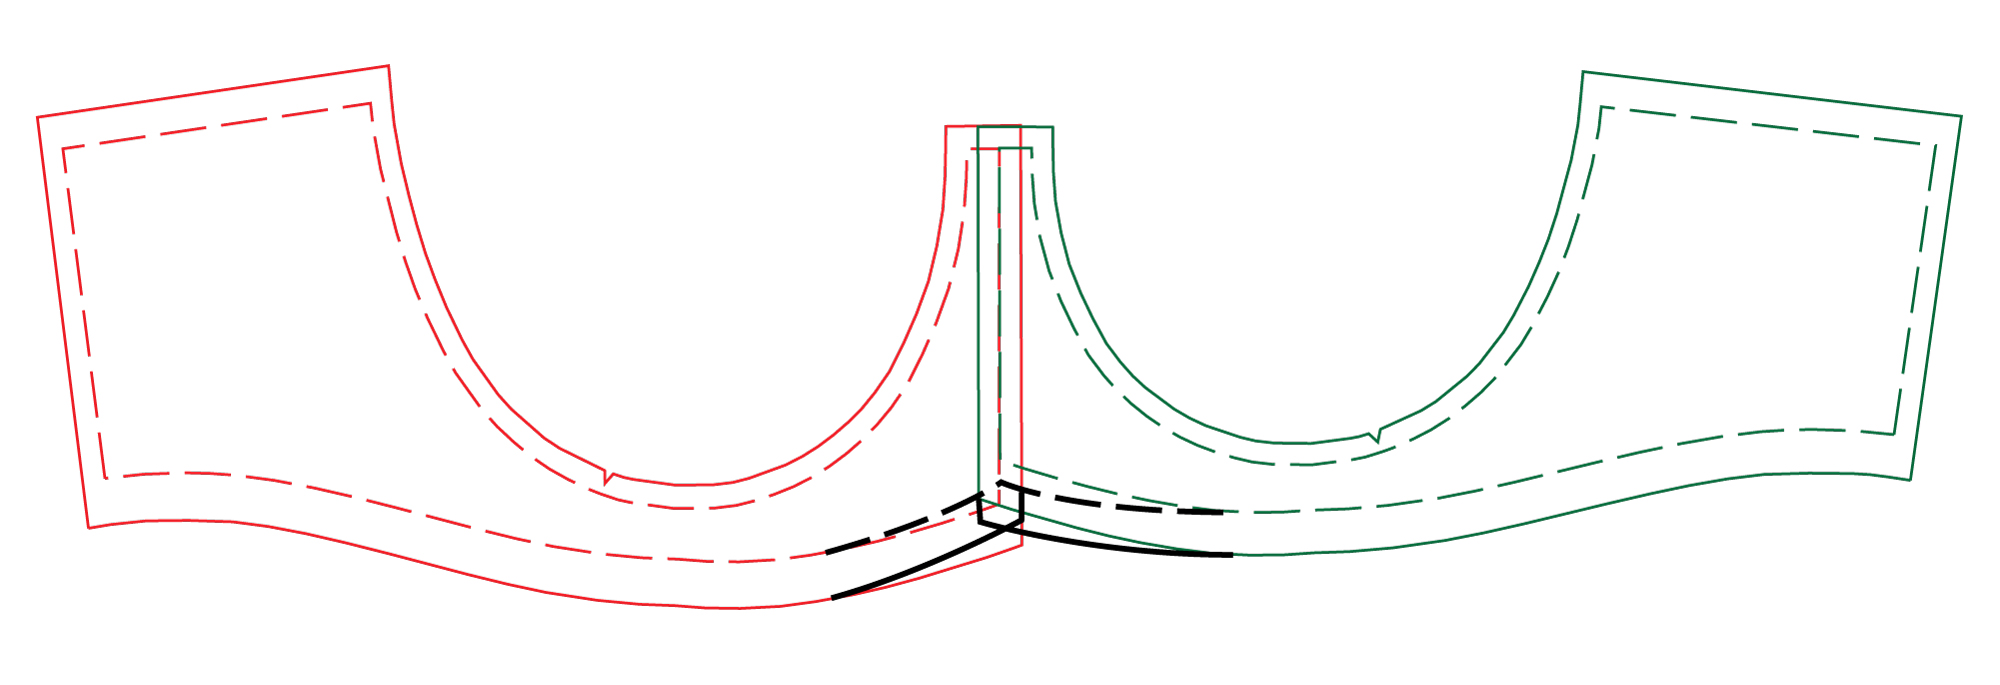
If you want to go a step further, you can mirror the bottom edge of the longer side onto the shorter side so that the bottoms look more symmetrical. (There is no right and wrong way to do this—it just depends on what works best for your body.)
You can then make your test version using the 34E for the left breast and 34G for the right breast. Remember to use two different wires for the different sides (the wires associated with the two different sizes).
For the Loftus Bralette:
How to make an asymmetrical Loftus Bra
To make the Loftus using two different cup sizes is actually quite simple. As the band heights at the center back are the same, you just need to join the two sizes together at the center front of the center insert.
That means you just need to modify the center insert piece of the 34E to match the center insert piece of the 34G.
You can do that by:
- Lowering the neckline of the 34G to match the neckline on the 34E as shown on the left,
- Raising the neckline of the34E to match the neckline on the 34G as shown on the right, or
- Modify the neckline on both pieces to some height in between.
Other adjustments
What if your breasts are the same cup size, but you need a different wire size on one side than other, or you need to adjust the side seam or strap on one side and not the other? You can make the two halves using separate pieces—one set with the adjustment and one without.
Not sure what fitting adjustment you might need? Check out our bra fitting checklist here.
Jump to another post in this series:
- Bra fitting guide overview
- How to choose your bra size
- How to make a test bra
- How to adjust the back band
- How to adjust the gore/bridge (Willowdale only)
- How to adjust the cups
- How to adjust the center insert (Loftus only)
- How to adjust the side seam angle
- How to adjust the straps
- How to adjust the underwires (Willowdale only)
- Adjusting the level of support and comfort
- How to make an asymmetrical bra
- Additional bra making resource