Samantha—or Samstress, as she lovingly calls herself—is a sewist with some serious skills. We got to chat with her about her pieced organza (!!) Kimball Bomber Jacket and so much more, and we’re sharing that interview with you today!

When we first saw Samantha’s colorful organza Kimball Bomber Jacket, we just had to know more about it and about her. Such detail! Such mastery! So we grilled her with our burning questions, and she willingly obliged us by sharing every detail of her process. We know you’re going to love learning about Samantha and her Kimball as much as we did, so grab a cup of tea and enjoy!
Feeling inspired to make your own Kimball Bomber Jacket? (I mean, how could you not be?!) You can get the Kimball pattern (available in sizes 0-32 and cup sizes C-H) and many other sewing goodies when you sign up for the Cashmerette Club at the yearly All Access level.
Tell us about yourself. When did you start sewing?
I have lived in the state of South Australia all my life—first in the city of Adelaide, and since getting married, on a farm near the Murray River.
I learned to sew while working in the sewing machine retail industry back in the 90s. We sold sewing machines, fabric, and patterns, so I had a lot of on-the-job training and made my own wardrobe to have practical knowledge and experience.
In my 35 years of sewing, I have made everything from bras to a wedding dress. My day job for the past 15 years is a seamstress at a dry cleaners. This mostly involves hemming jeans, but occasionally I get use my creativity for something very rewarding like transforming an everyday bra to fit a mastectomy patient.
For the past 6 years, I have worked part-time in the amateur theatre industry making costumes for productions like Priscilla Queen of the Desert. (I made 15 of the outfits pictured below.)

Photo credit: Jaybirdy Photography
Since discovering Cashmerette patterns in 2020, I have returned to making some of my own clothes. Previously I hated having to do a full bust adjustment on everything with a bodice (my measurements are high bust 44″, full bust 47″, waist 43″, and hips 48″) so I had focused more on textile art sewing. I have been making dresses, jacket/coat and tops since.
Tell us about your Kimball. Every last detail, please!
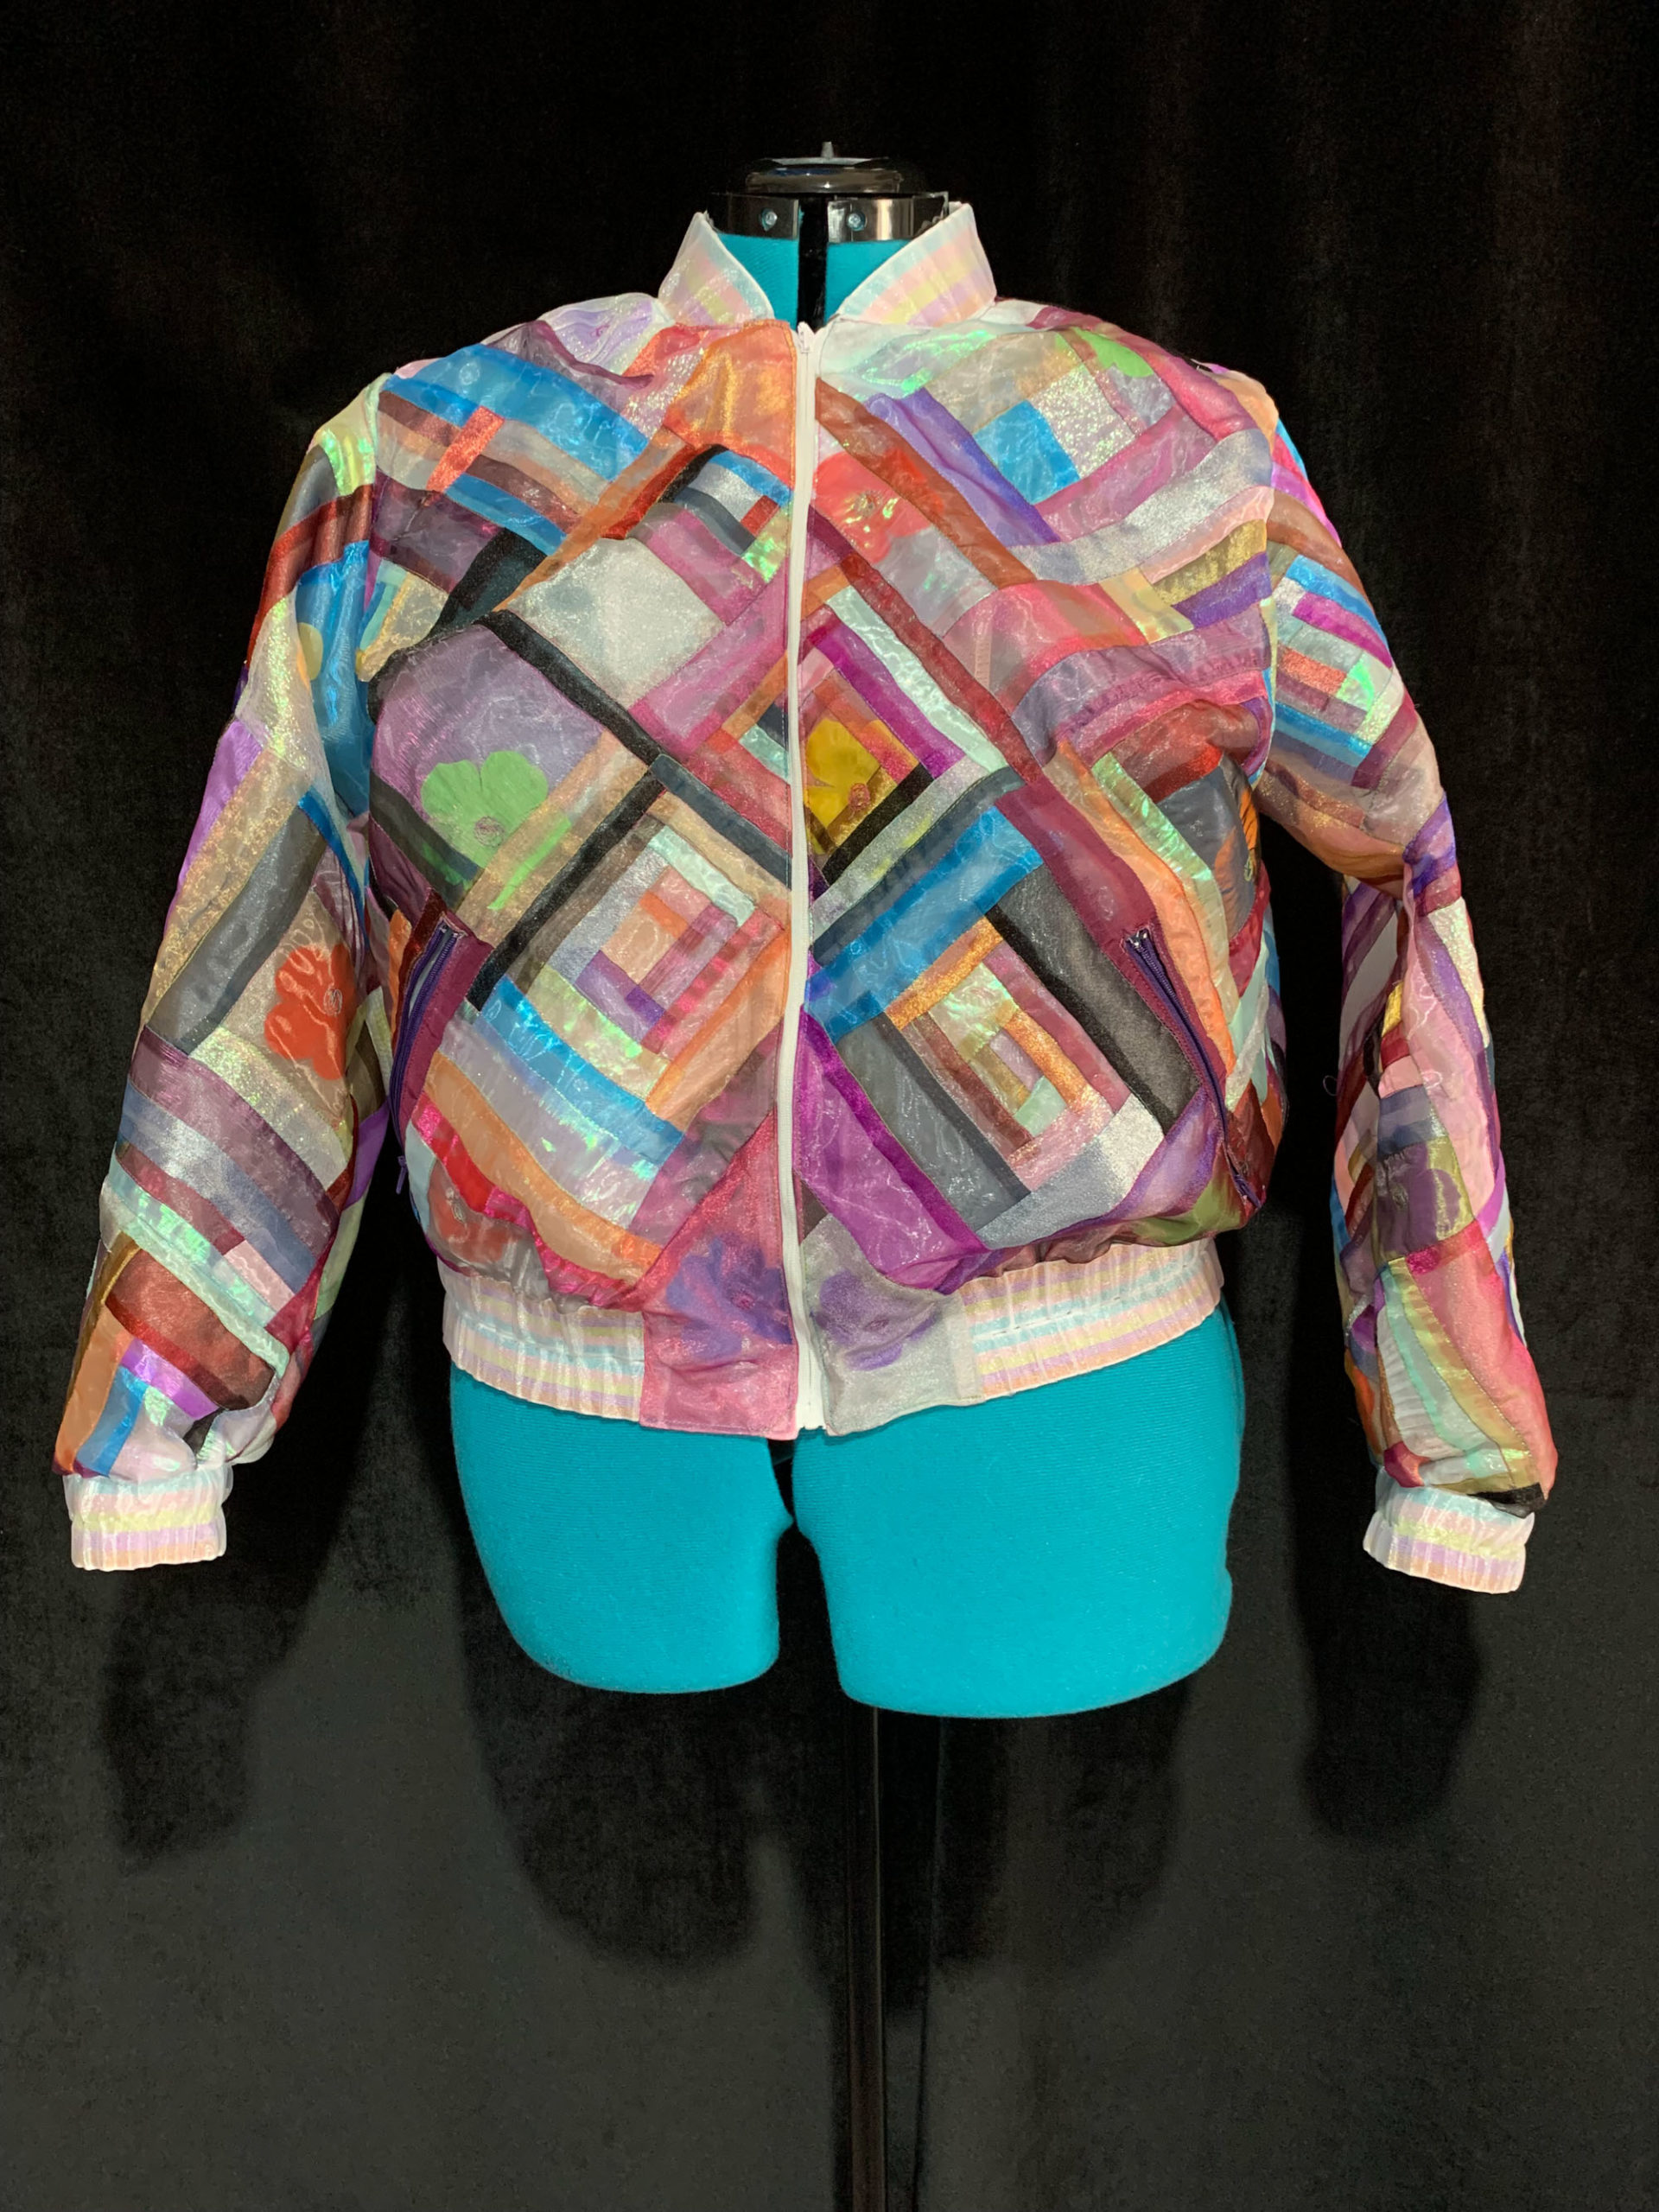
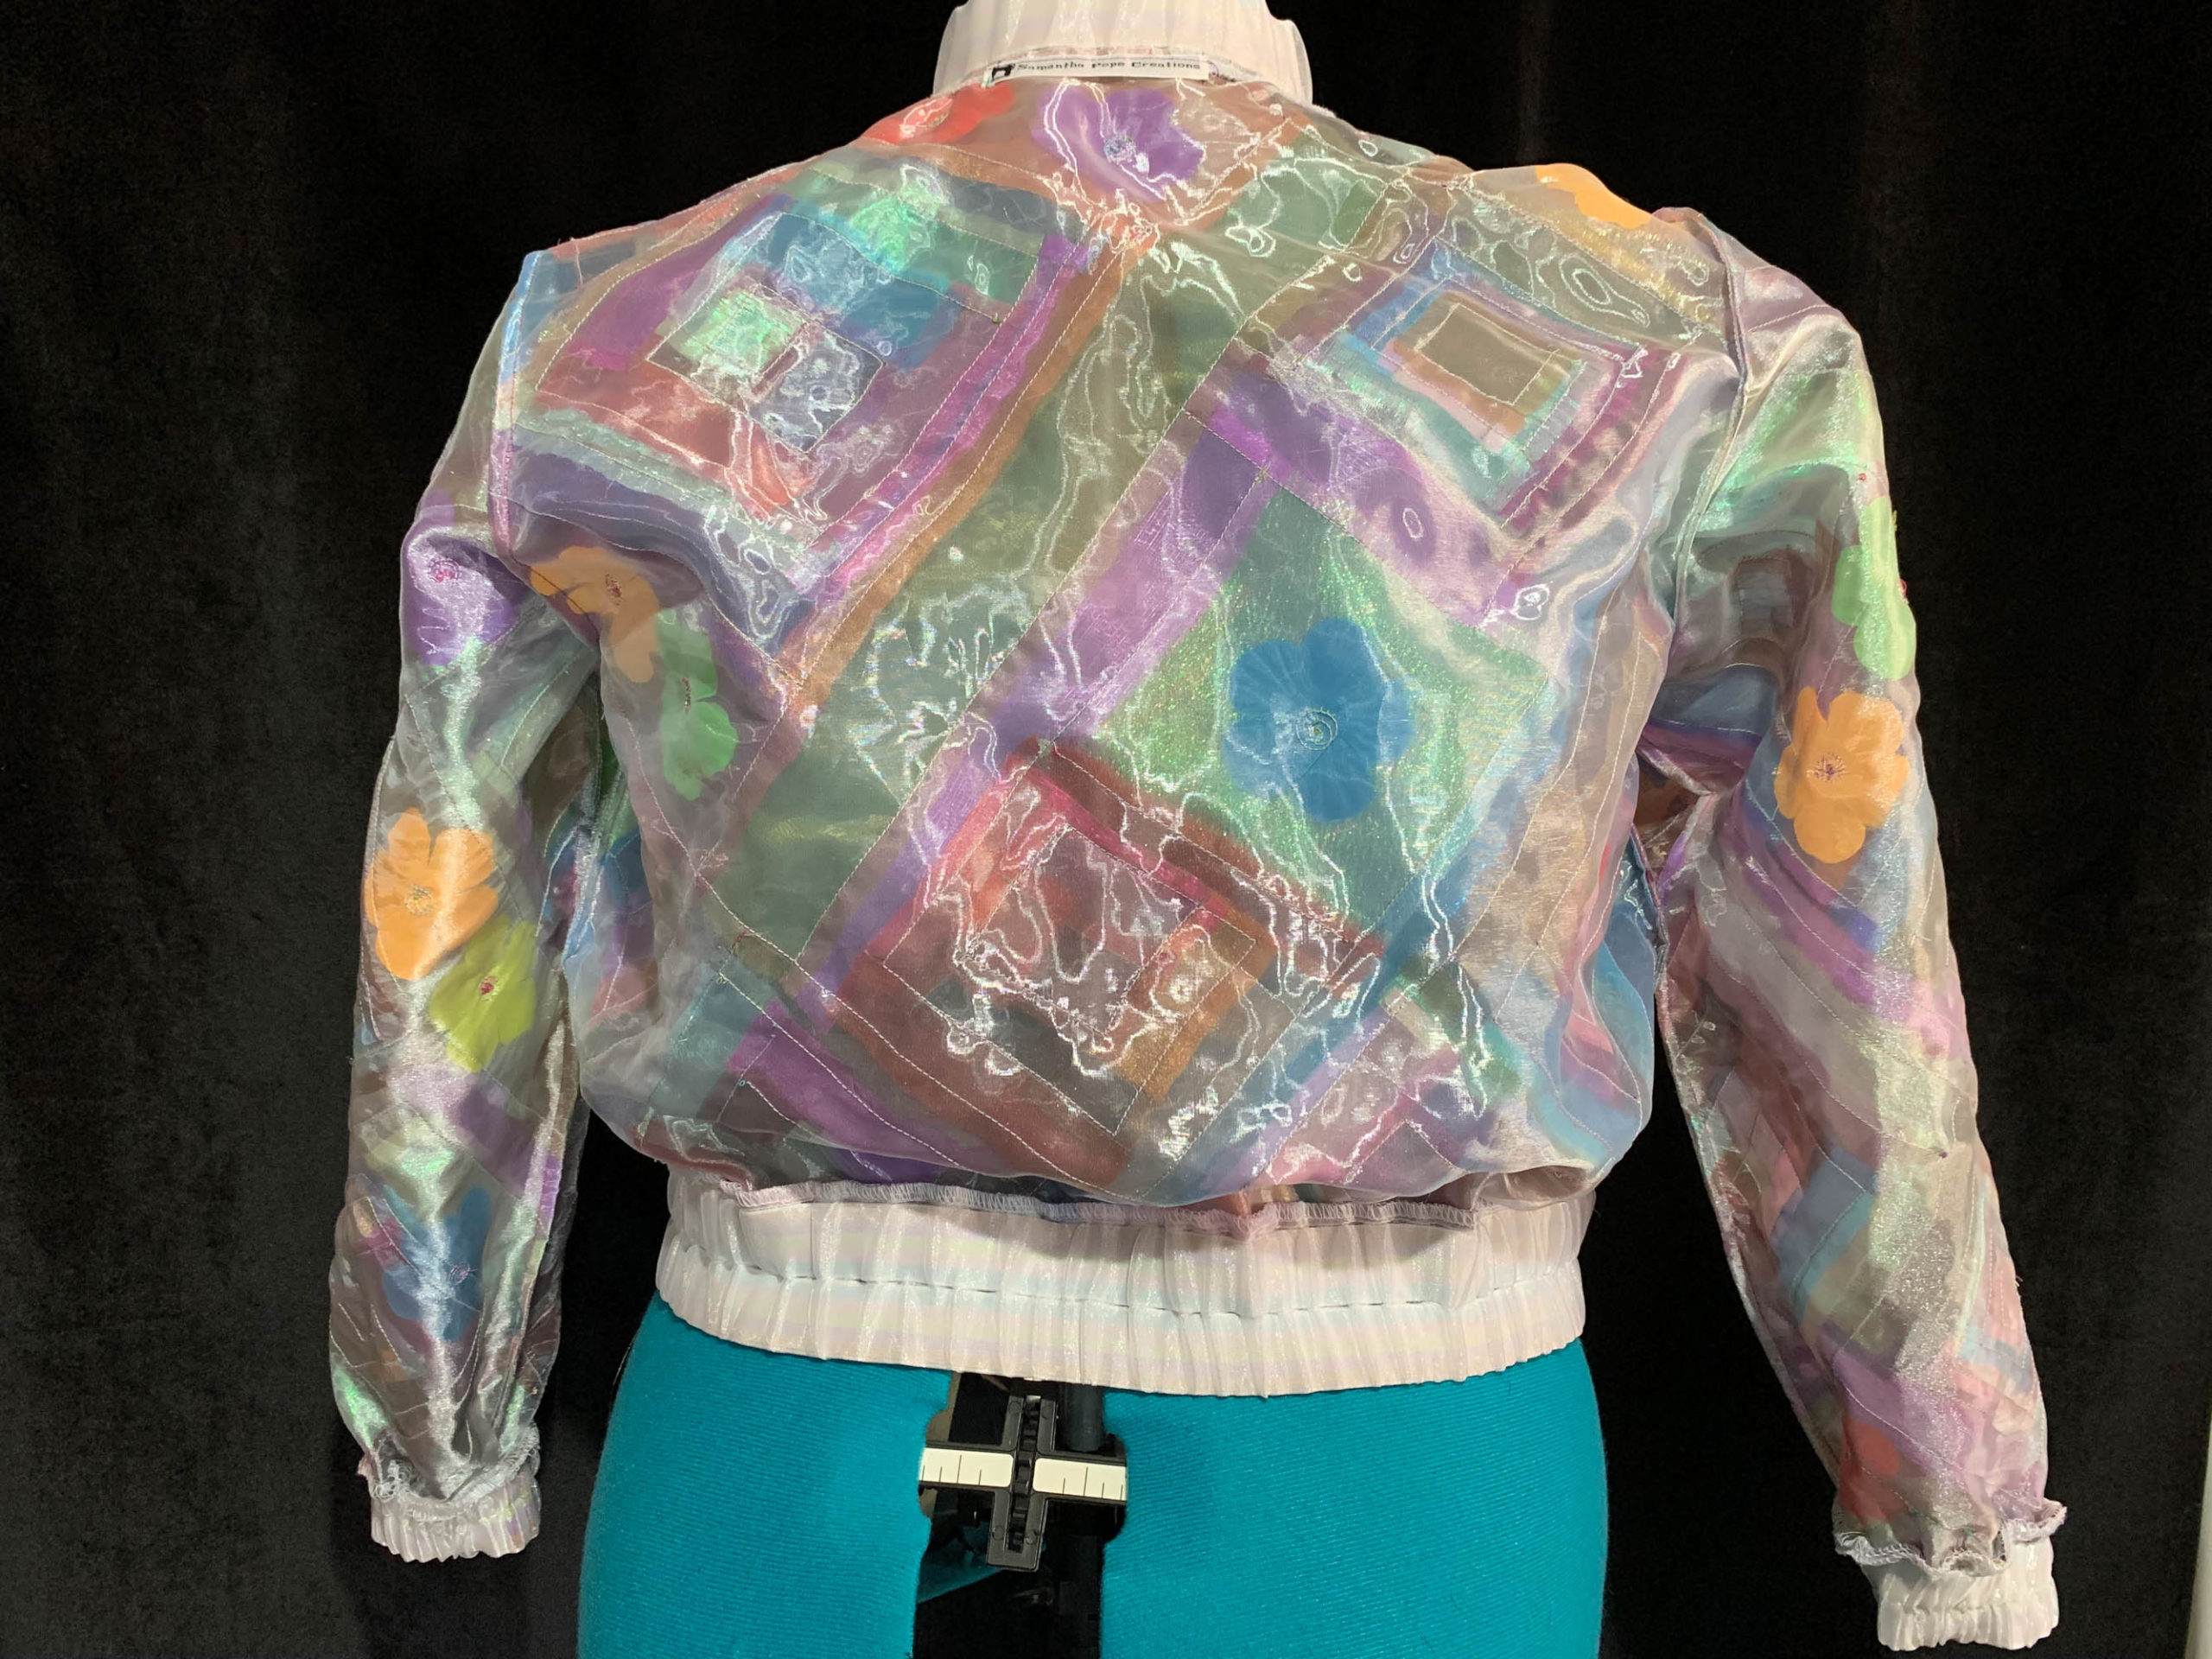
When the Kimball Bomber Jacket came out I immediately knew I wanted a sequin version so I started making that. I traced off my size which is the 20 G/H cup.
Then I was invited to go on a weekend trip to Port Douglas—a very tropical town in North Queensland, Australia—to see costumes I had made in a production of Priscilla Queen of the Desert. I wanted to make something to wear that night that was sparkly and colourful but couldn’t use sequins or brocade. The temperature averages 27-32 Celsius (80-90 Fahrenheit) with 80%+ humidity, so I wanted a lightweight breathable outfit.
Back in 2014, I attended a Bojagi making workshop by Catherine O’Leary at the Geelong Fibre Forum in Victoria, Australia. Bojagi is a traditional Korean wrapping cloth used to wrap presents among other things. We learnt how to make the patchwork like fabric using exclusively silk organza. The finished fabric was a single layer with enclosed seams and could be constructed as individual pattern pieces or a large piece of fabric from which the pattern could be cut out.
I created a jacket in class and later a wall hanging using this technique.
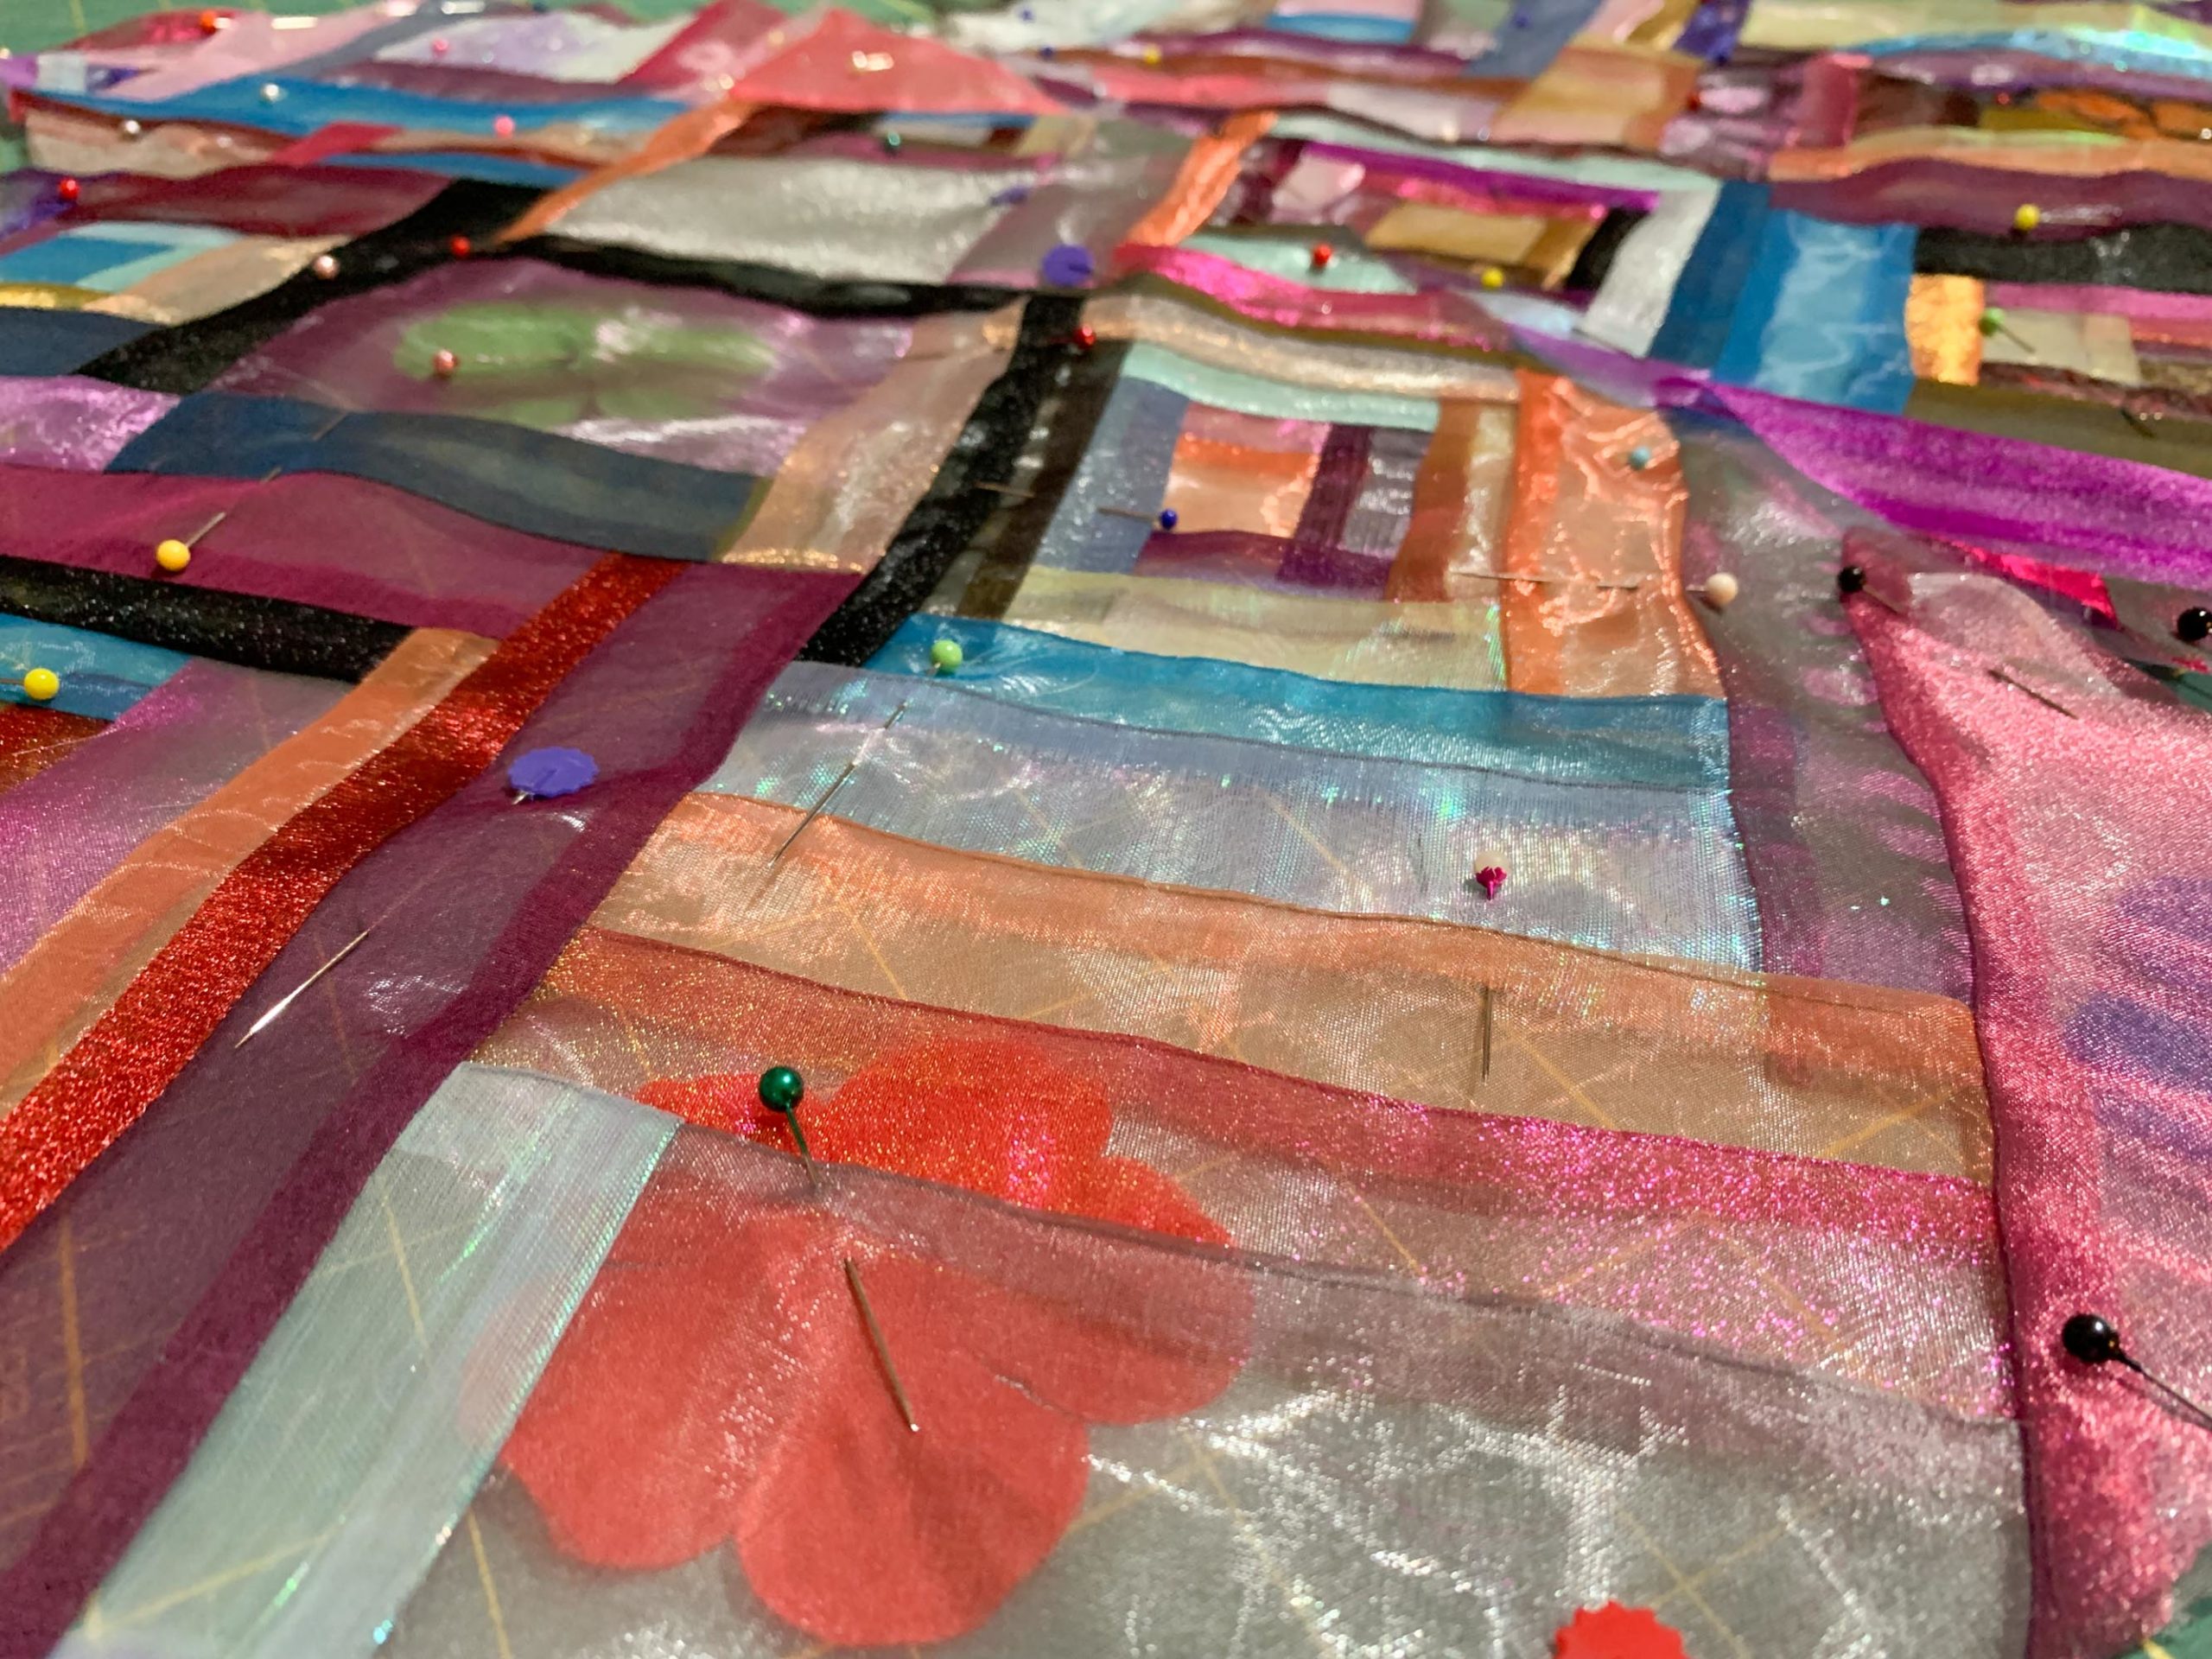
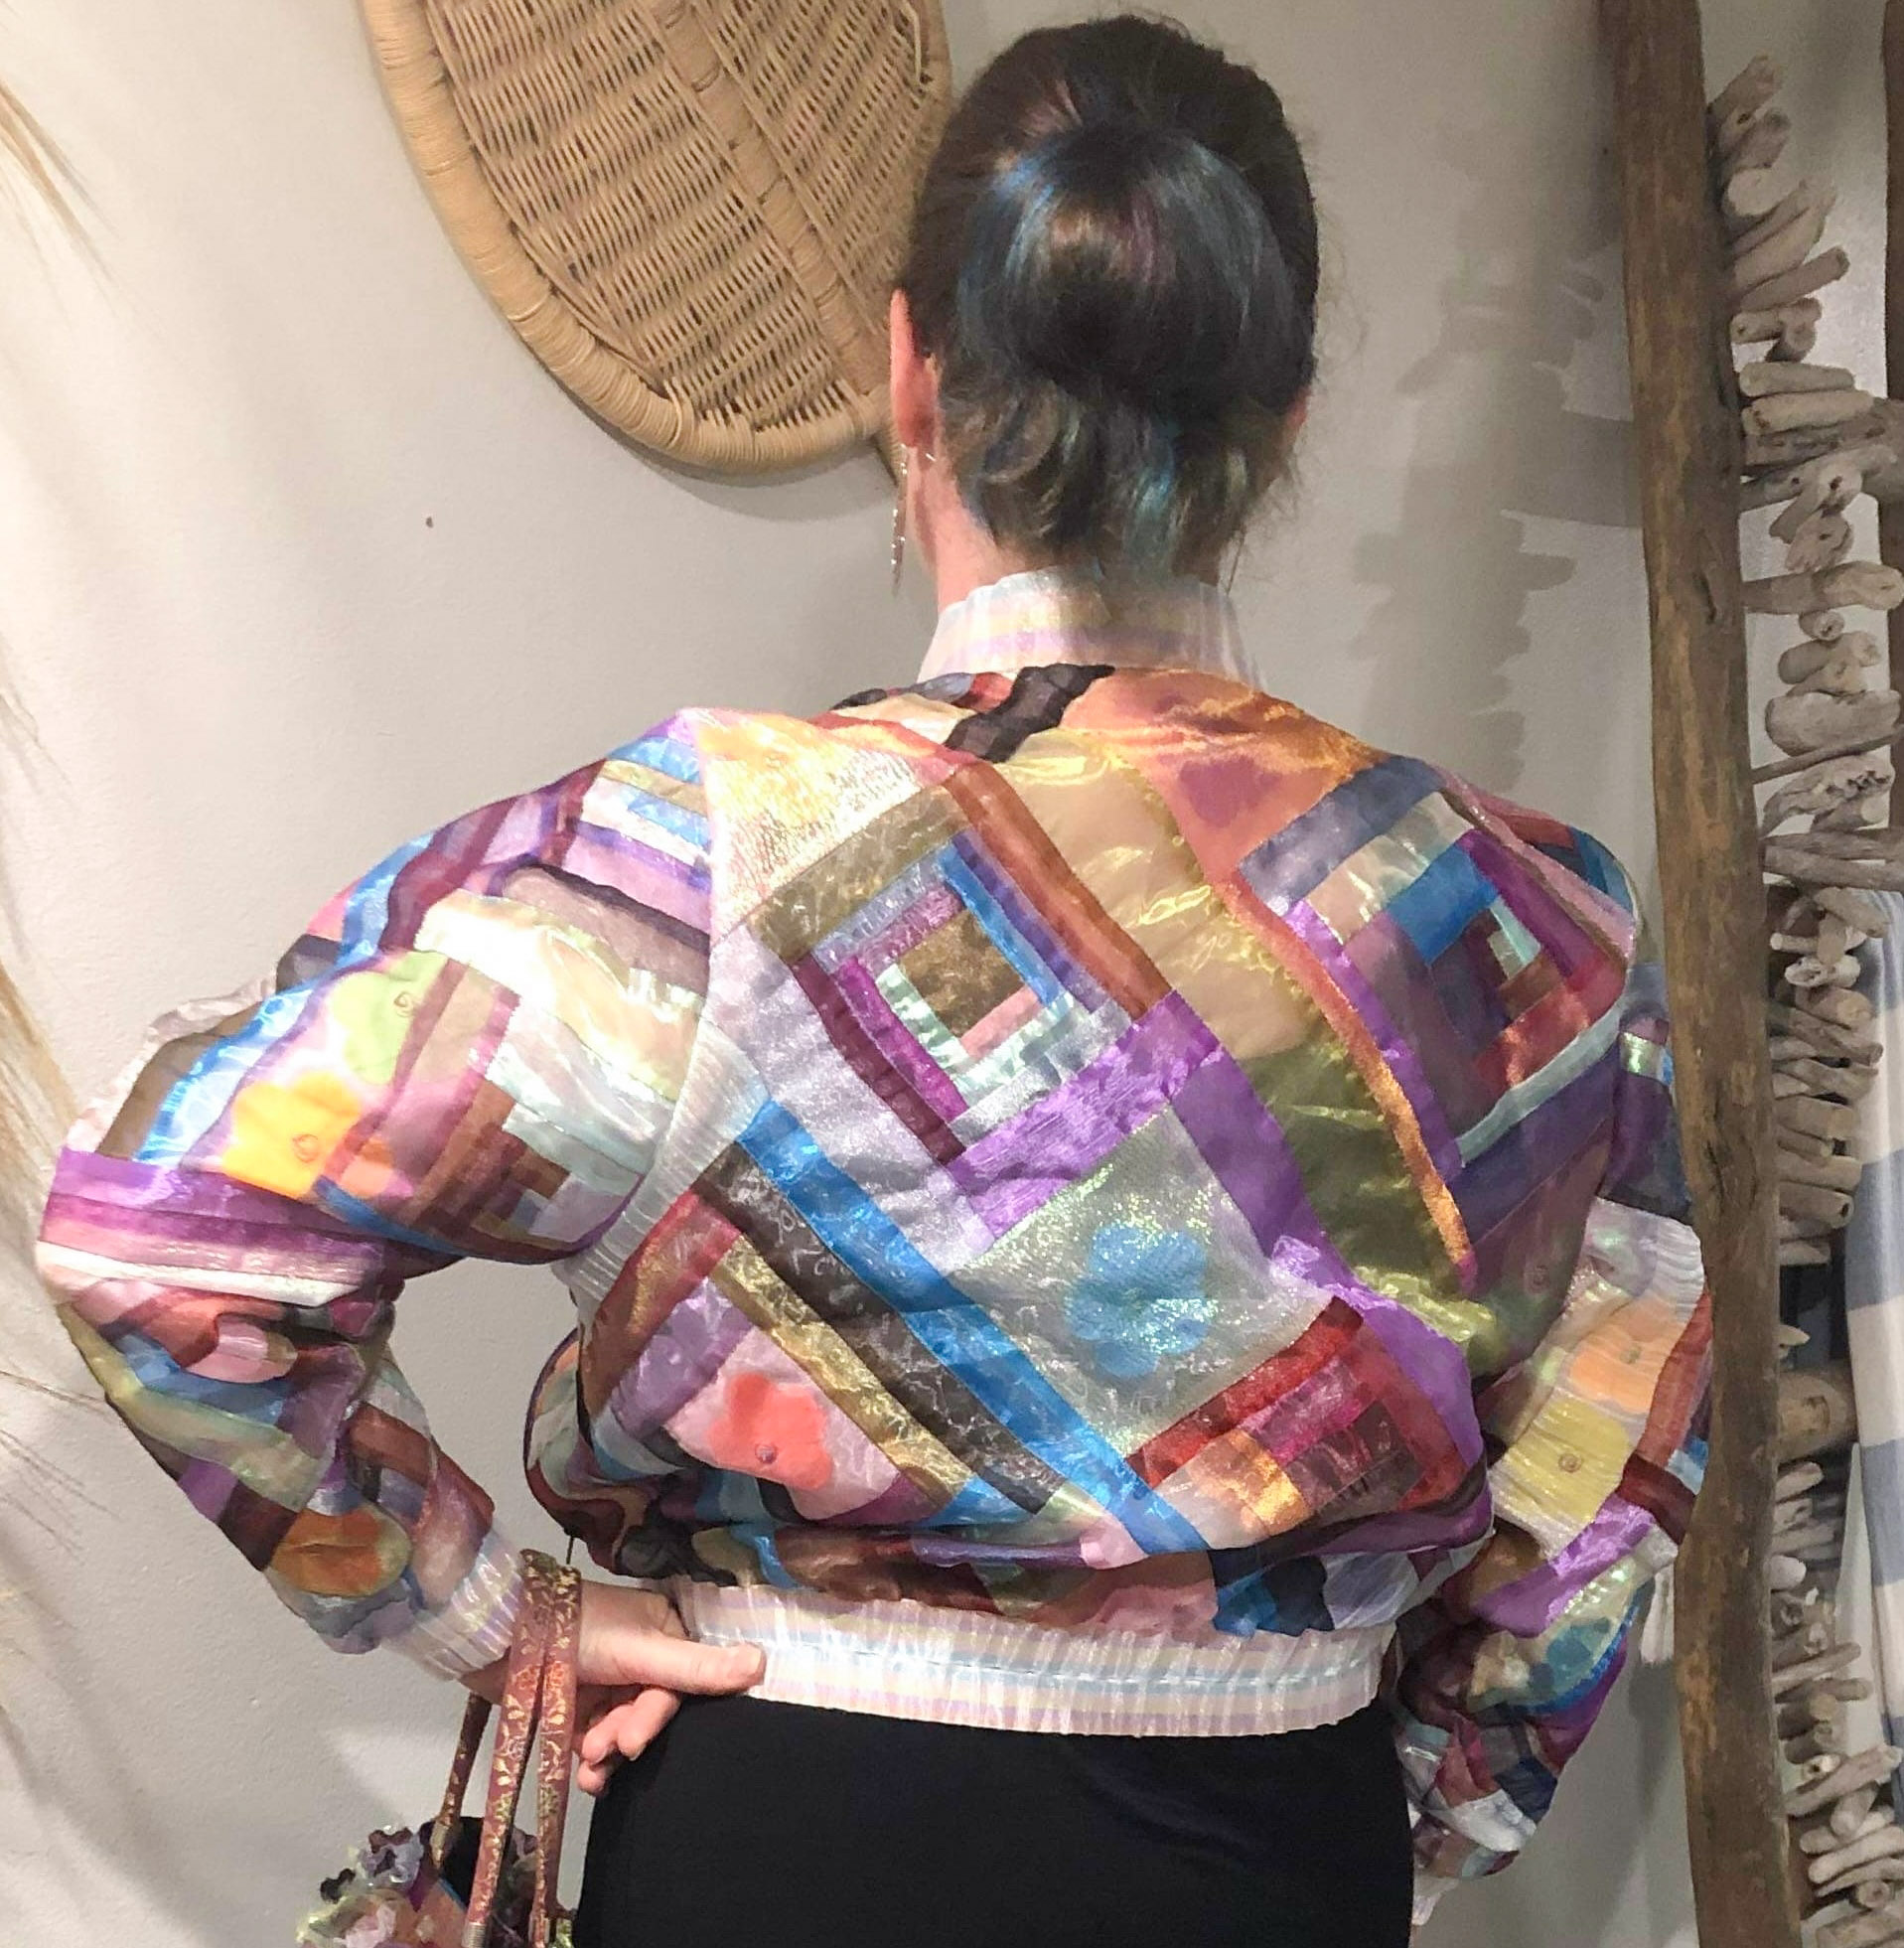
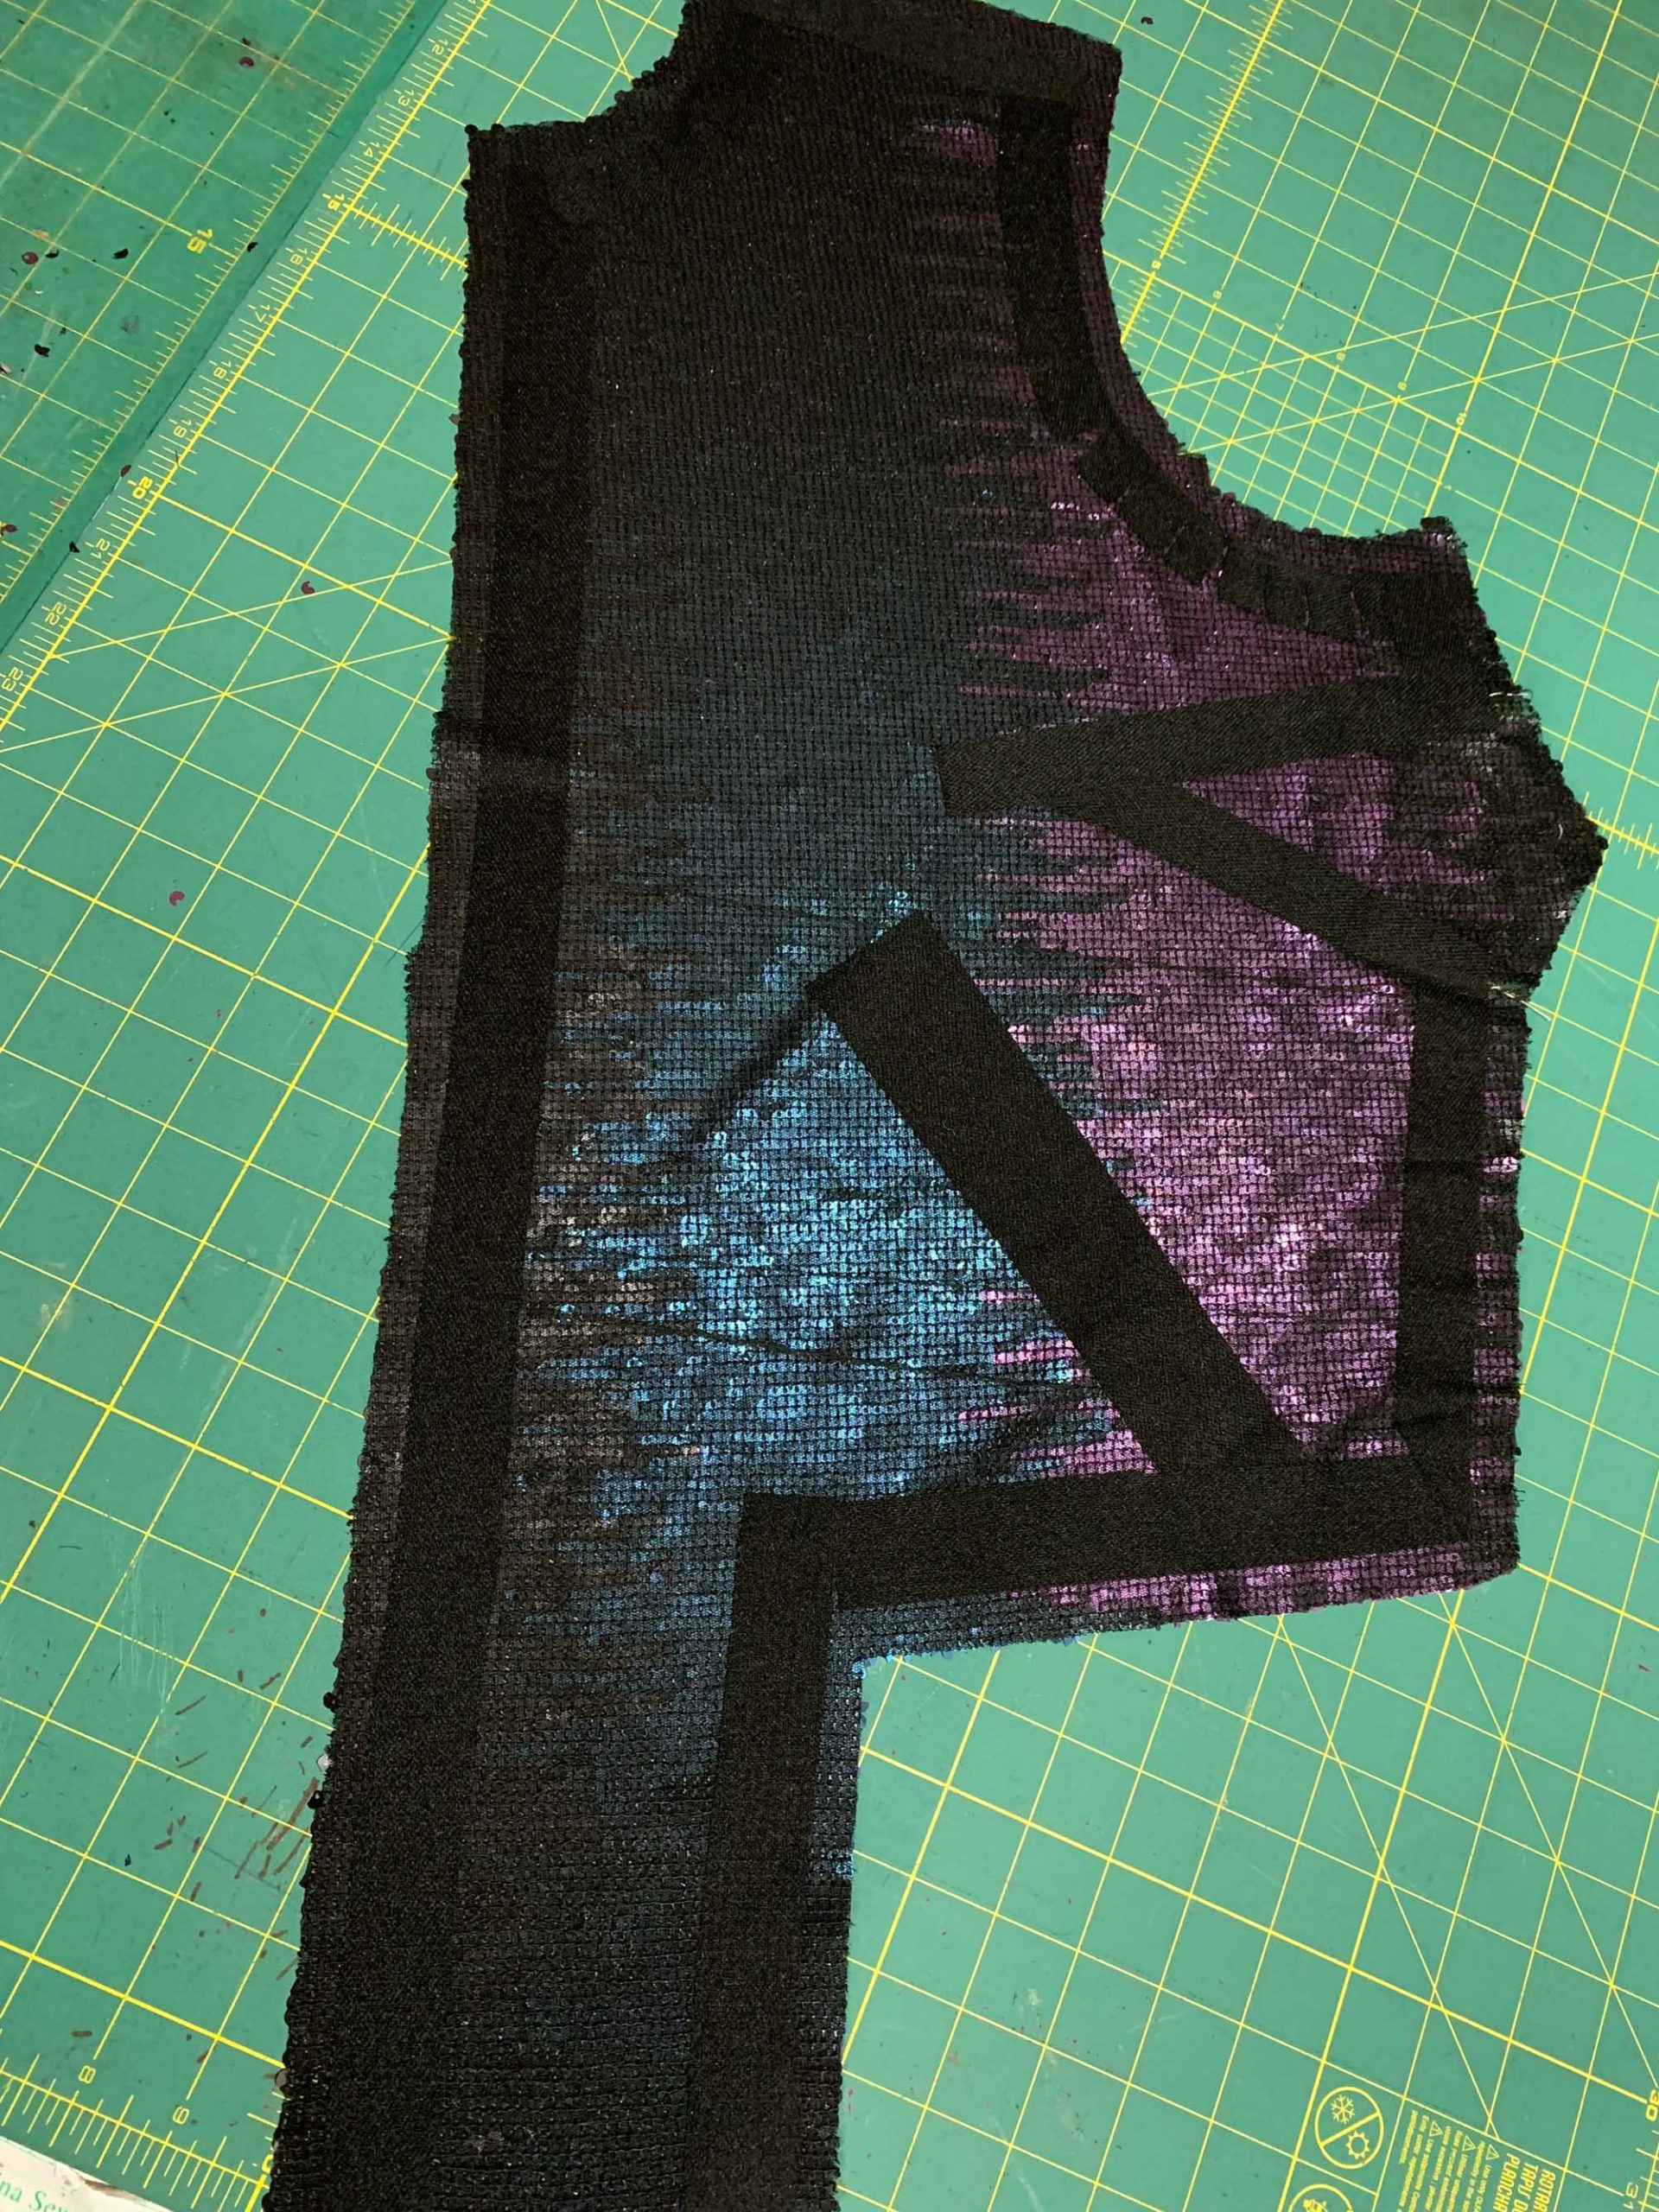
I was inspired by the Bojagi technique and combined it with patchwork for my Kimball Bomber. Because polyester organza comes in so many colours and finishes and silk organza is a more muted mat finish I went with mostly polyester organzas. I have a large stash of fabric I have been collecting since I started hand sewing my Barbies clothes at age 13, making costumes now has really increased the bling factor to my accumulated fabrics. I dug out all the different colours of organza I had and that included mirror, crystal, silk, shot, satin and crushed organza.
I cut a bunch of 1” strips and 1.5” strips and set to work building log cabin patchwork blocks. I pressed each block’s seams flat carefully as I went using a silk organza pressing cloth to protect the polyester organza, as it will melt easily.
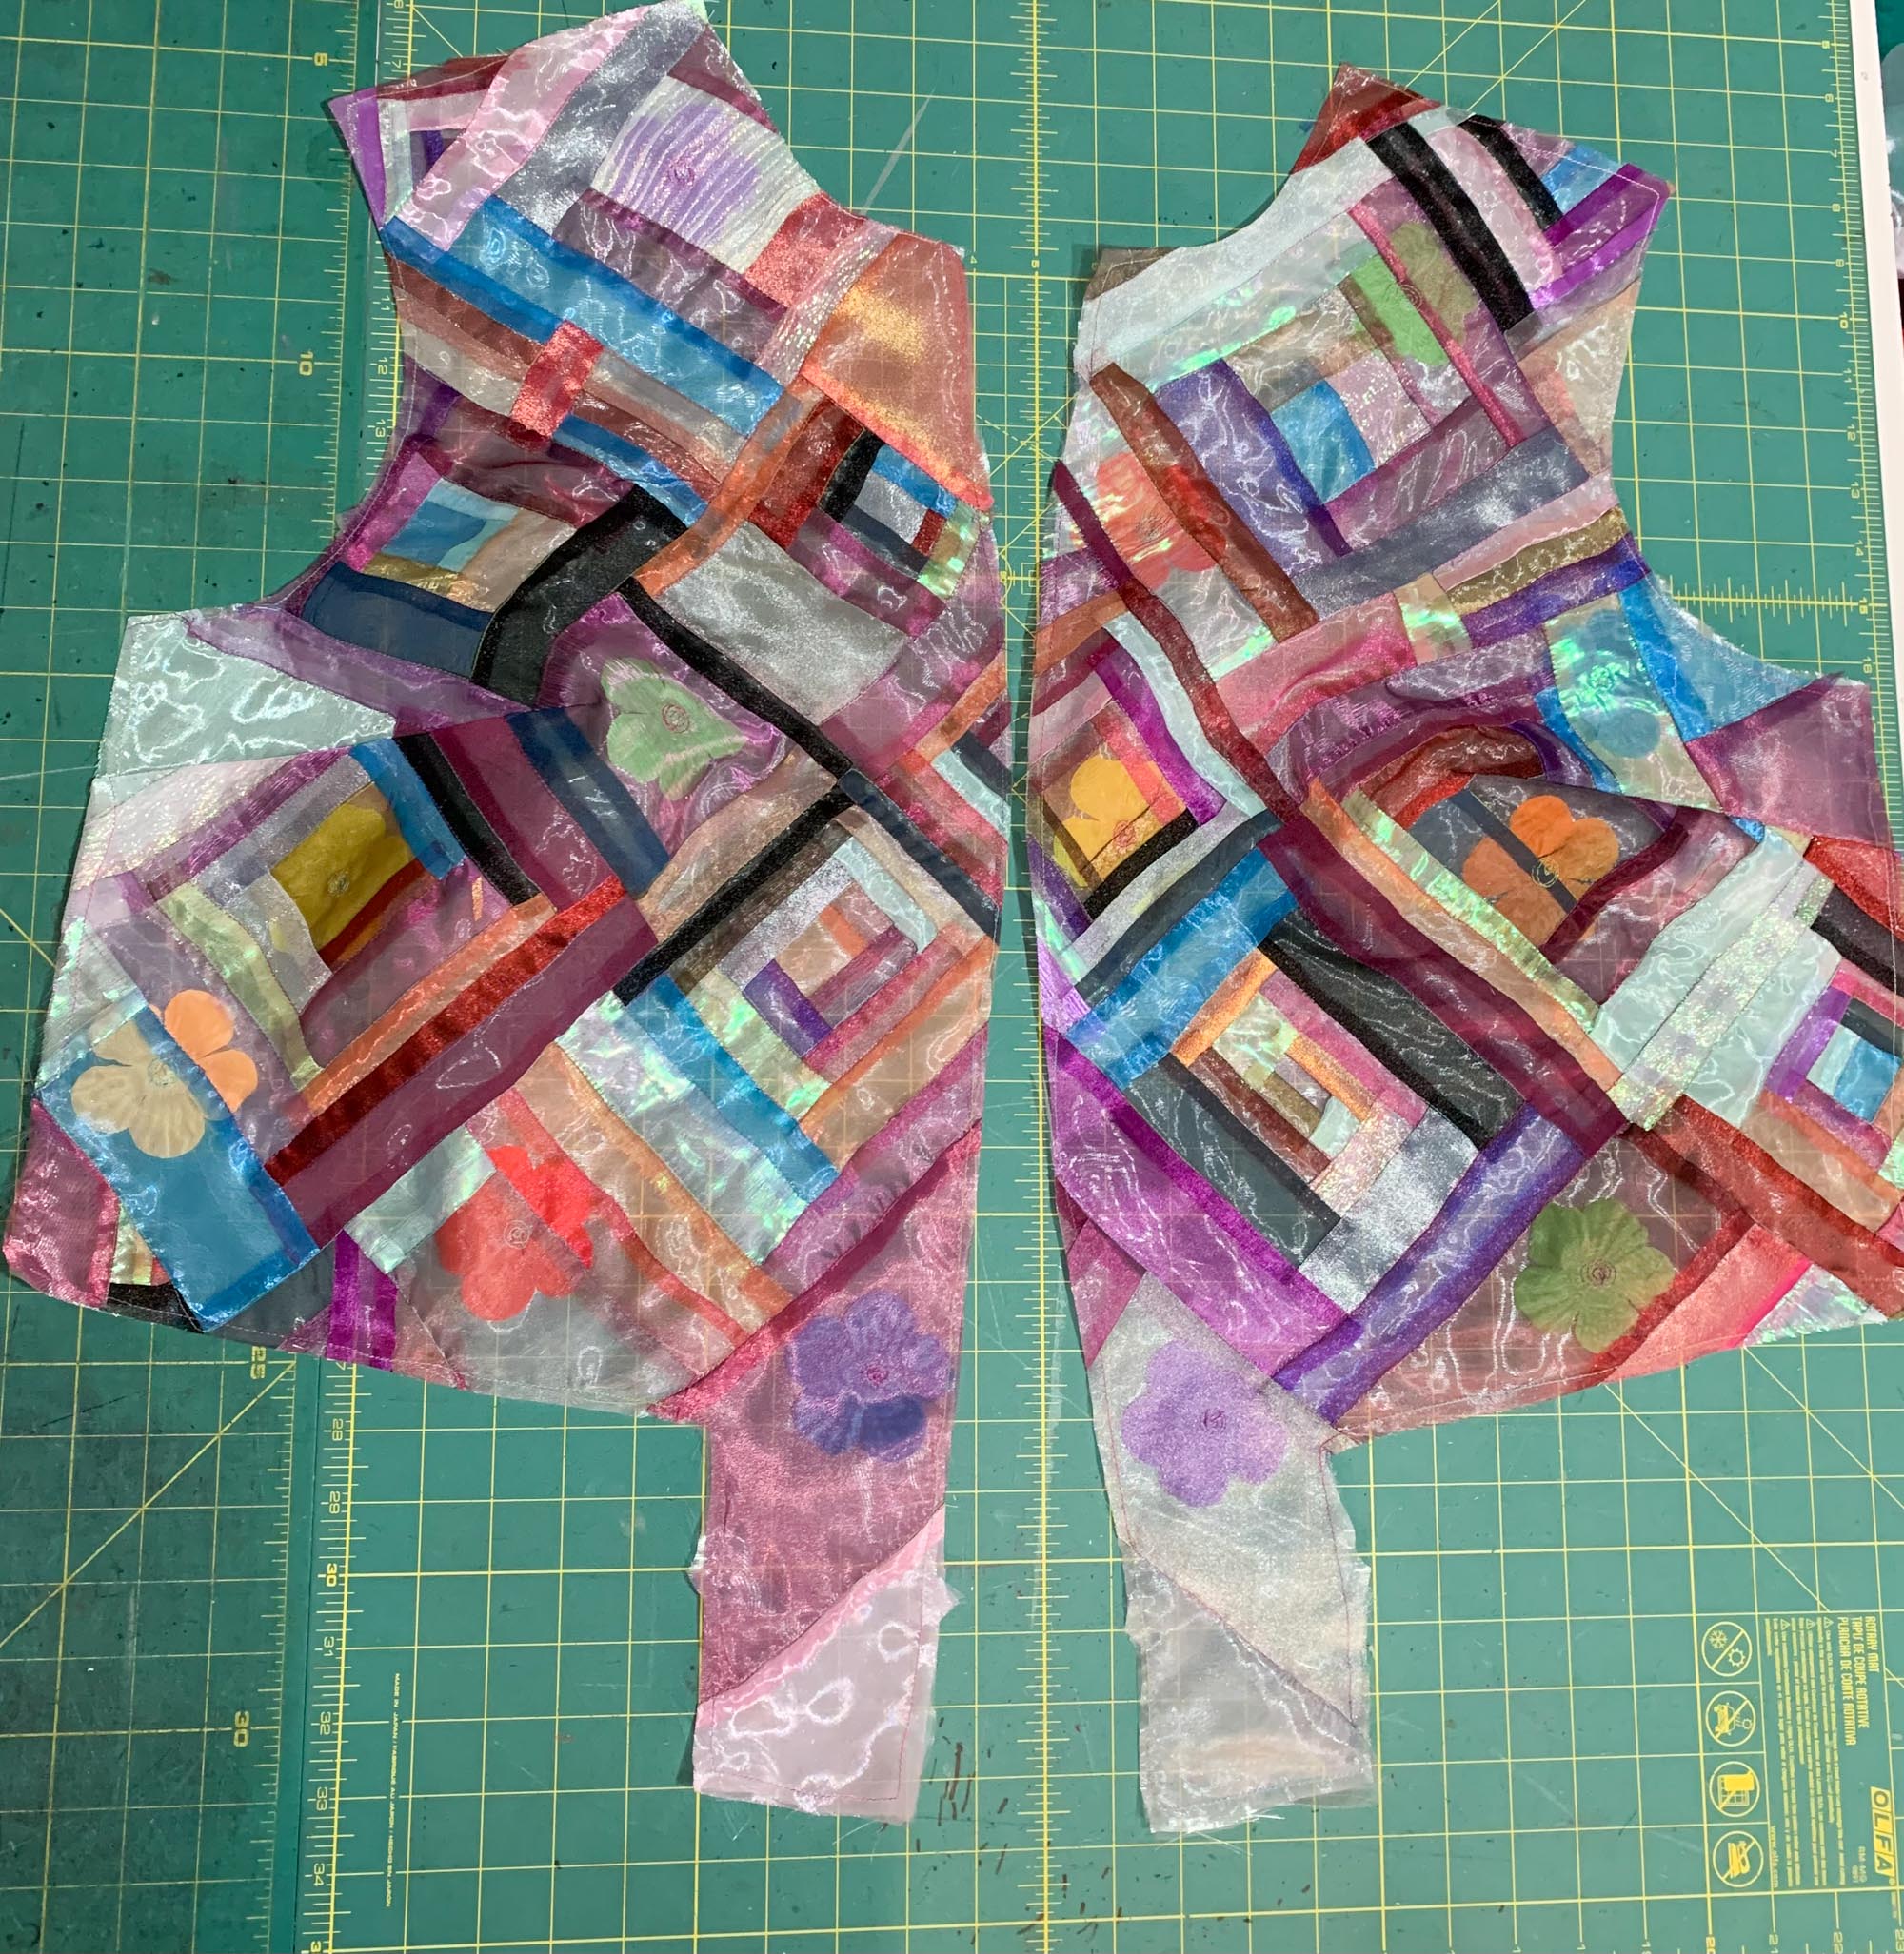
Once I had a selection of different colour combination and sizes of log cabin, I laid them over the back pattern piece.
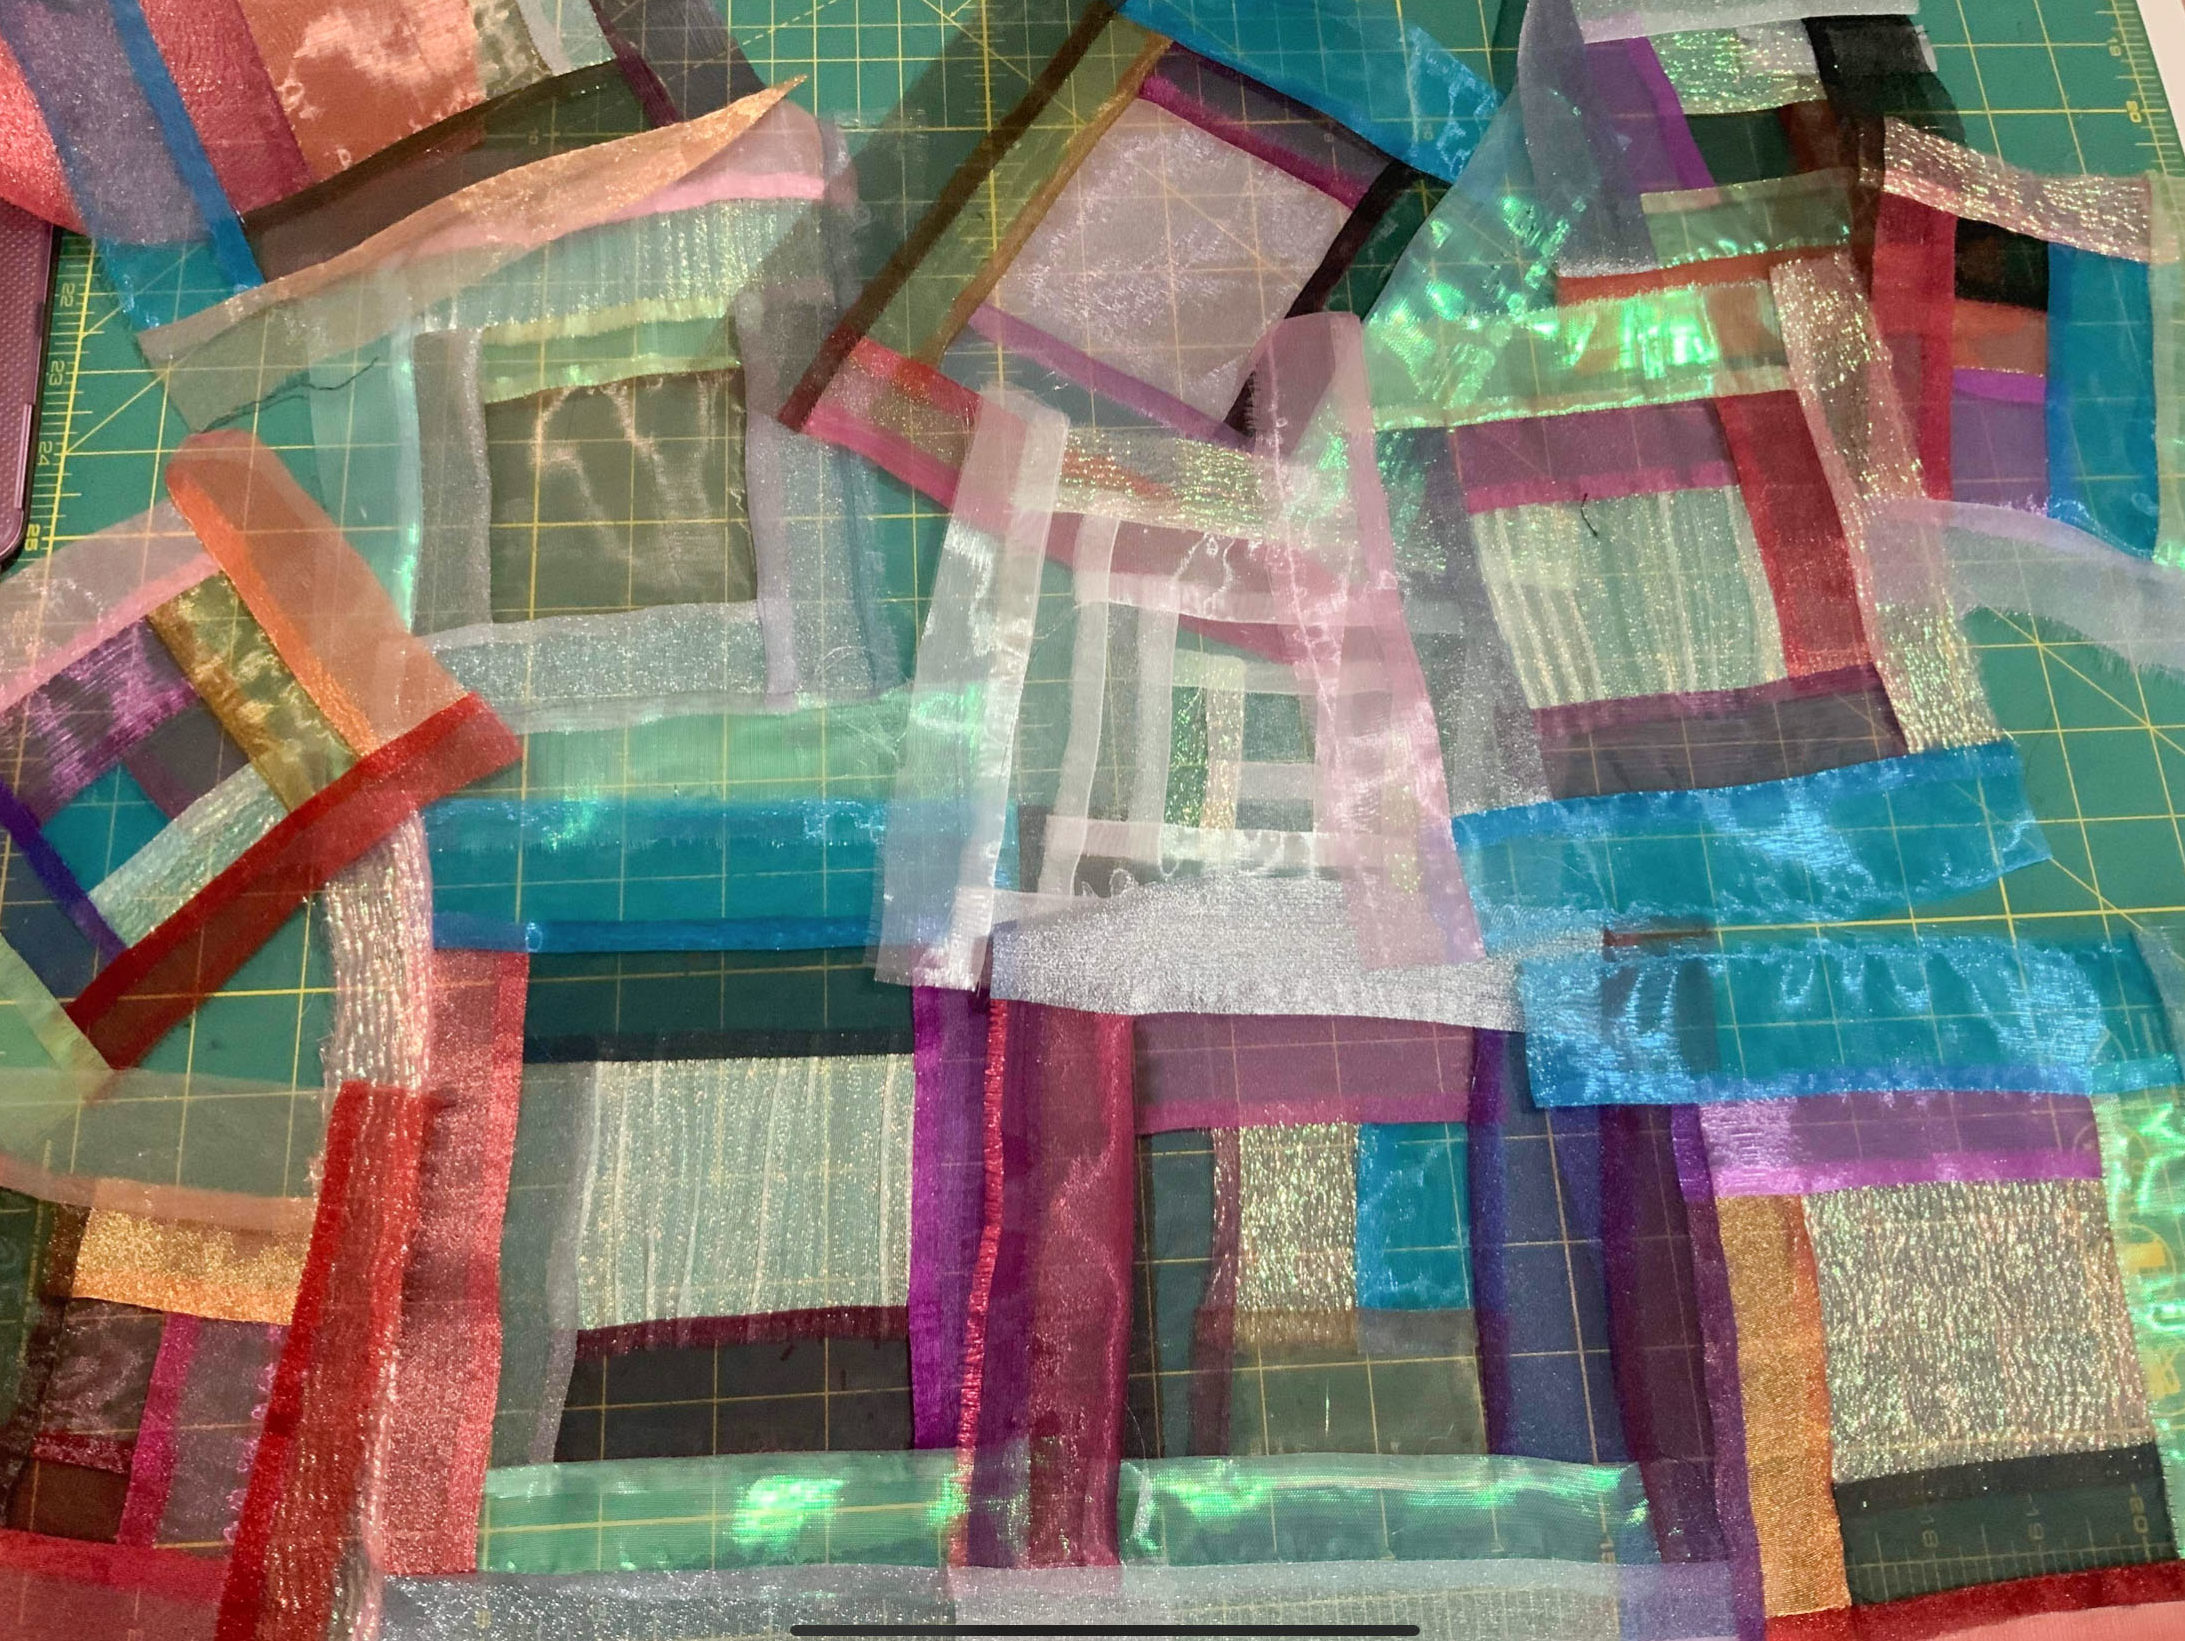
I built my patchwork fabric directly over each traced of pattern shape. I added strips of organza between the blocks to build up the fabric.
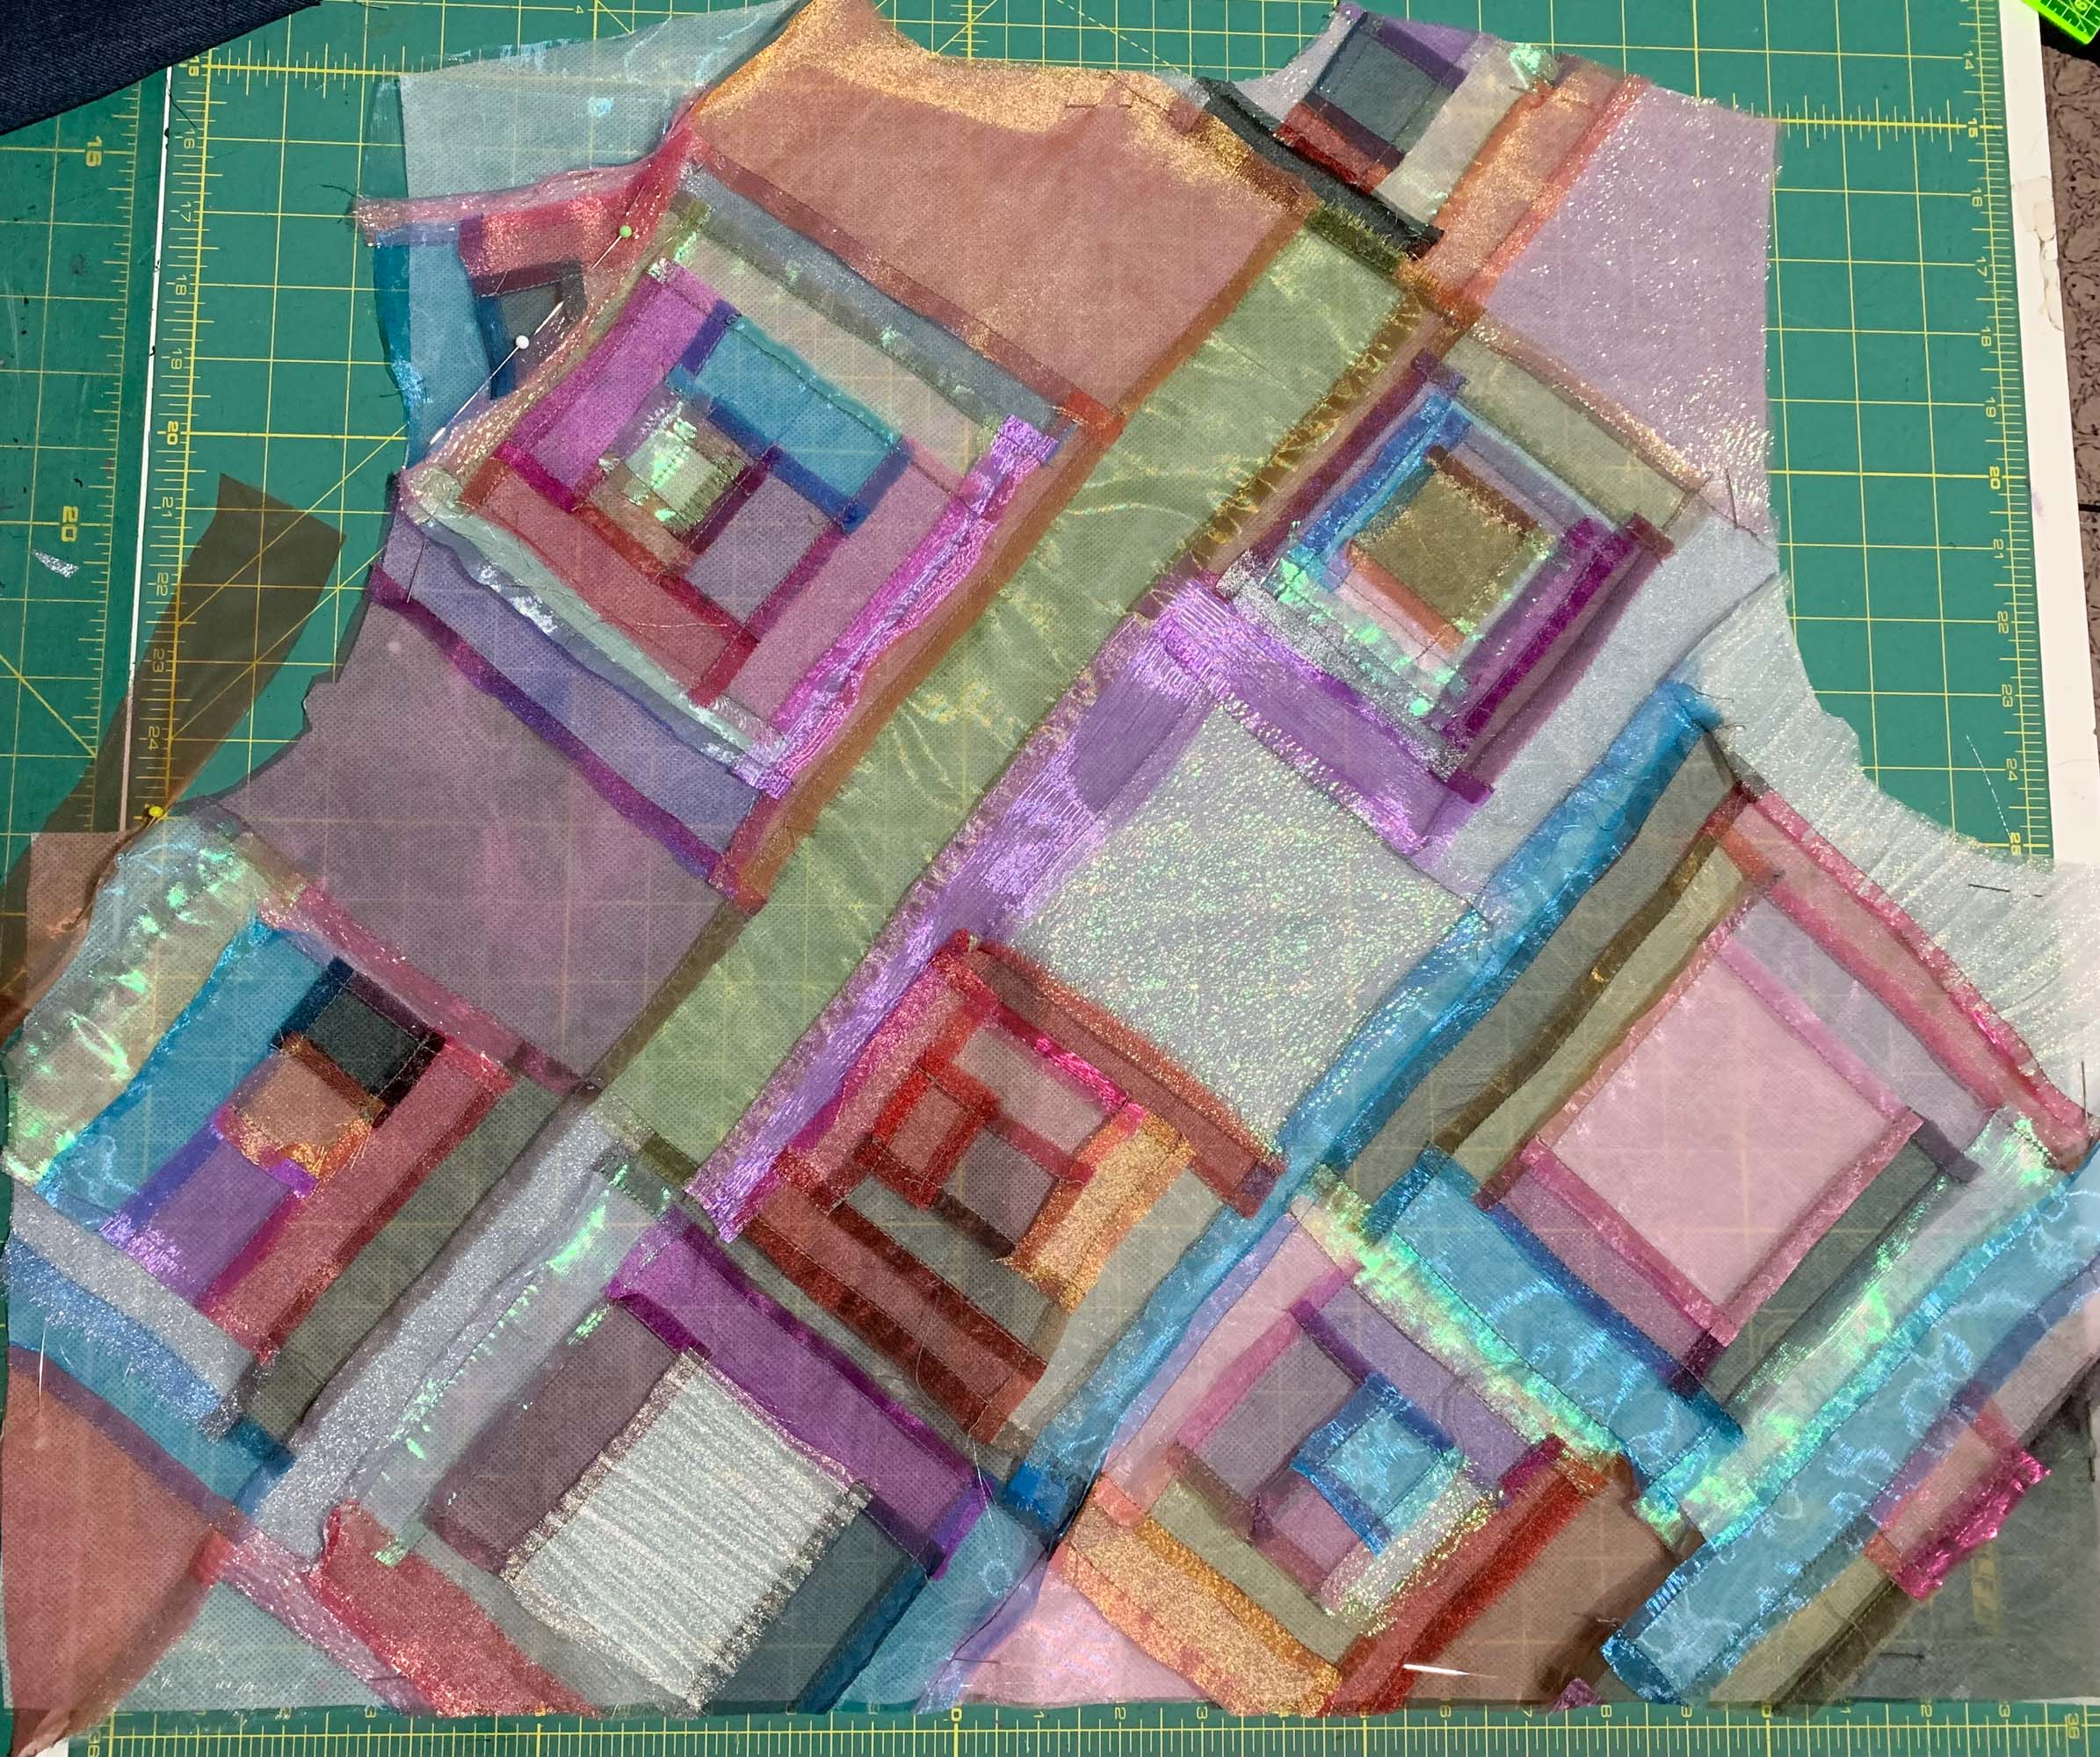
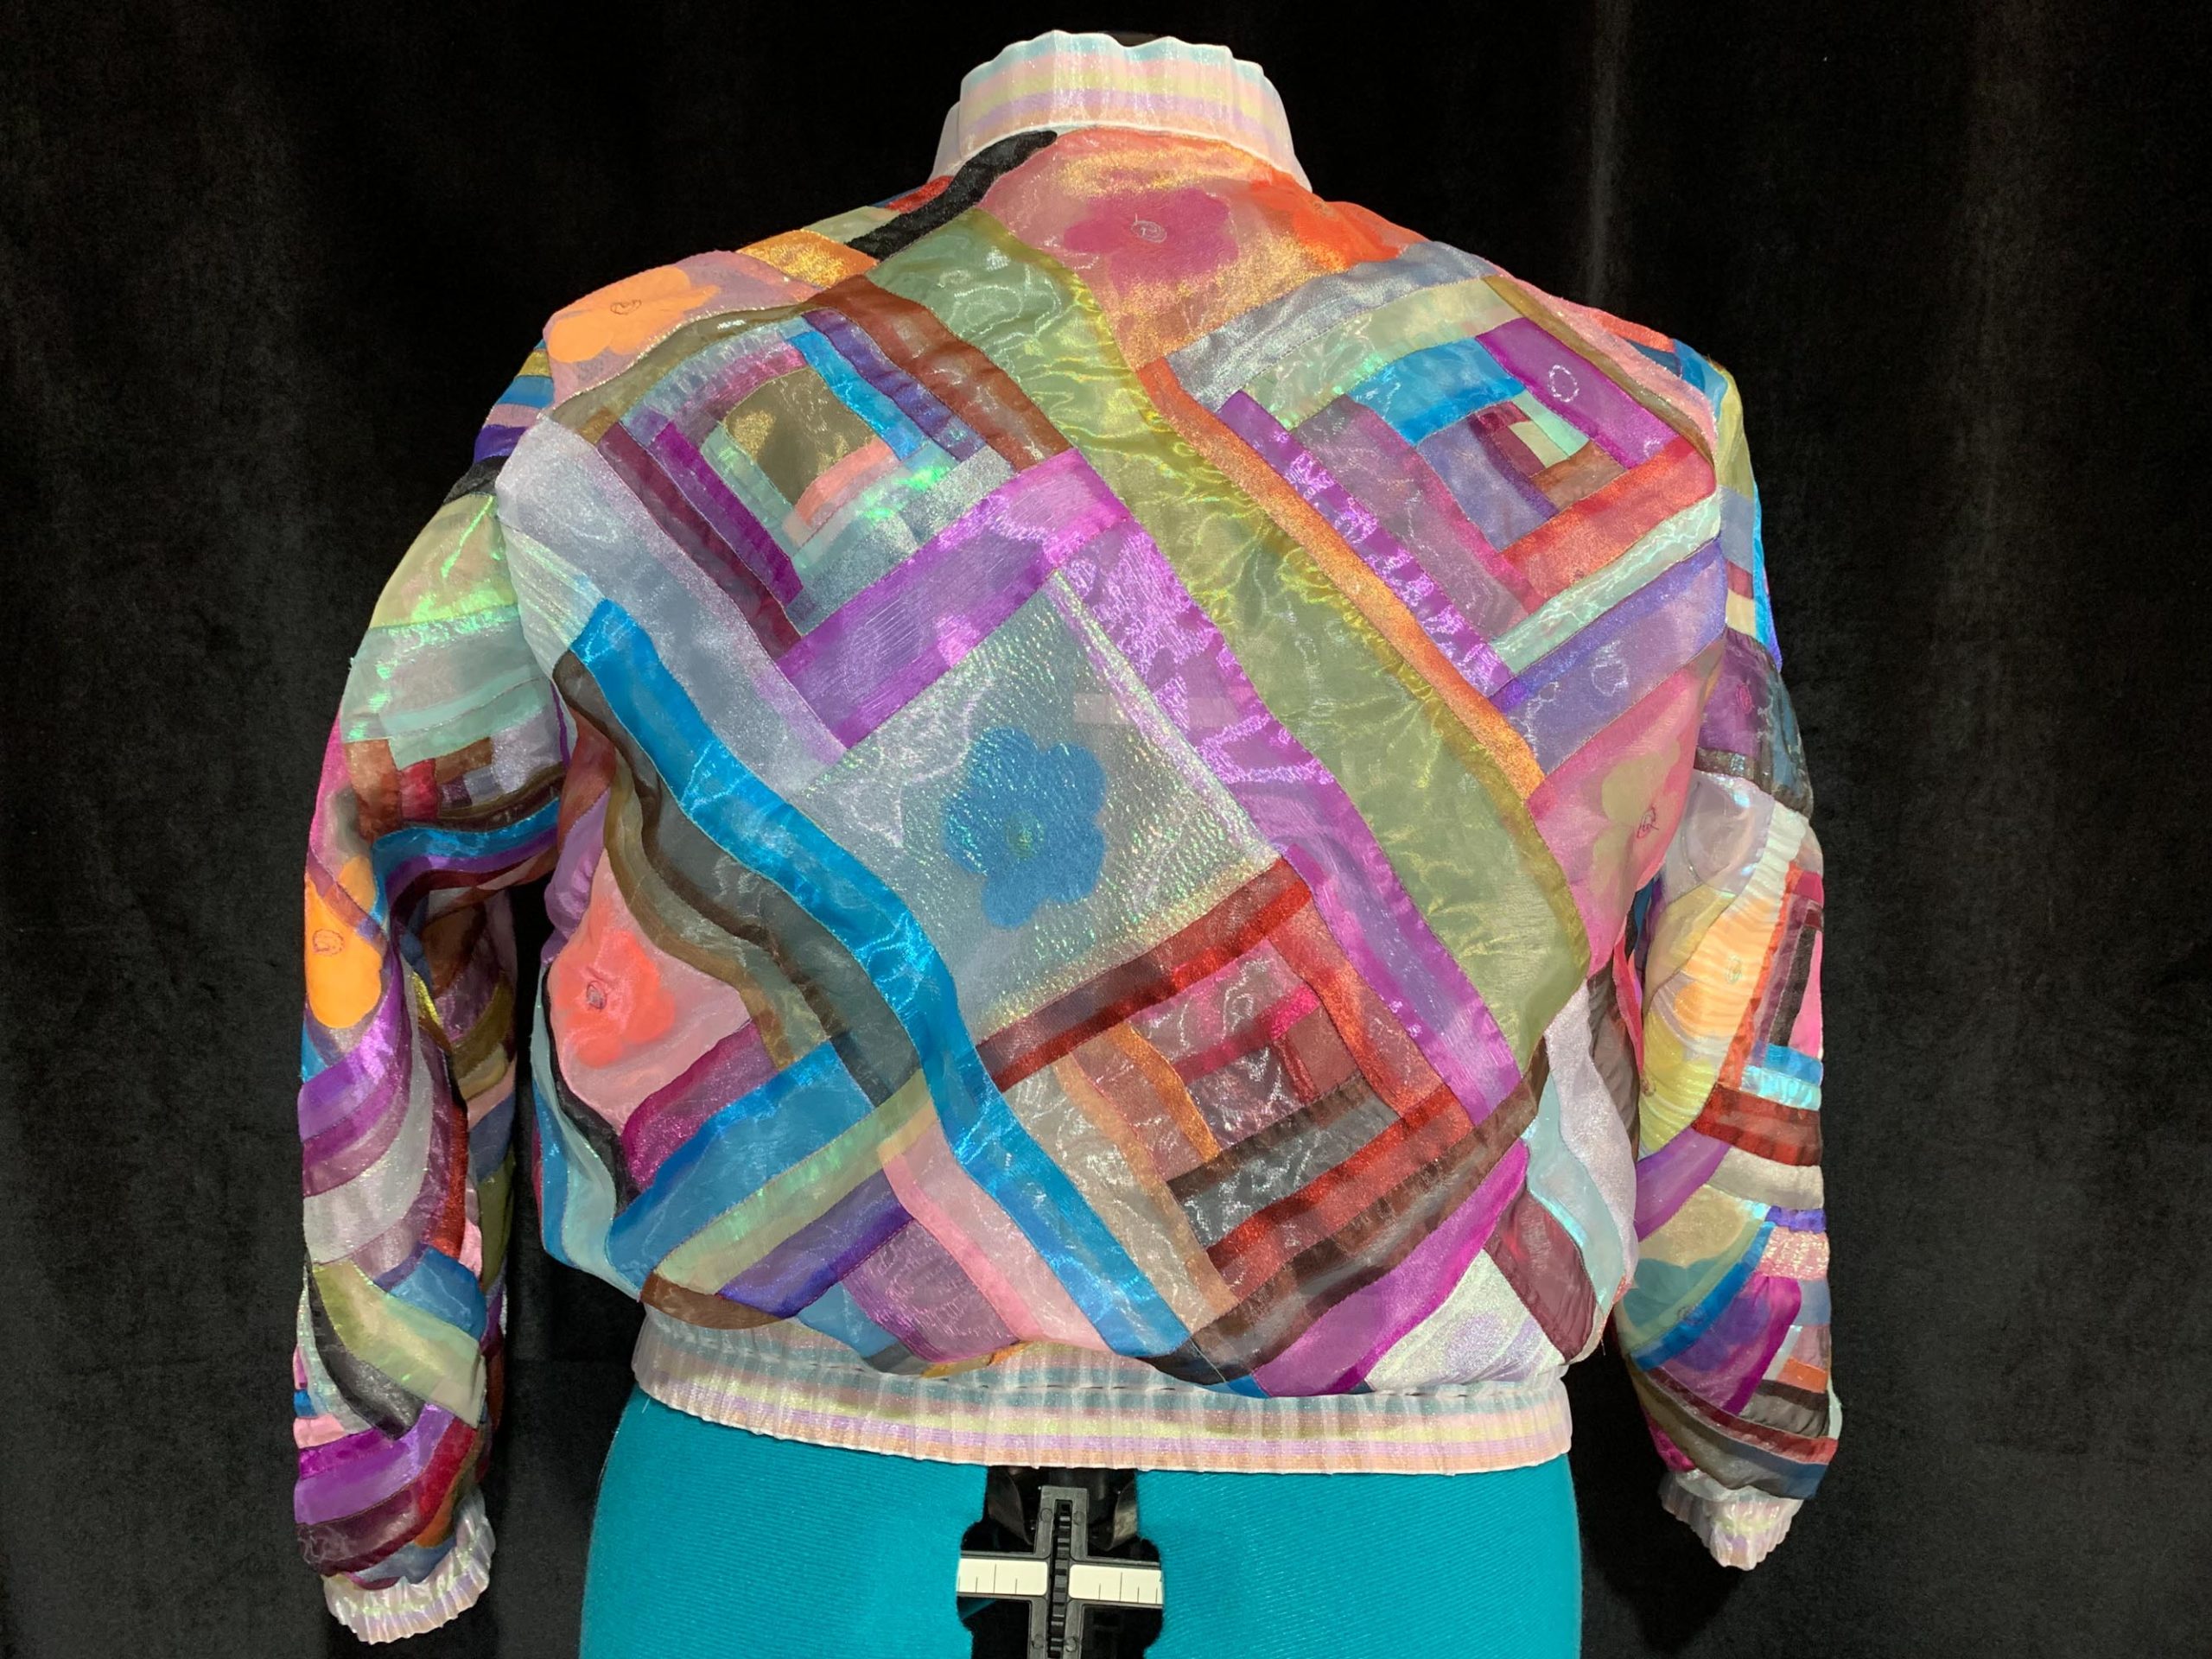
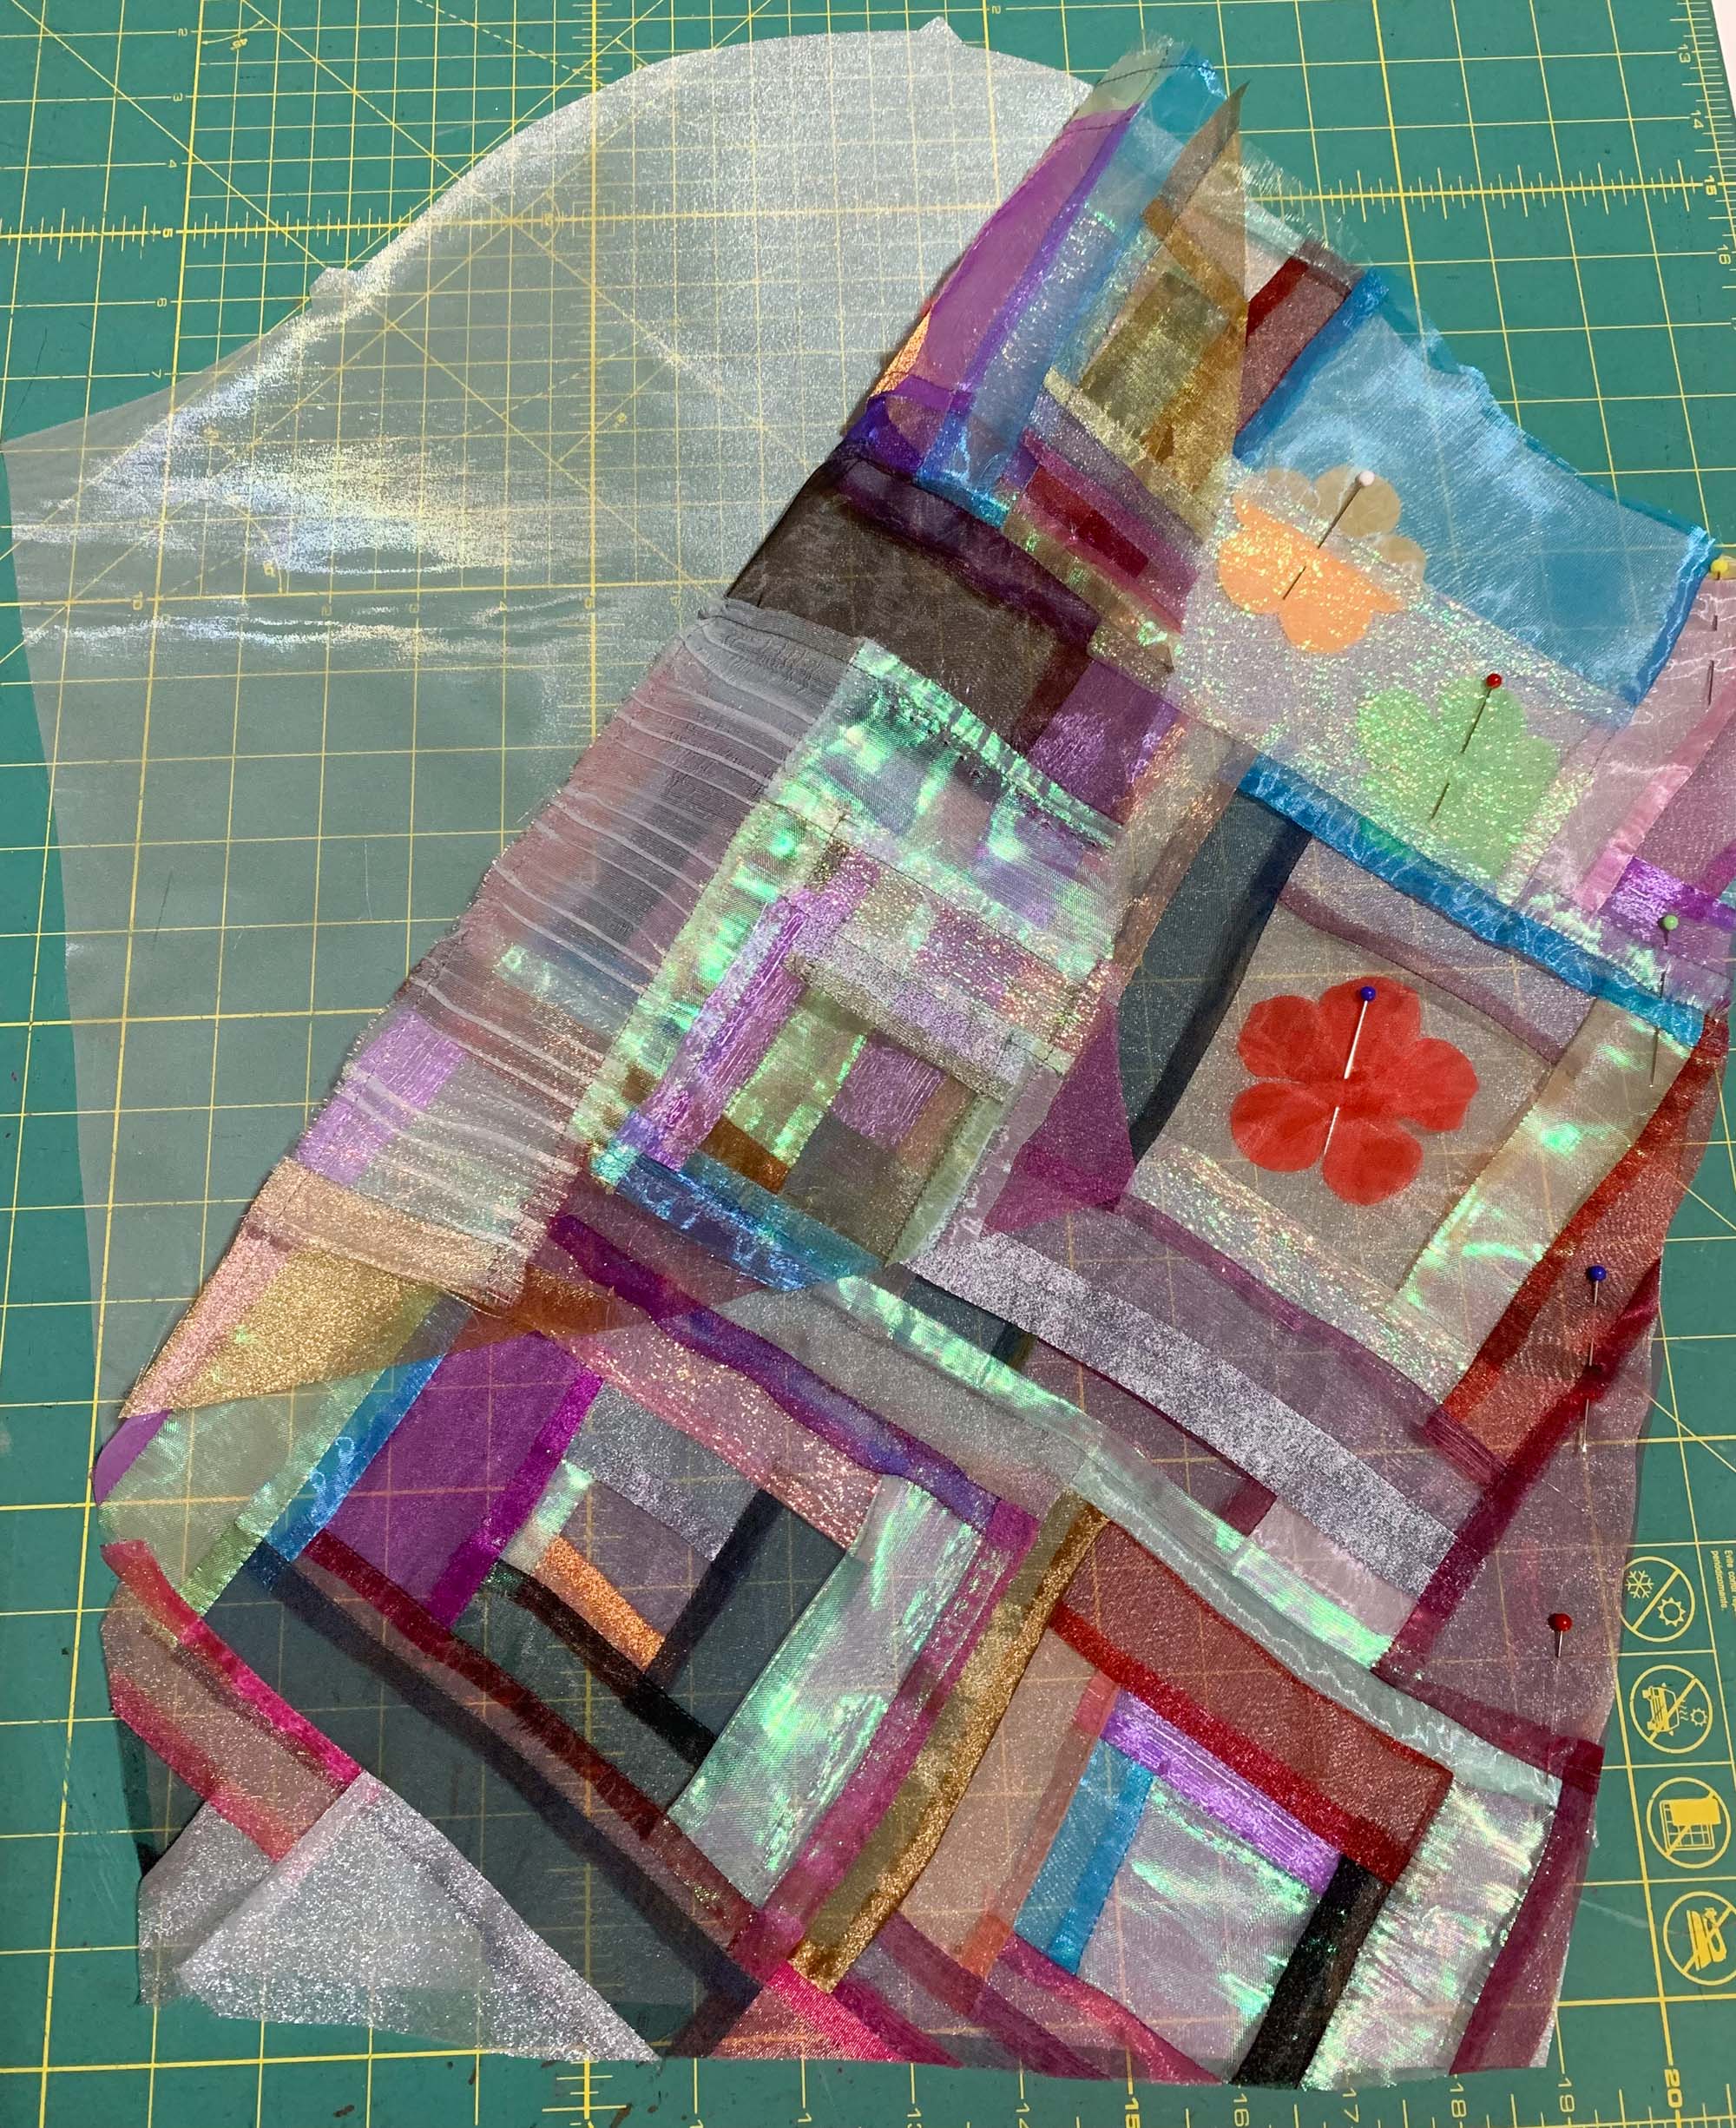
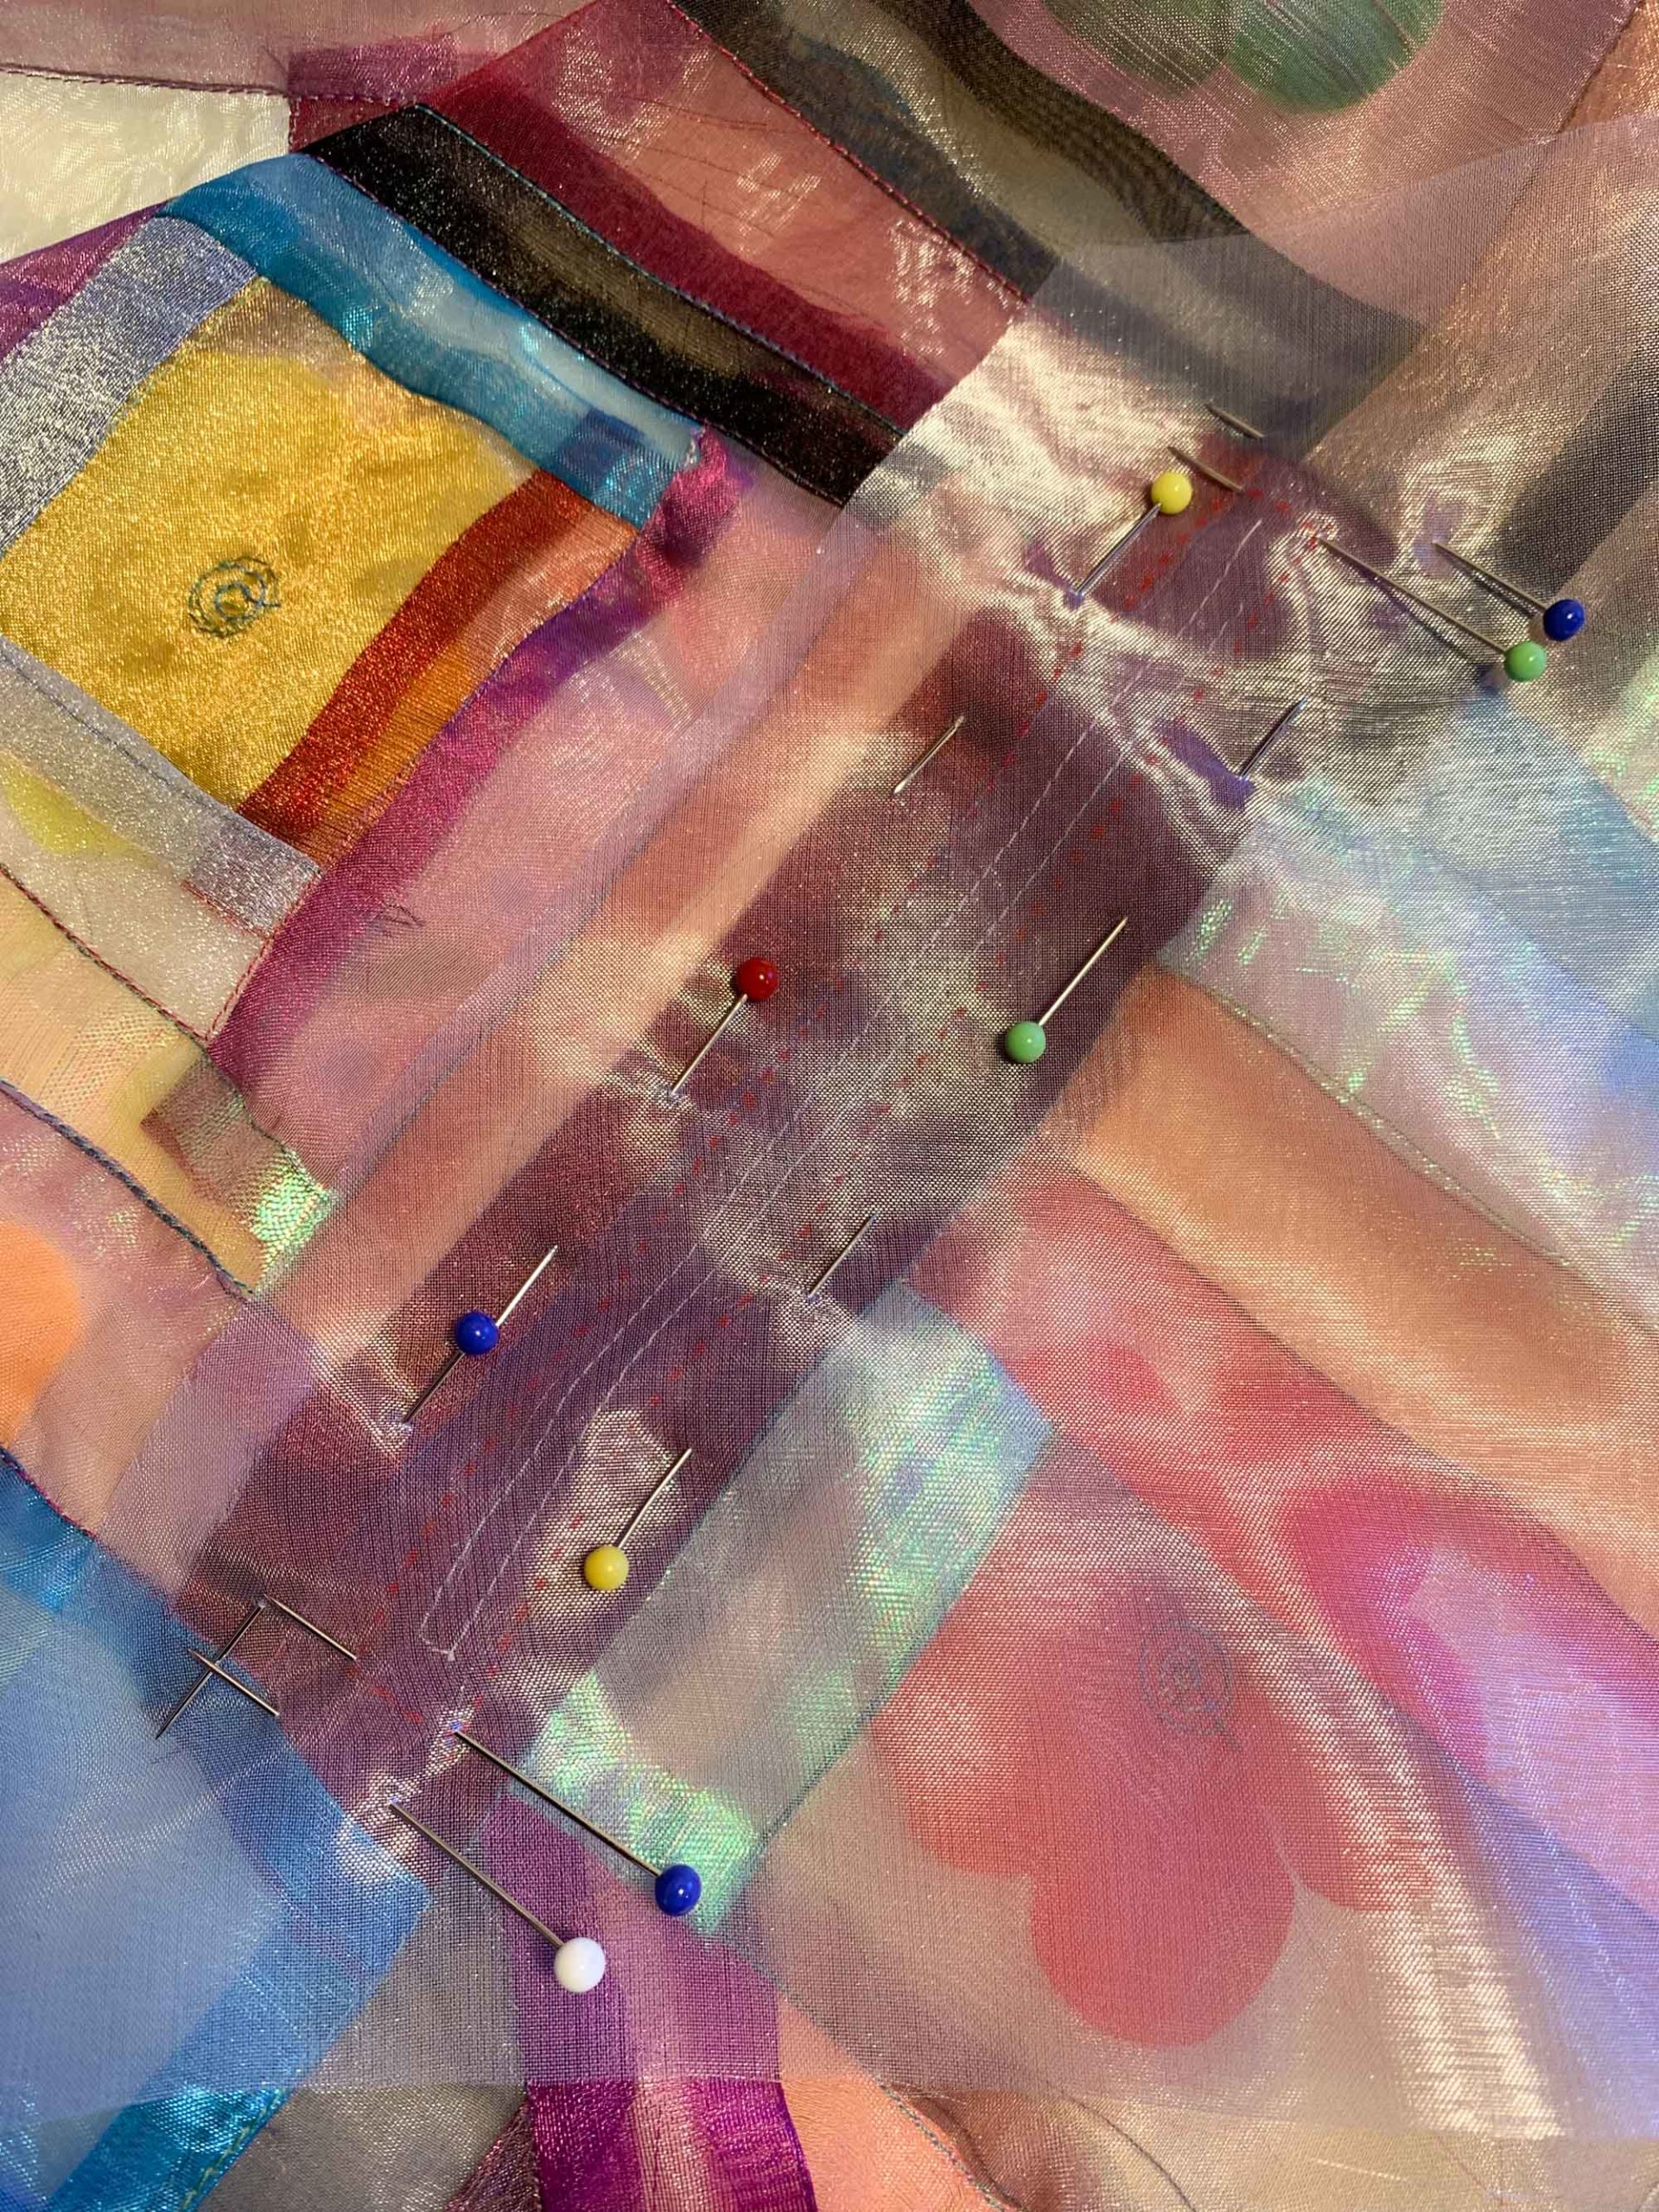
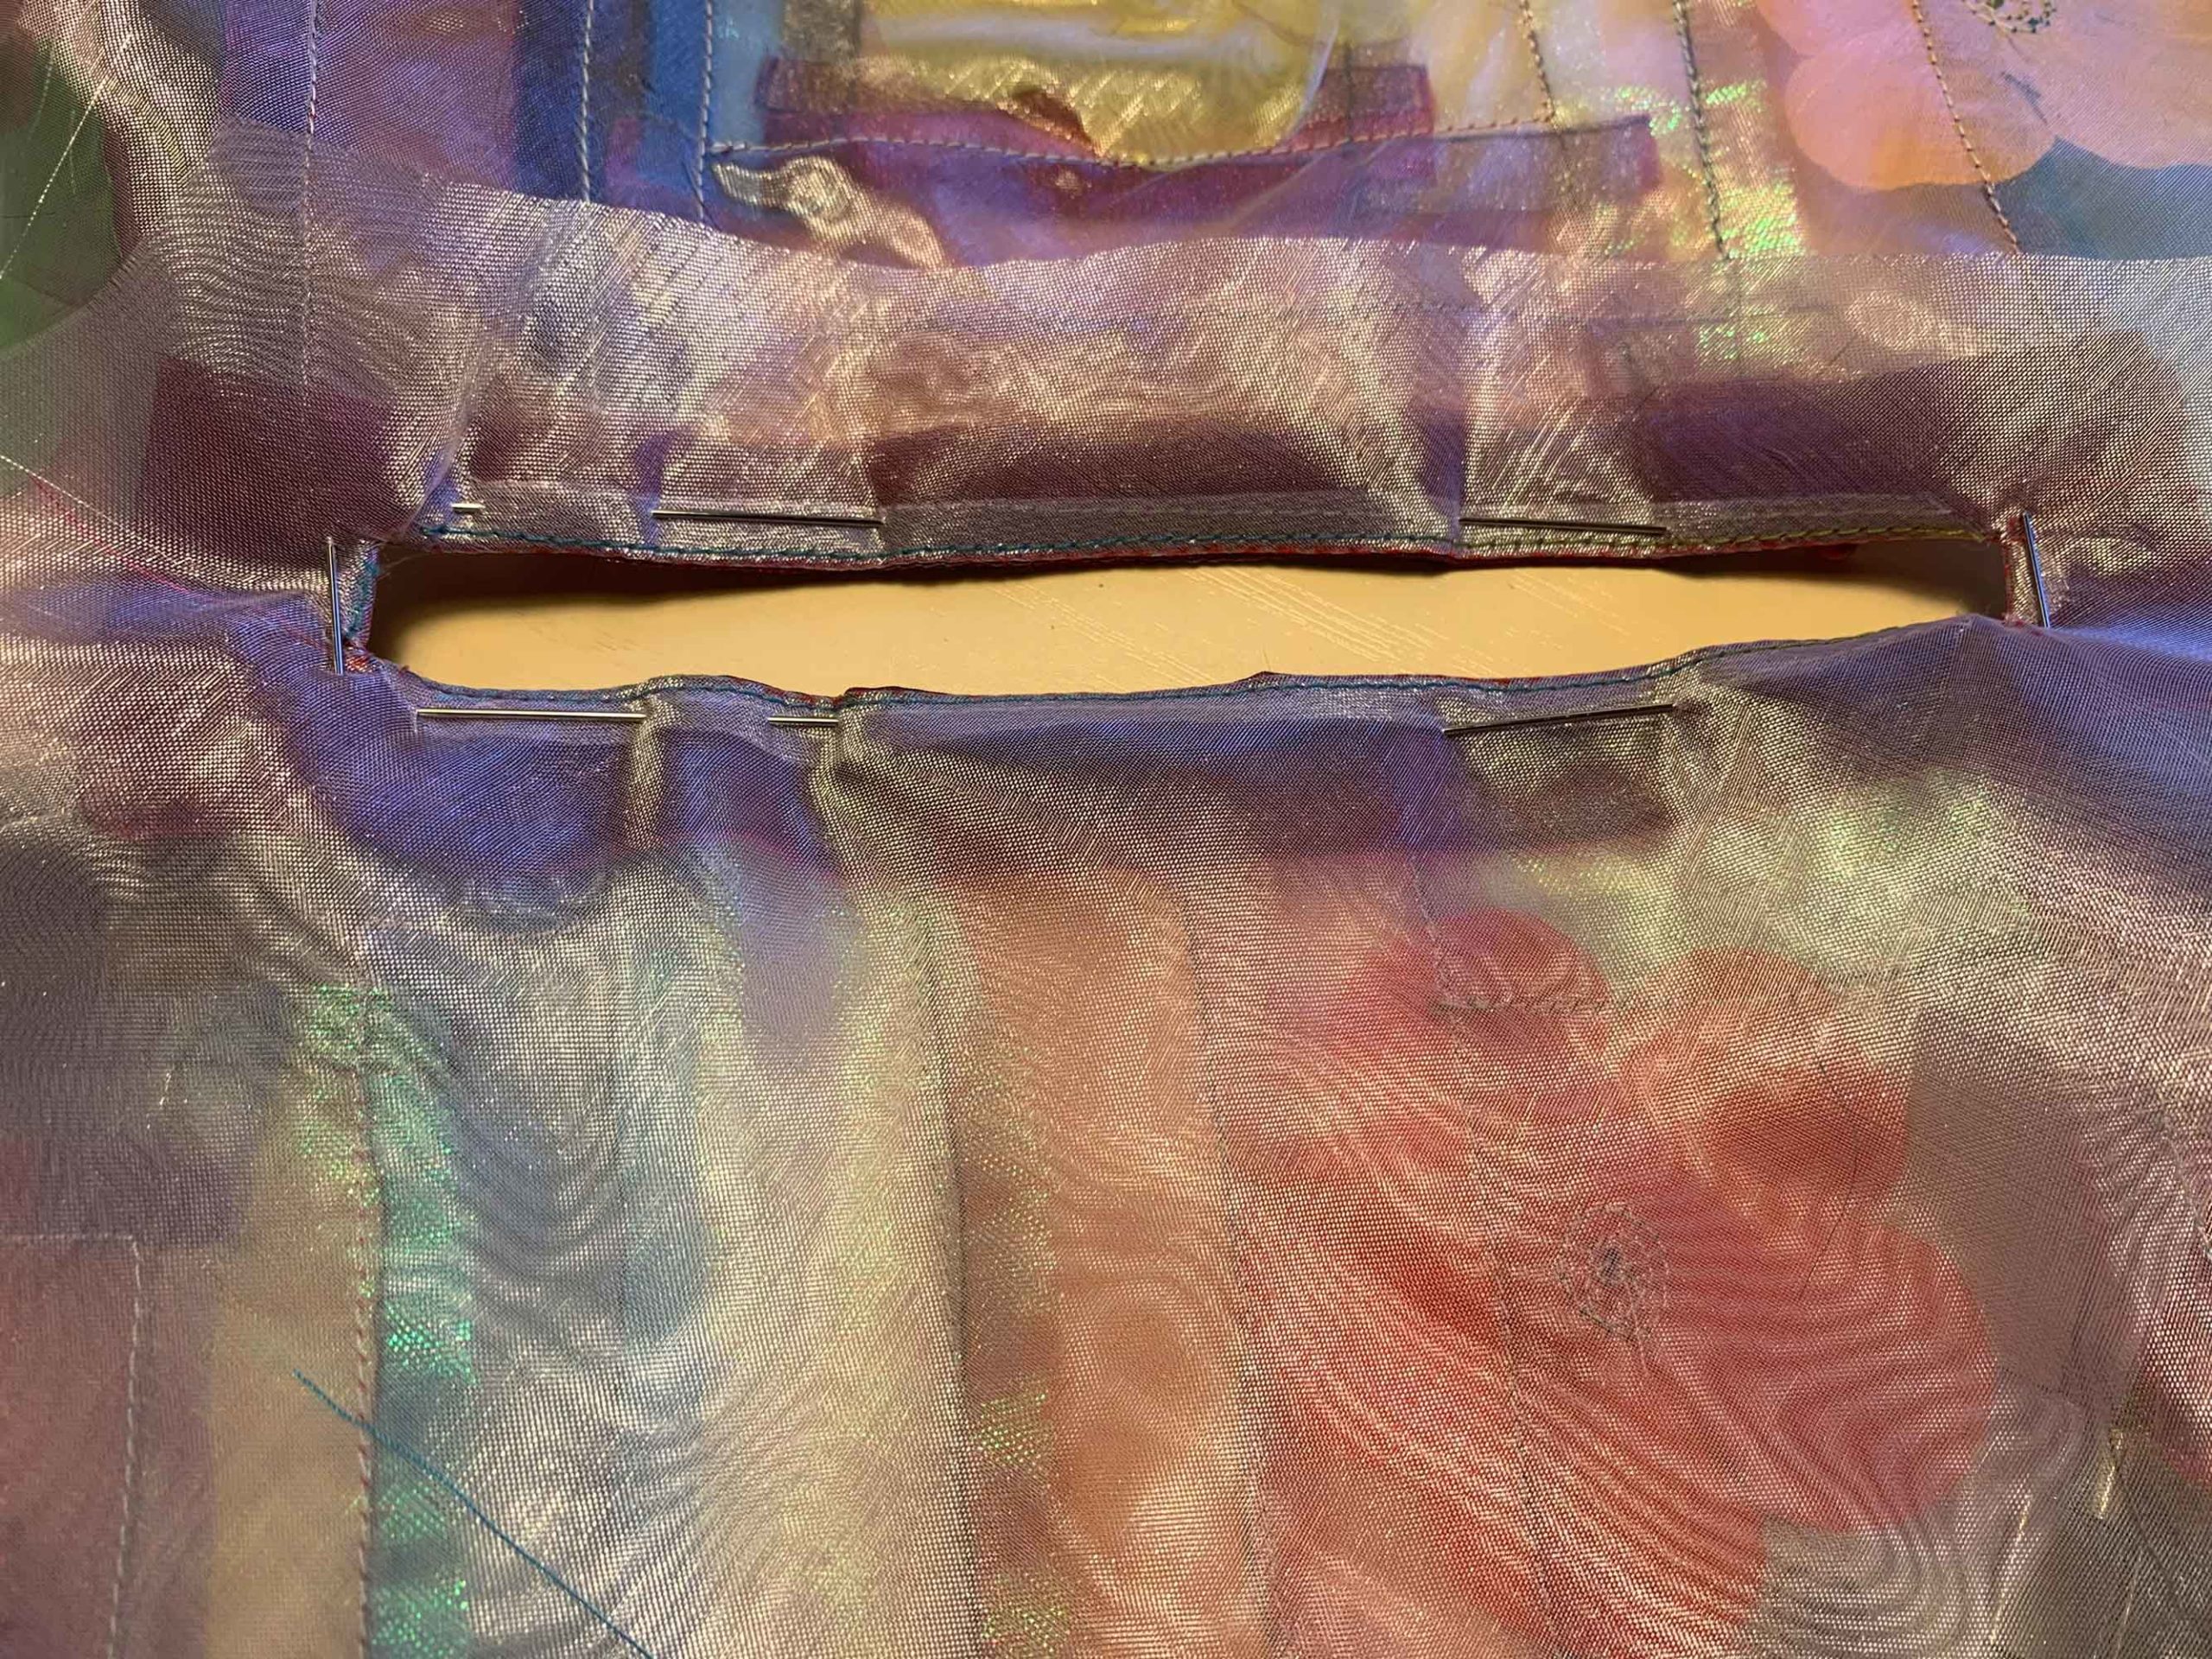
I chose to lay my pieces on an angle because it was a more pleasing design. This meant that the finished fabric was on the bias. That left me with the problem that the fabric would be stretchy where the grainline should be. I fixed this issue by cutting out each pattern piece in plain white mirror organza. I laid my patchwork piece over the mirror organza and pined the layers together just like a traditional quilt but without the batting between. I was careful not to stretch out the shapes when pinning.
At this point, my brain said how about trapping some faux flower petals between the layers for another element. I had a dress-up lei necklace so I used some of the petals and placed them strategically in my fabric, avoiding the bust point area!
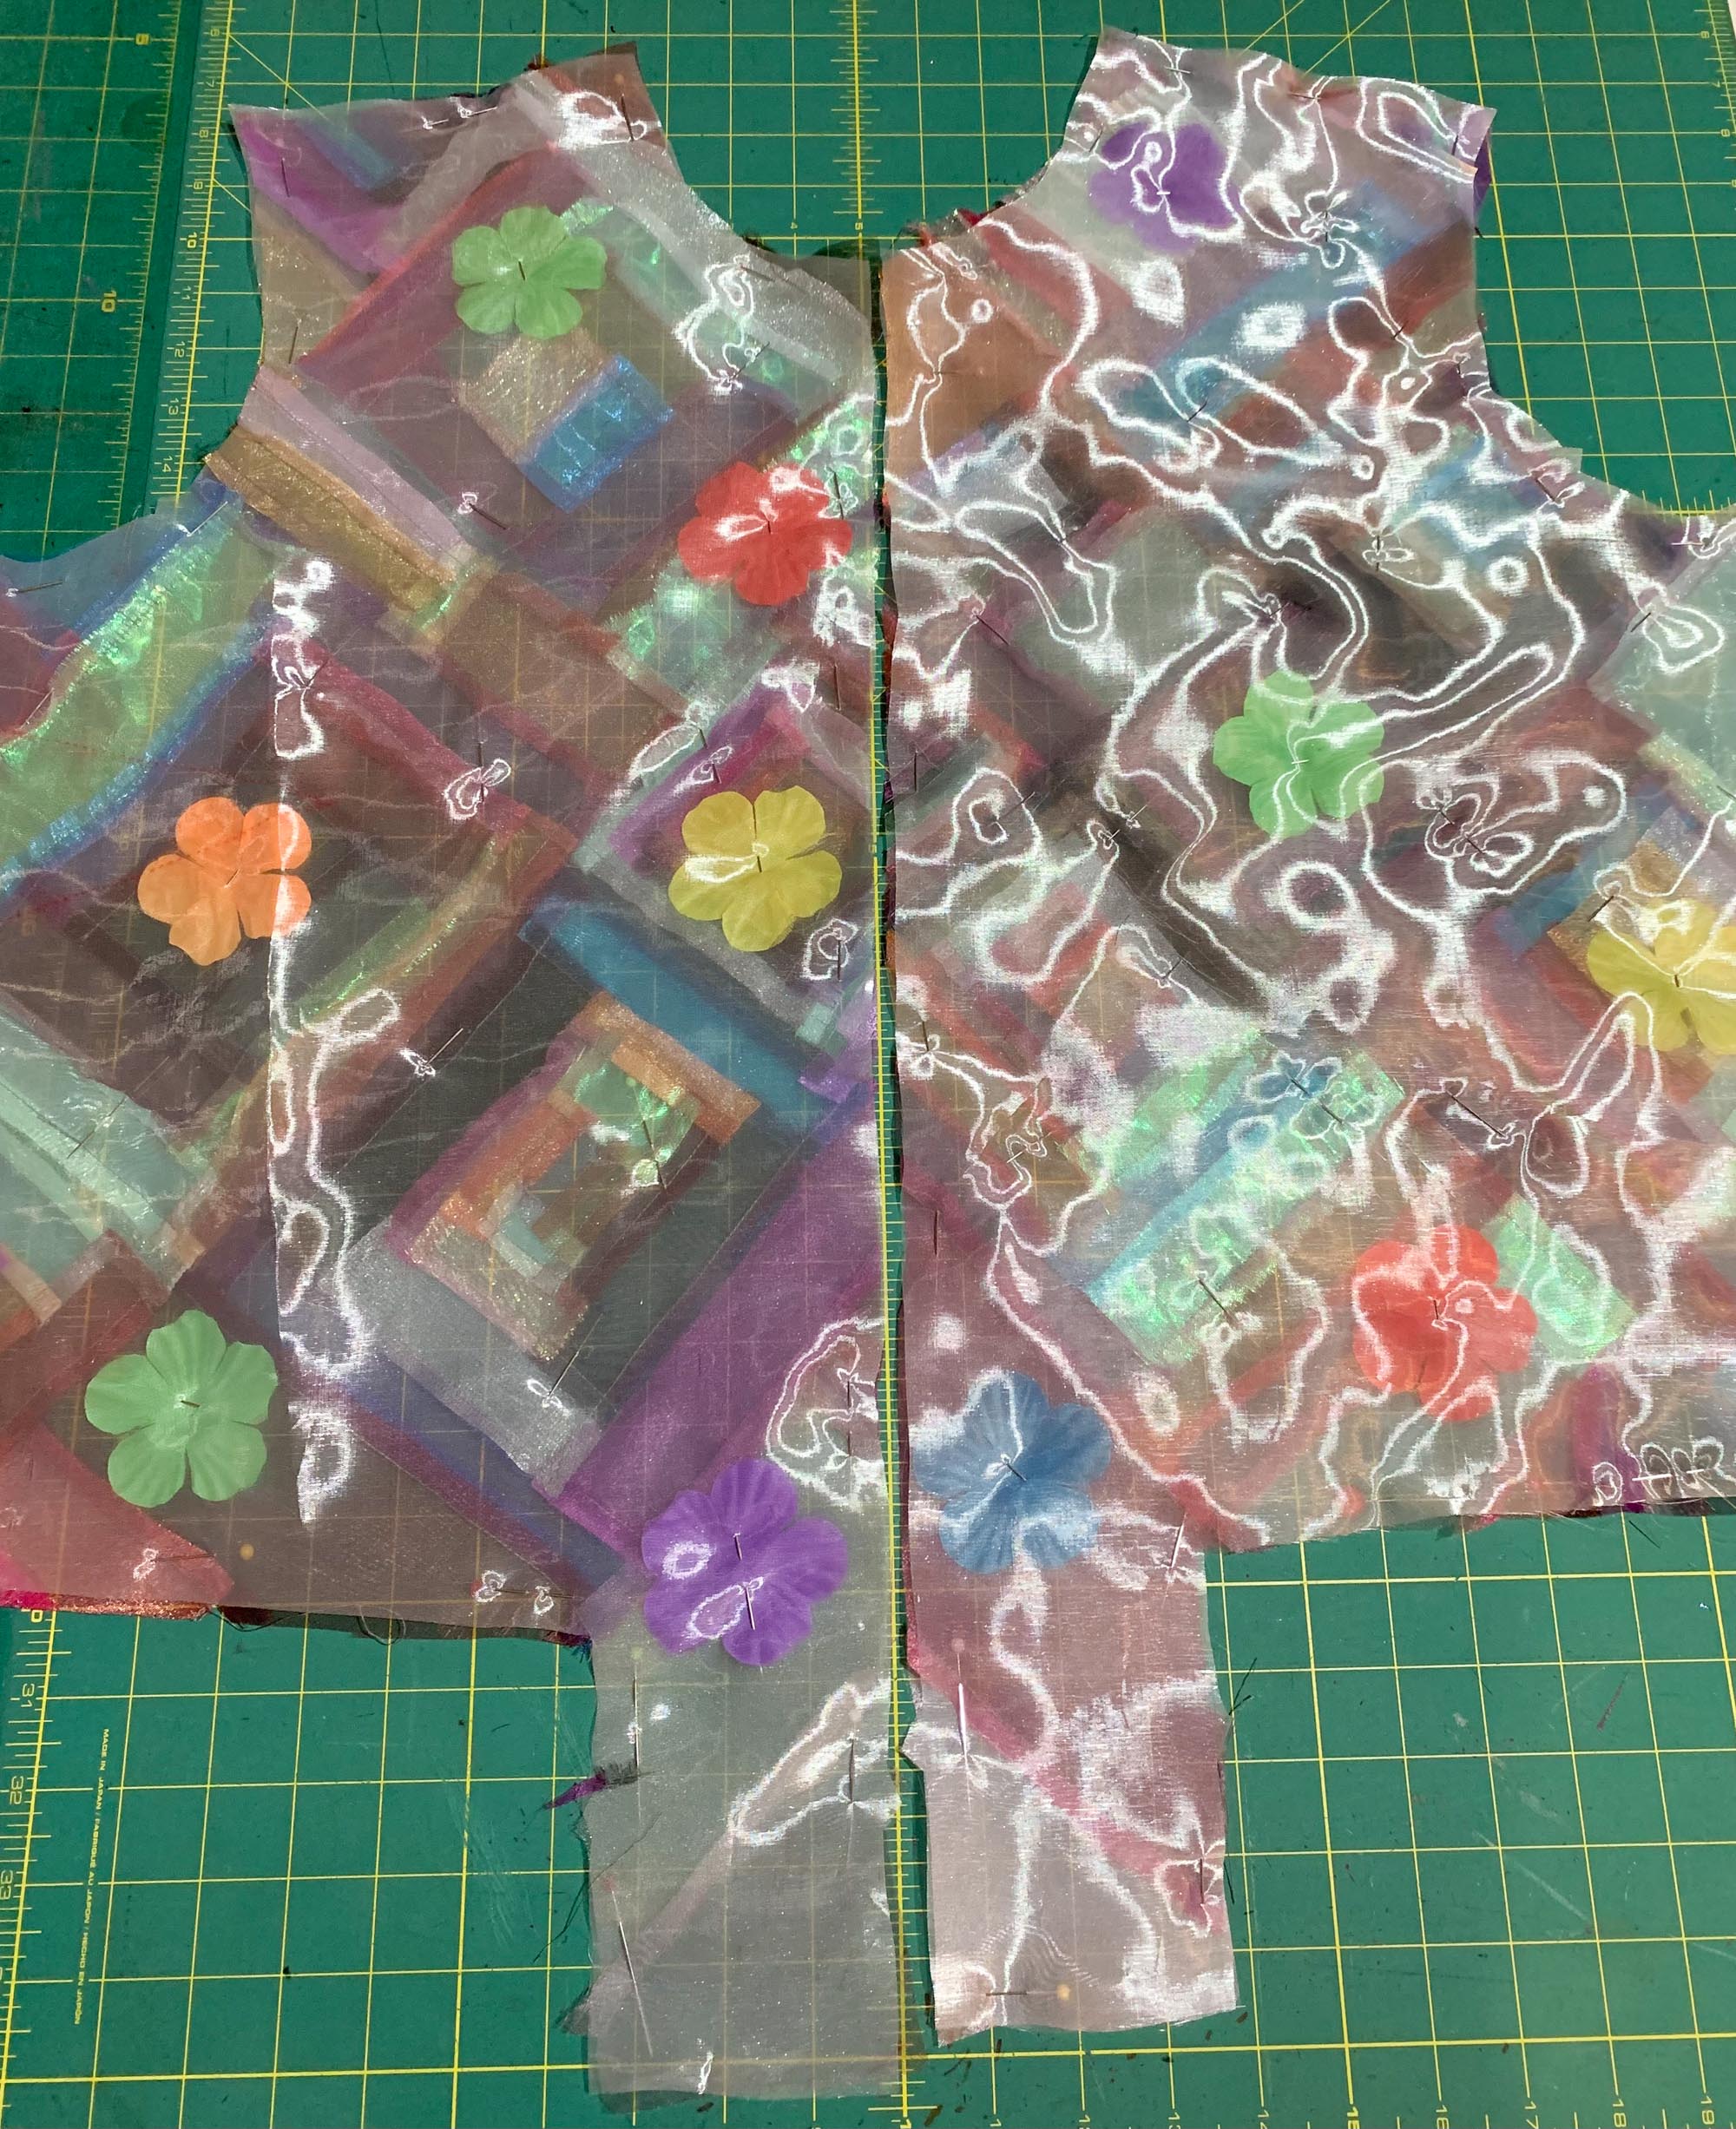
To secure the layers together, I topstitched them using a variegated thread following the seam lines. I sewed the bust darts and pressed them.

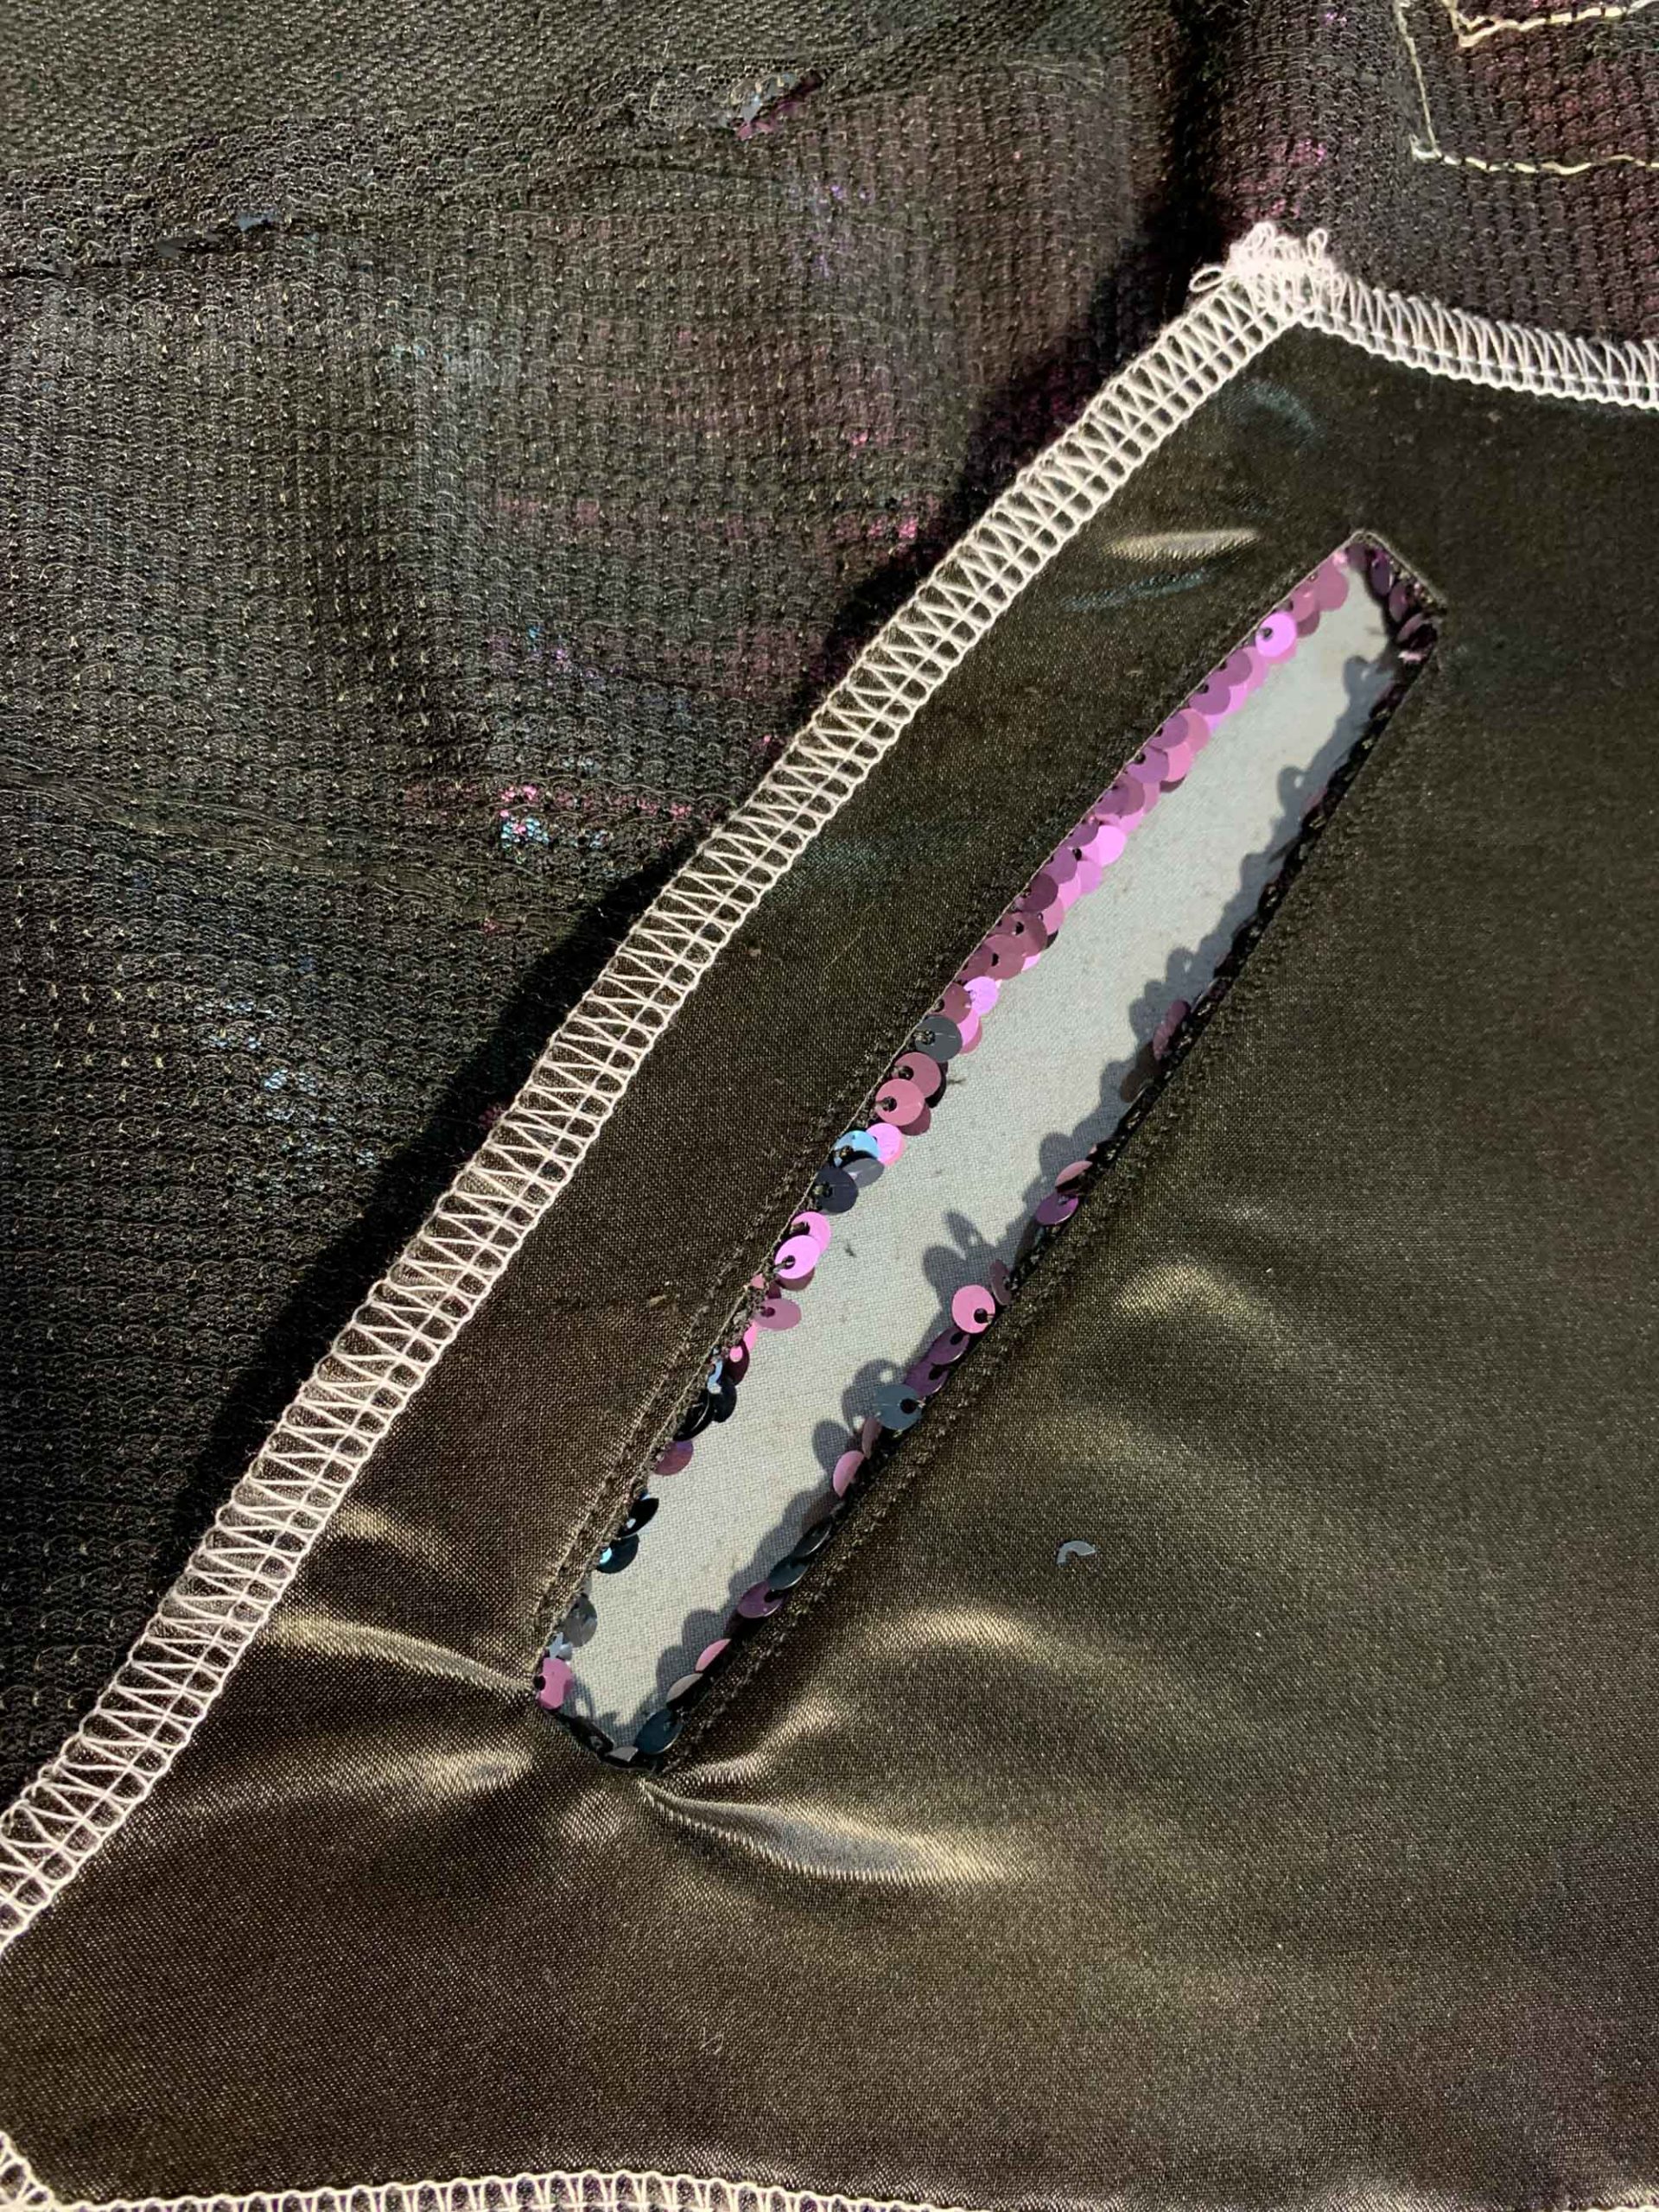
For the pocket bags, I used the white mirror organza. I constructed them as detailed in the instructions.

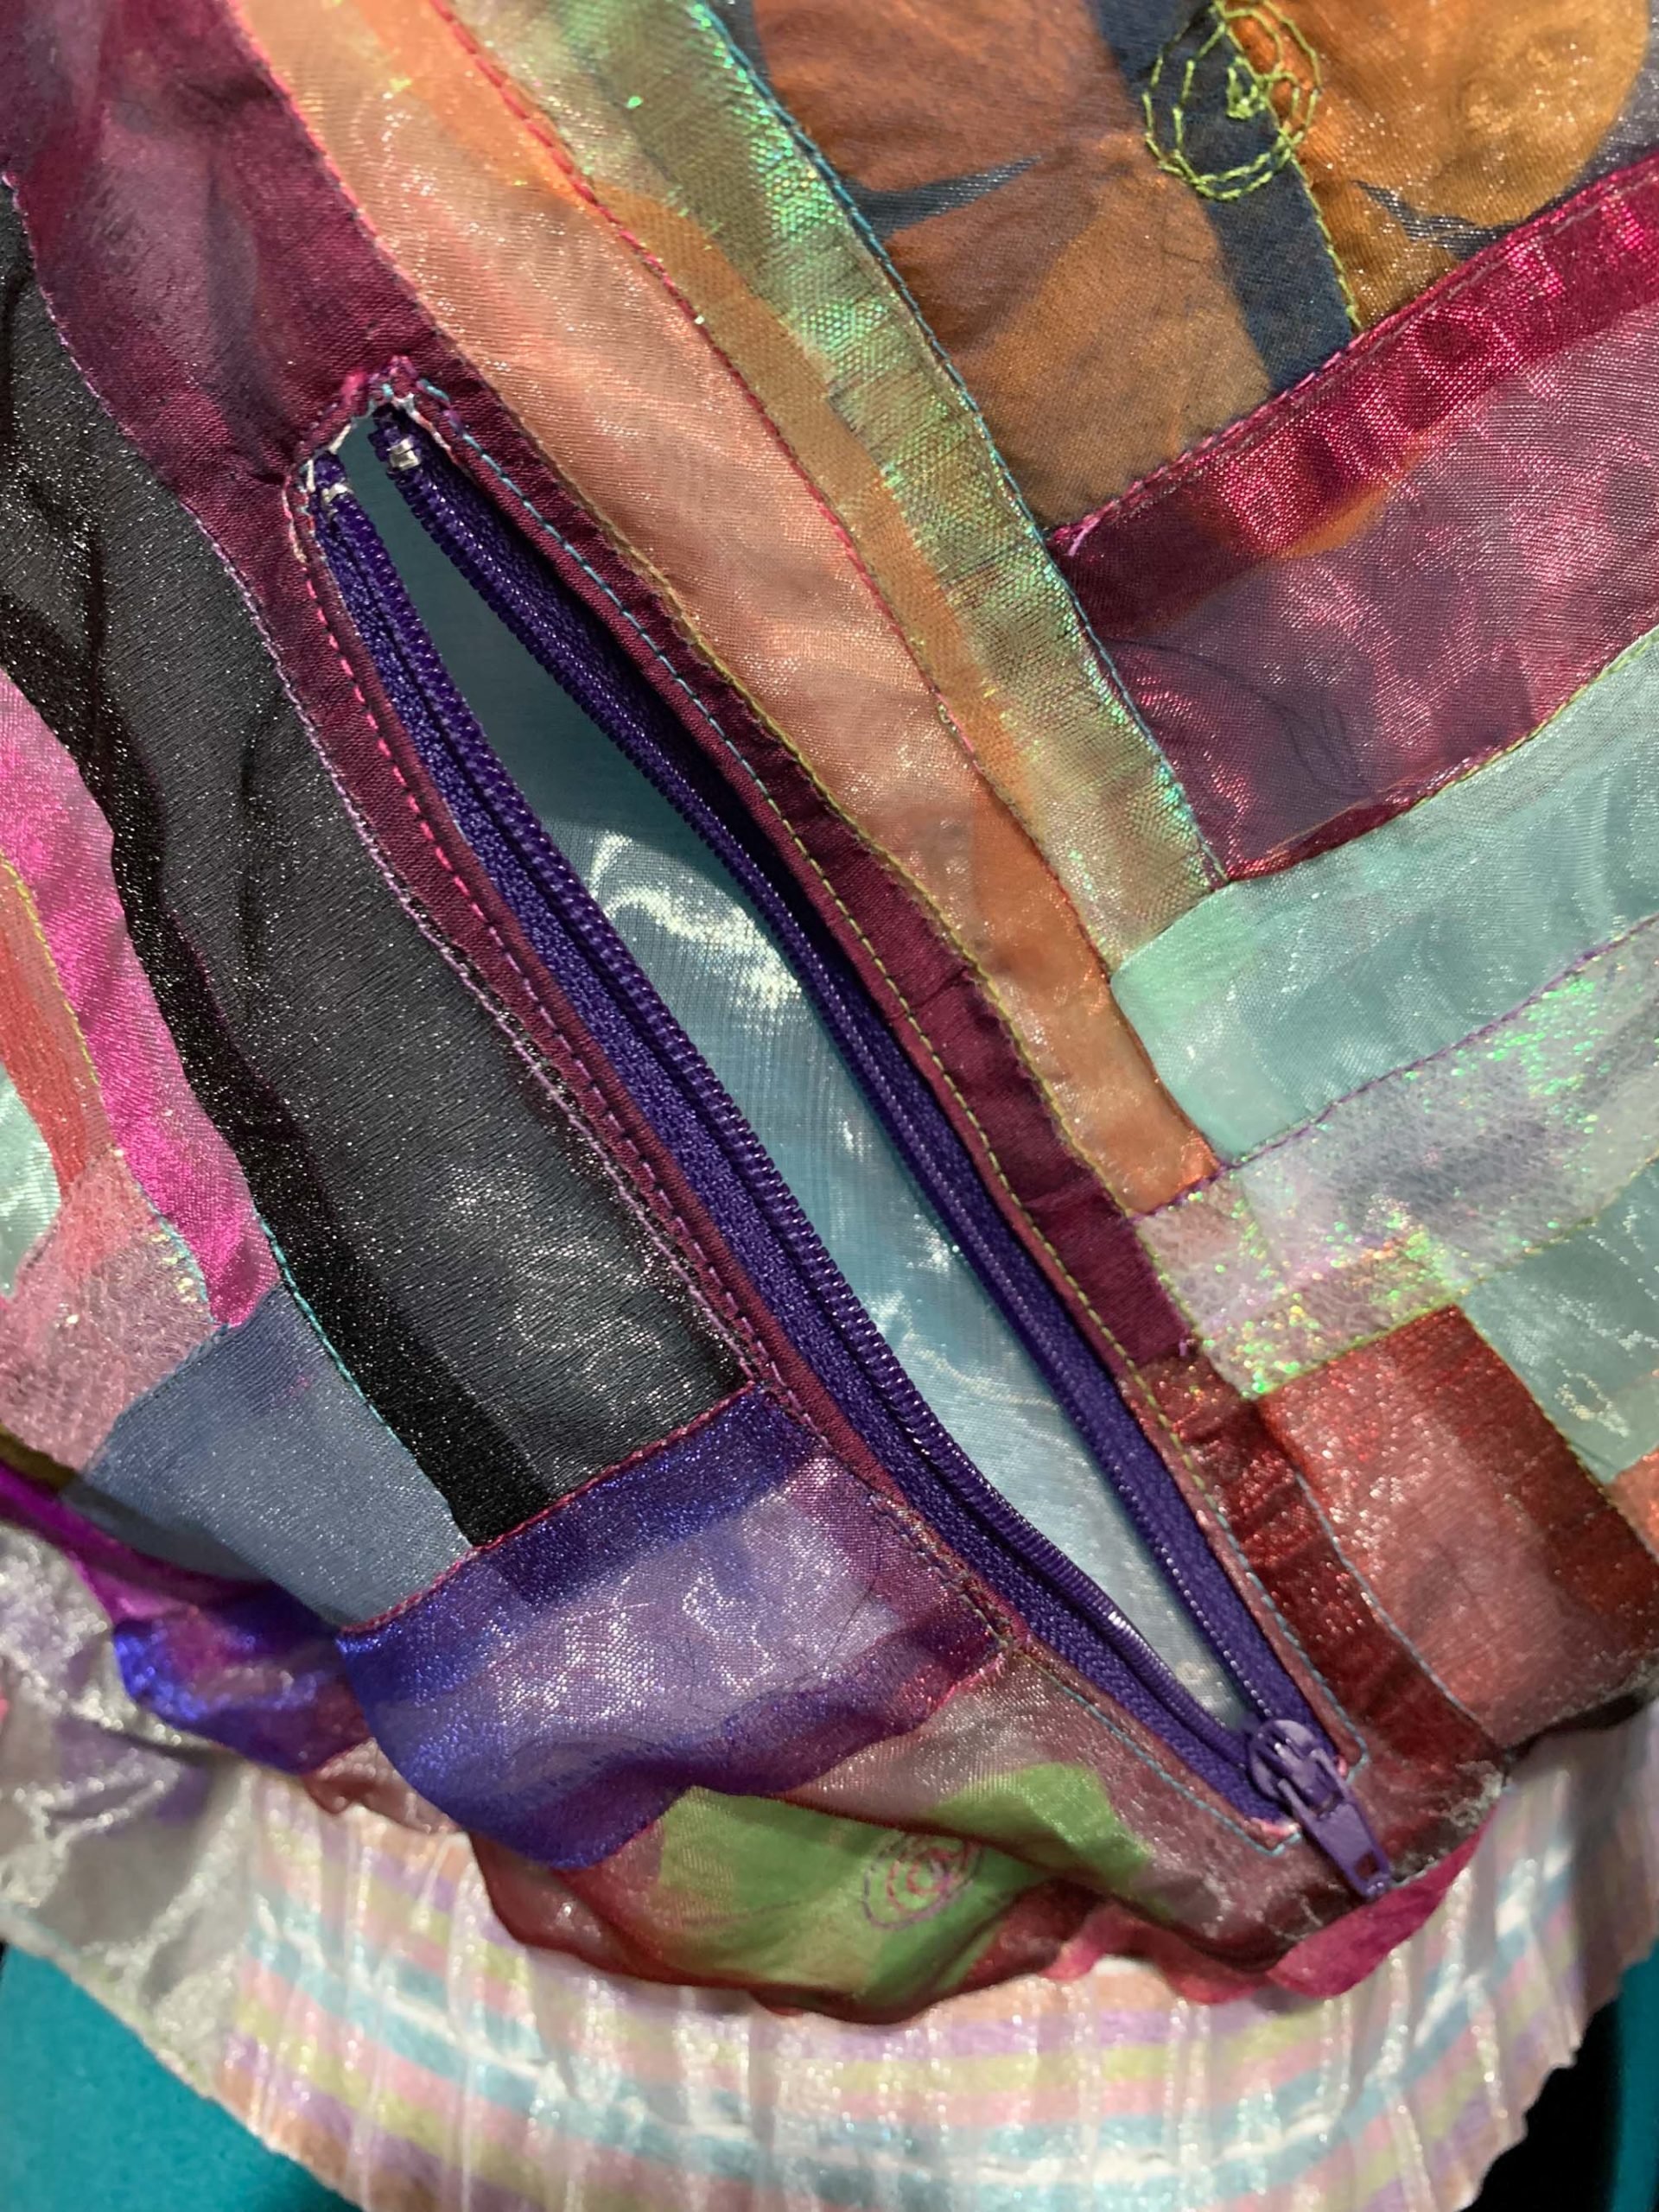
I sewed the garment up using french seams for the armholes, shoulders, sleeve and side seams.
I used a white invisible zip and inserted it as instructed with mirror organza facings.

For the ribbing, I couldn’t find any ribbing fabric that I liked. I decided to make casings from the white mirror organza and insert a rainbow metallic striped elastic inside.

I used the Kimball pattern pieces for the shape and width of each casing but I lengthened the pattern pieces to fit the garment flat. I sewed the waistband casings onto the garment leaving an opening for the elastic, then inserted the elastic and adjusted it to the stretch so it did the job the ribbing would have.
For the neck and cuffs I made these casings as independent elements with the elastic already inserted then sewed them onto the garment.
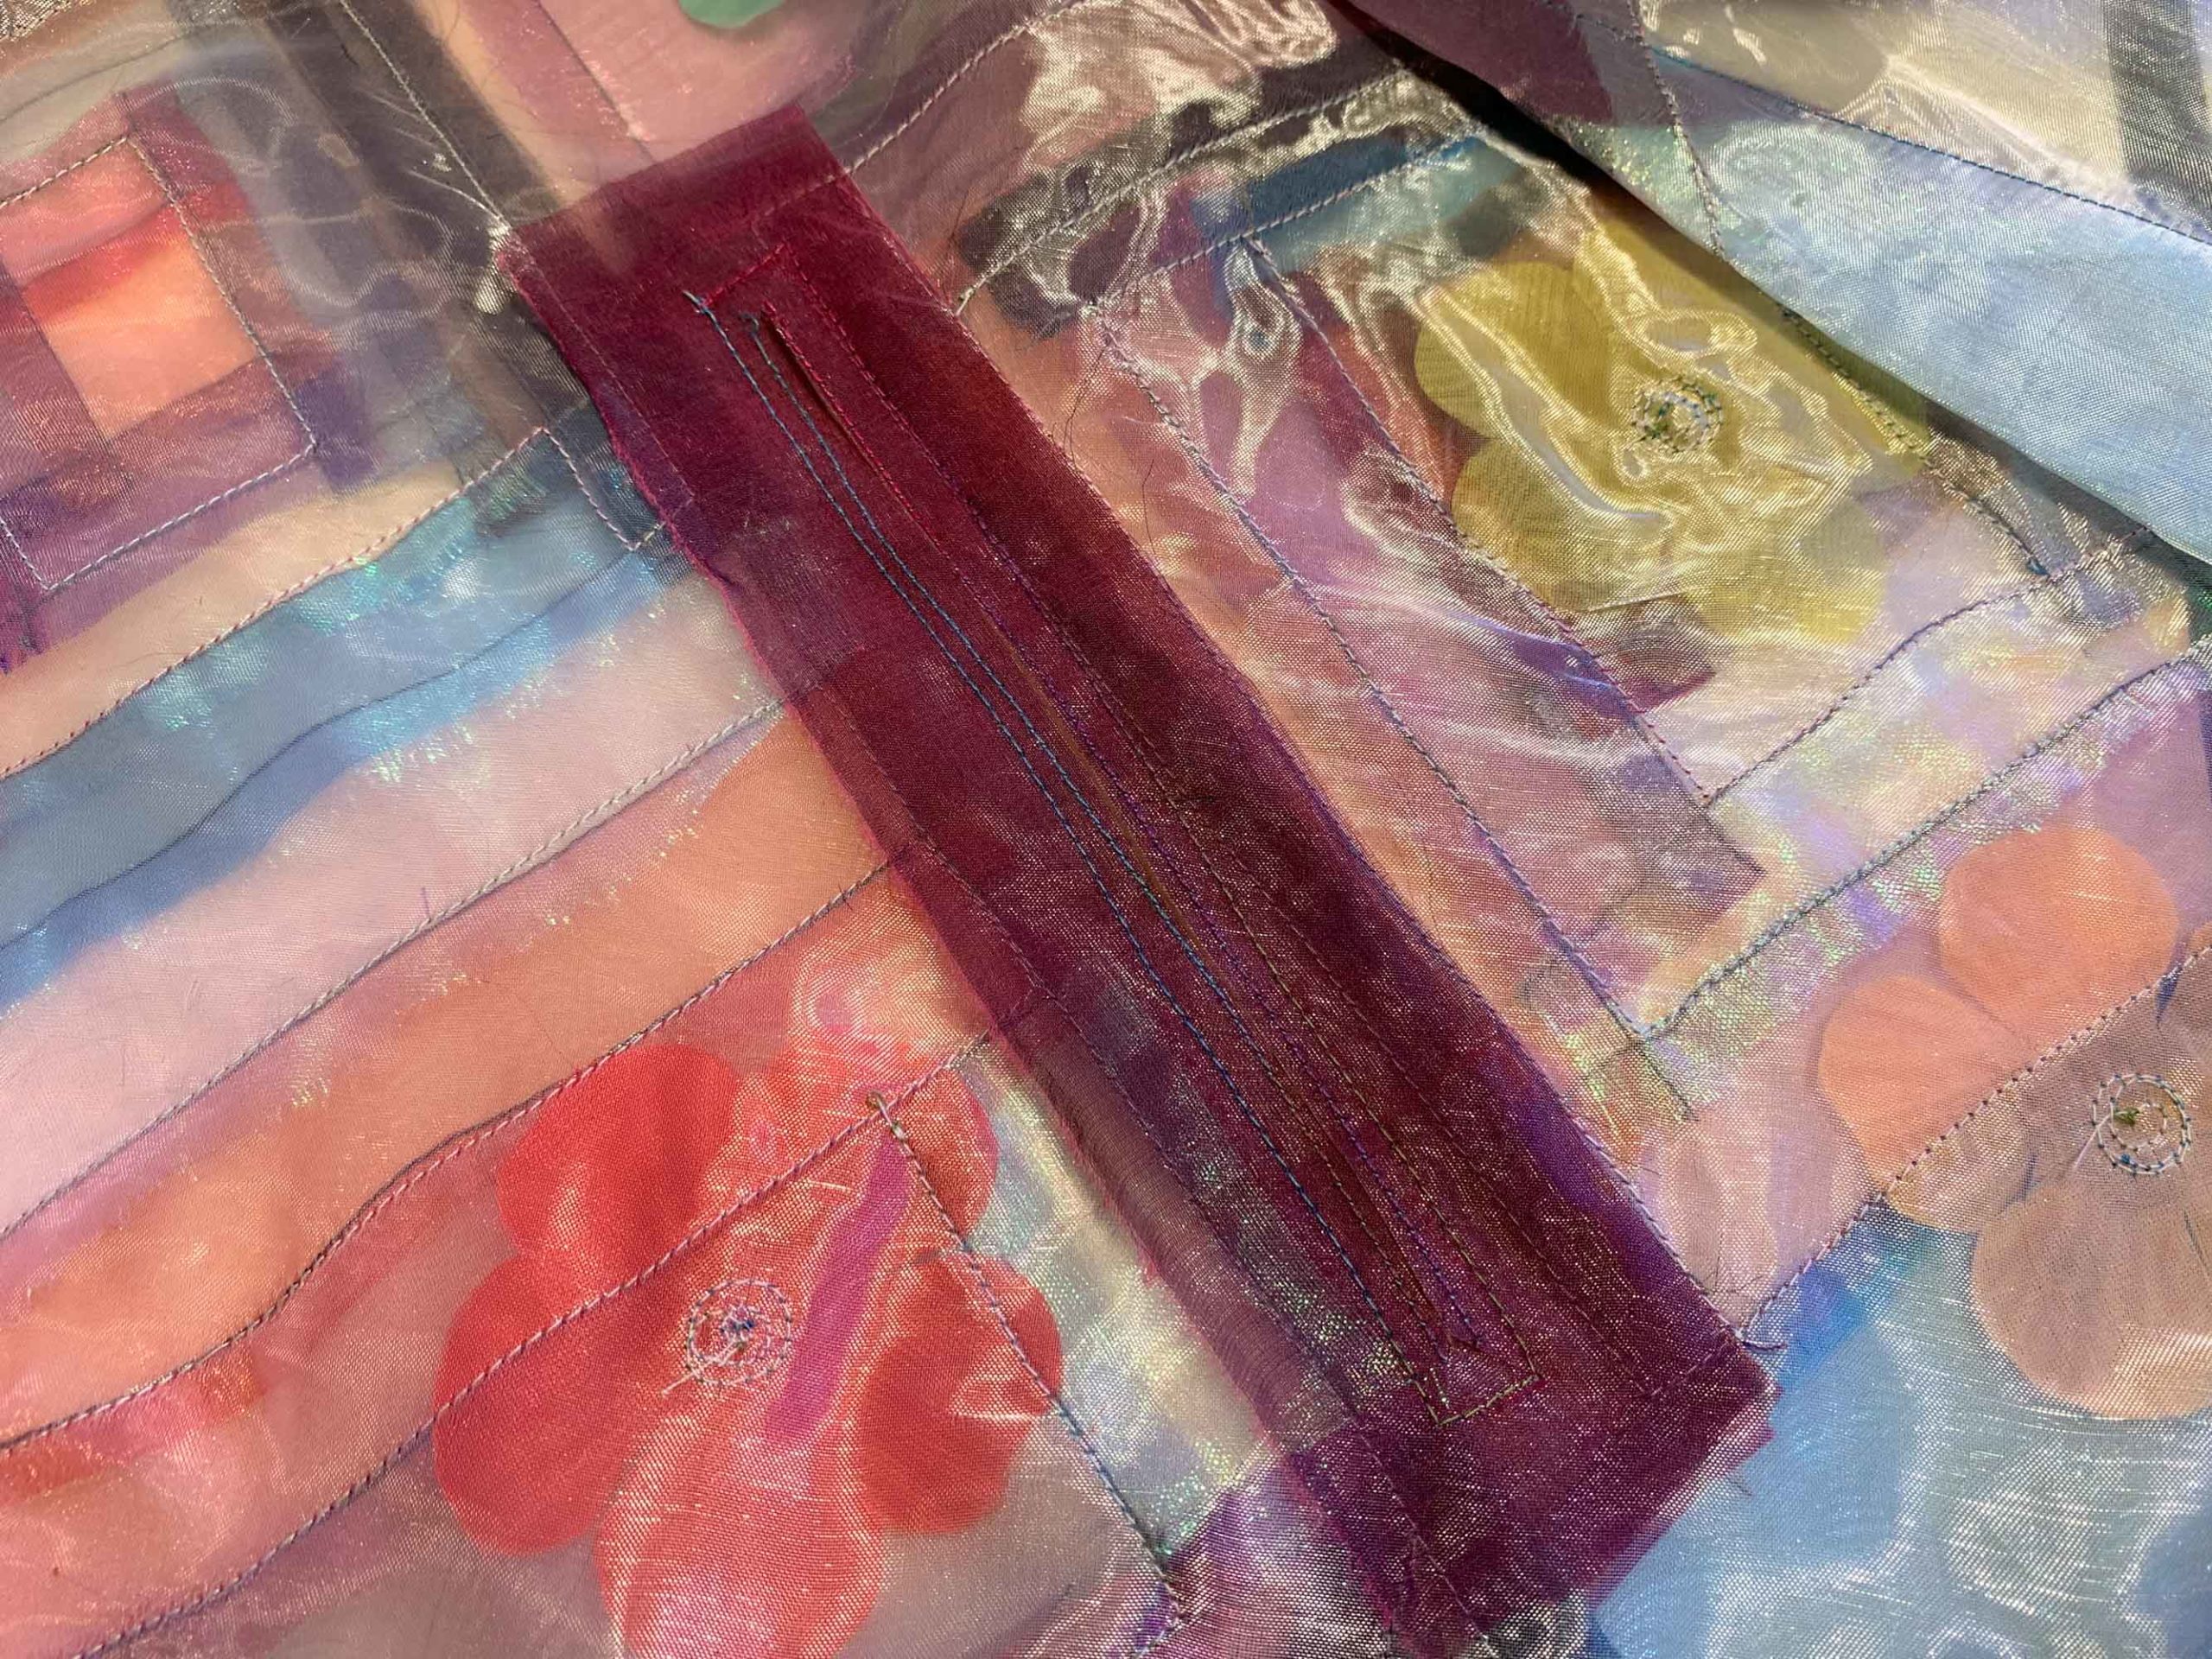
I had to overlock the waist, neck and cuff seams, and this left a prickly finish. It was very itchy, so I added silk organza bias binding to the neck and cuff seams to cover the bits of fibre stick out.
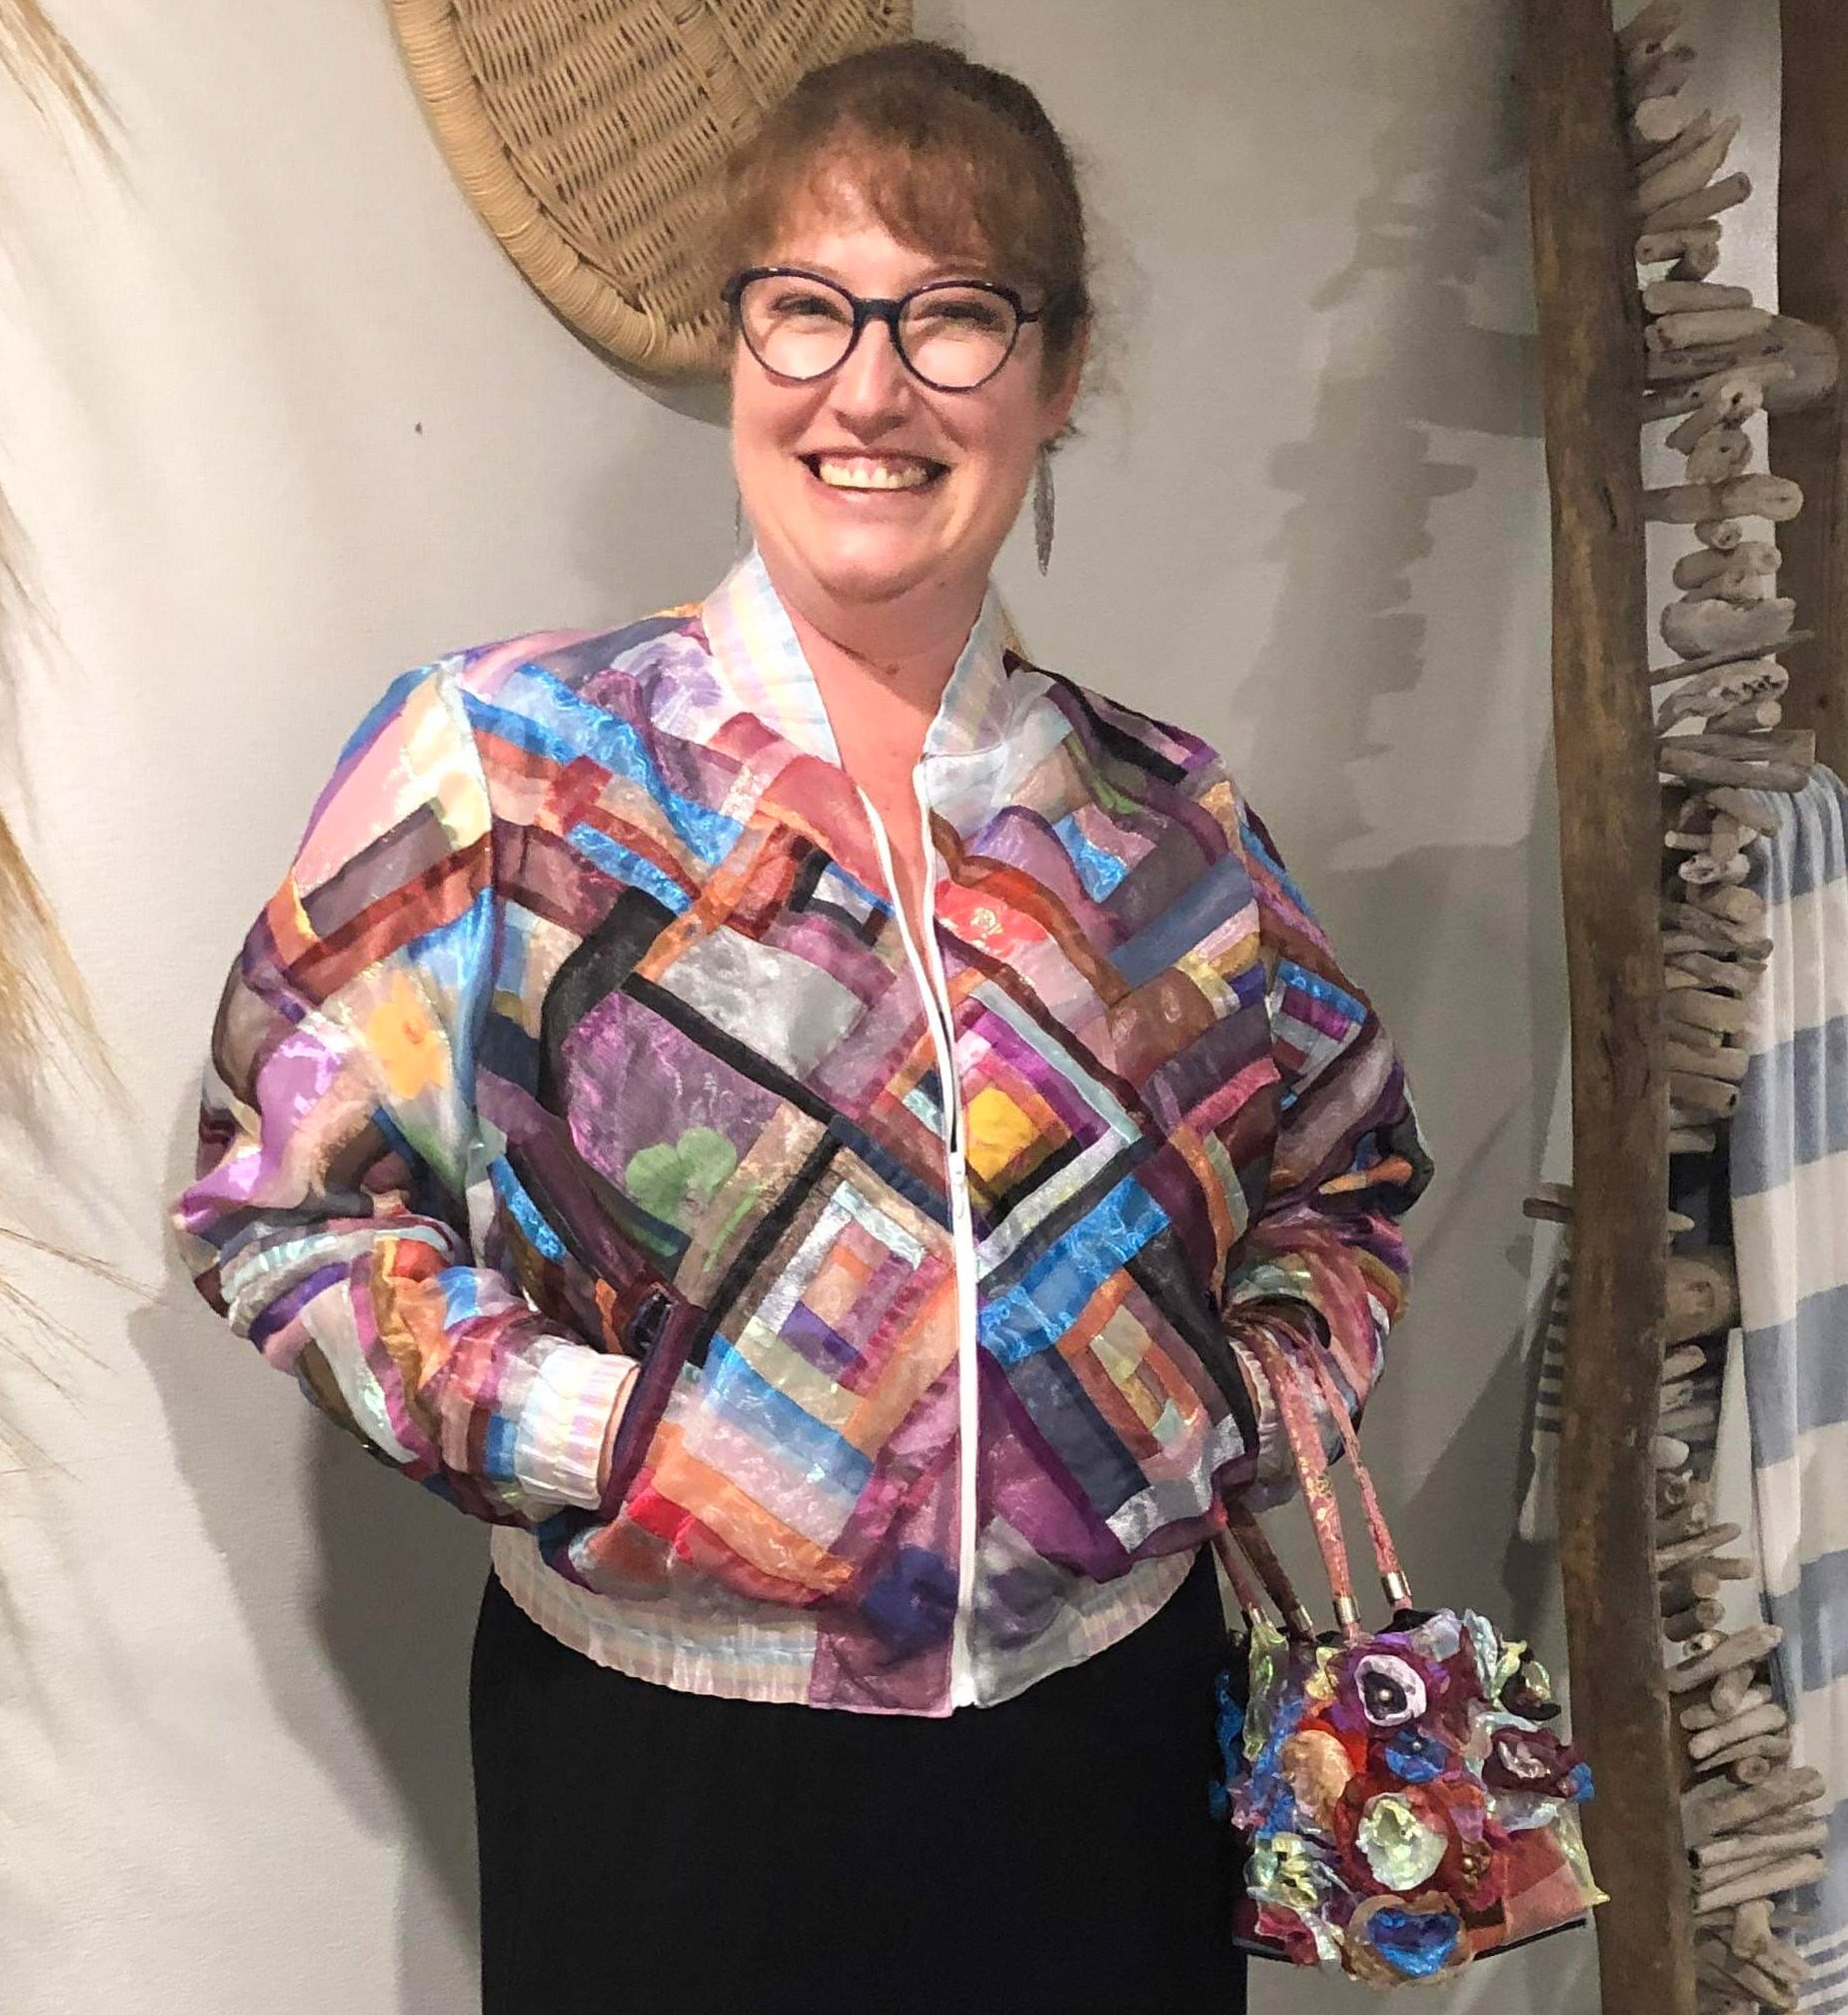


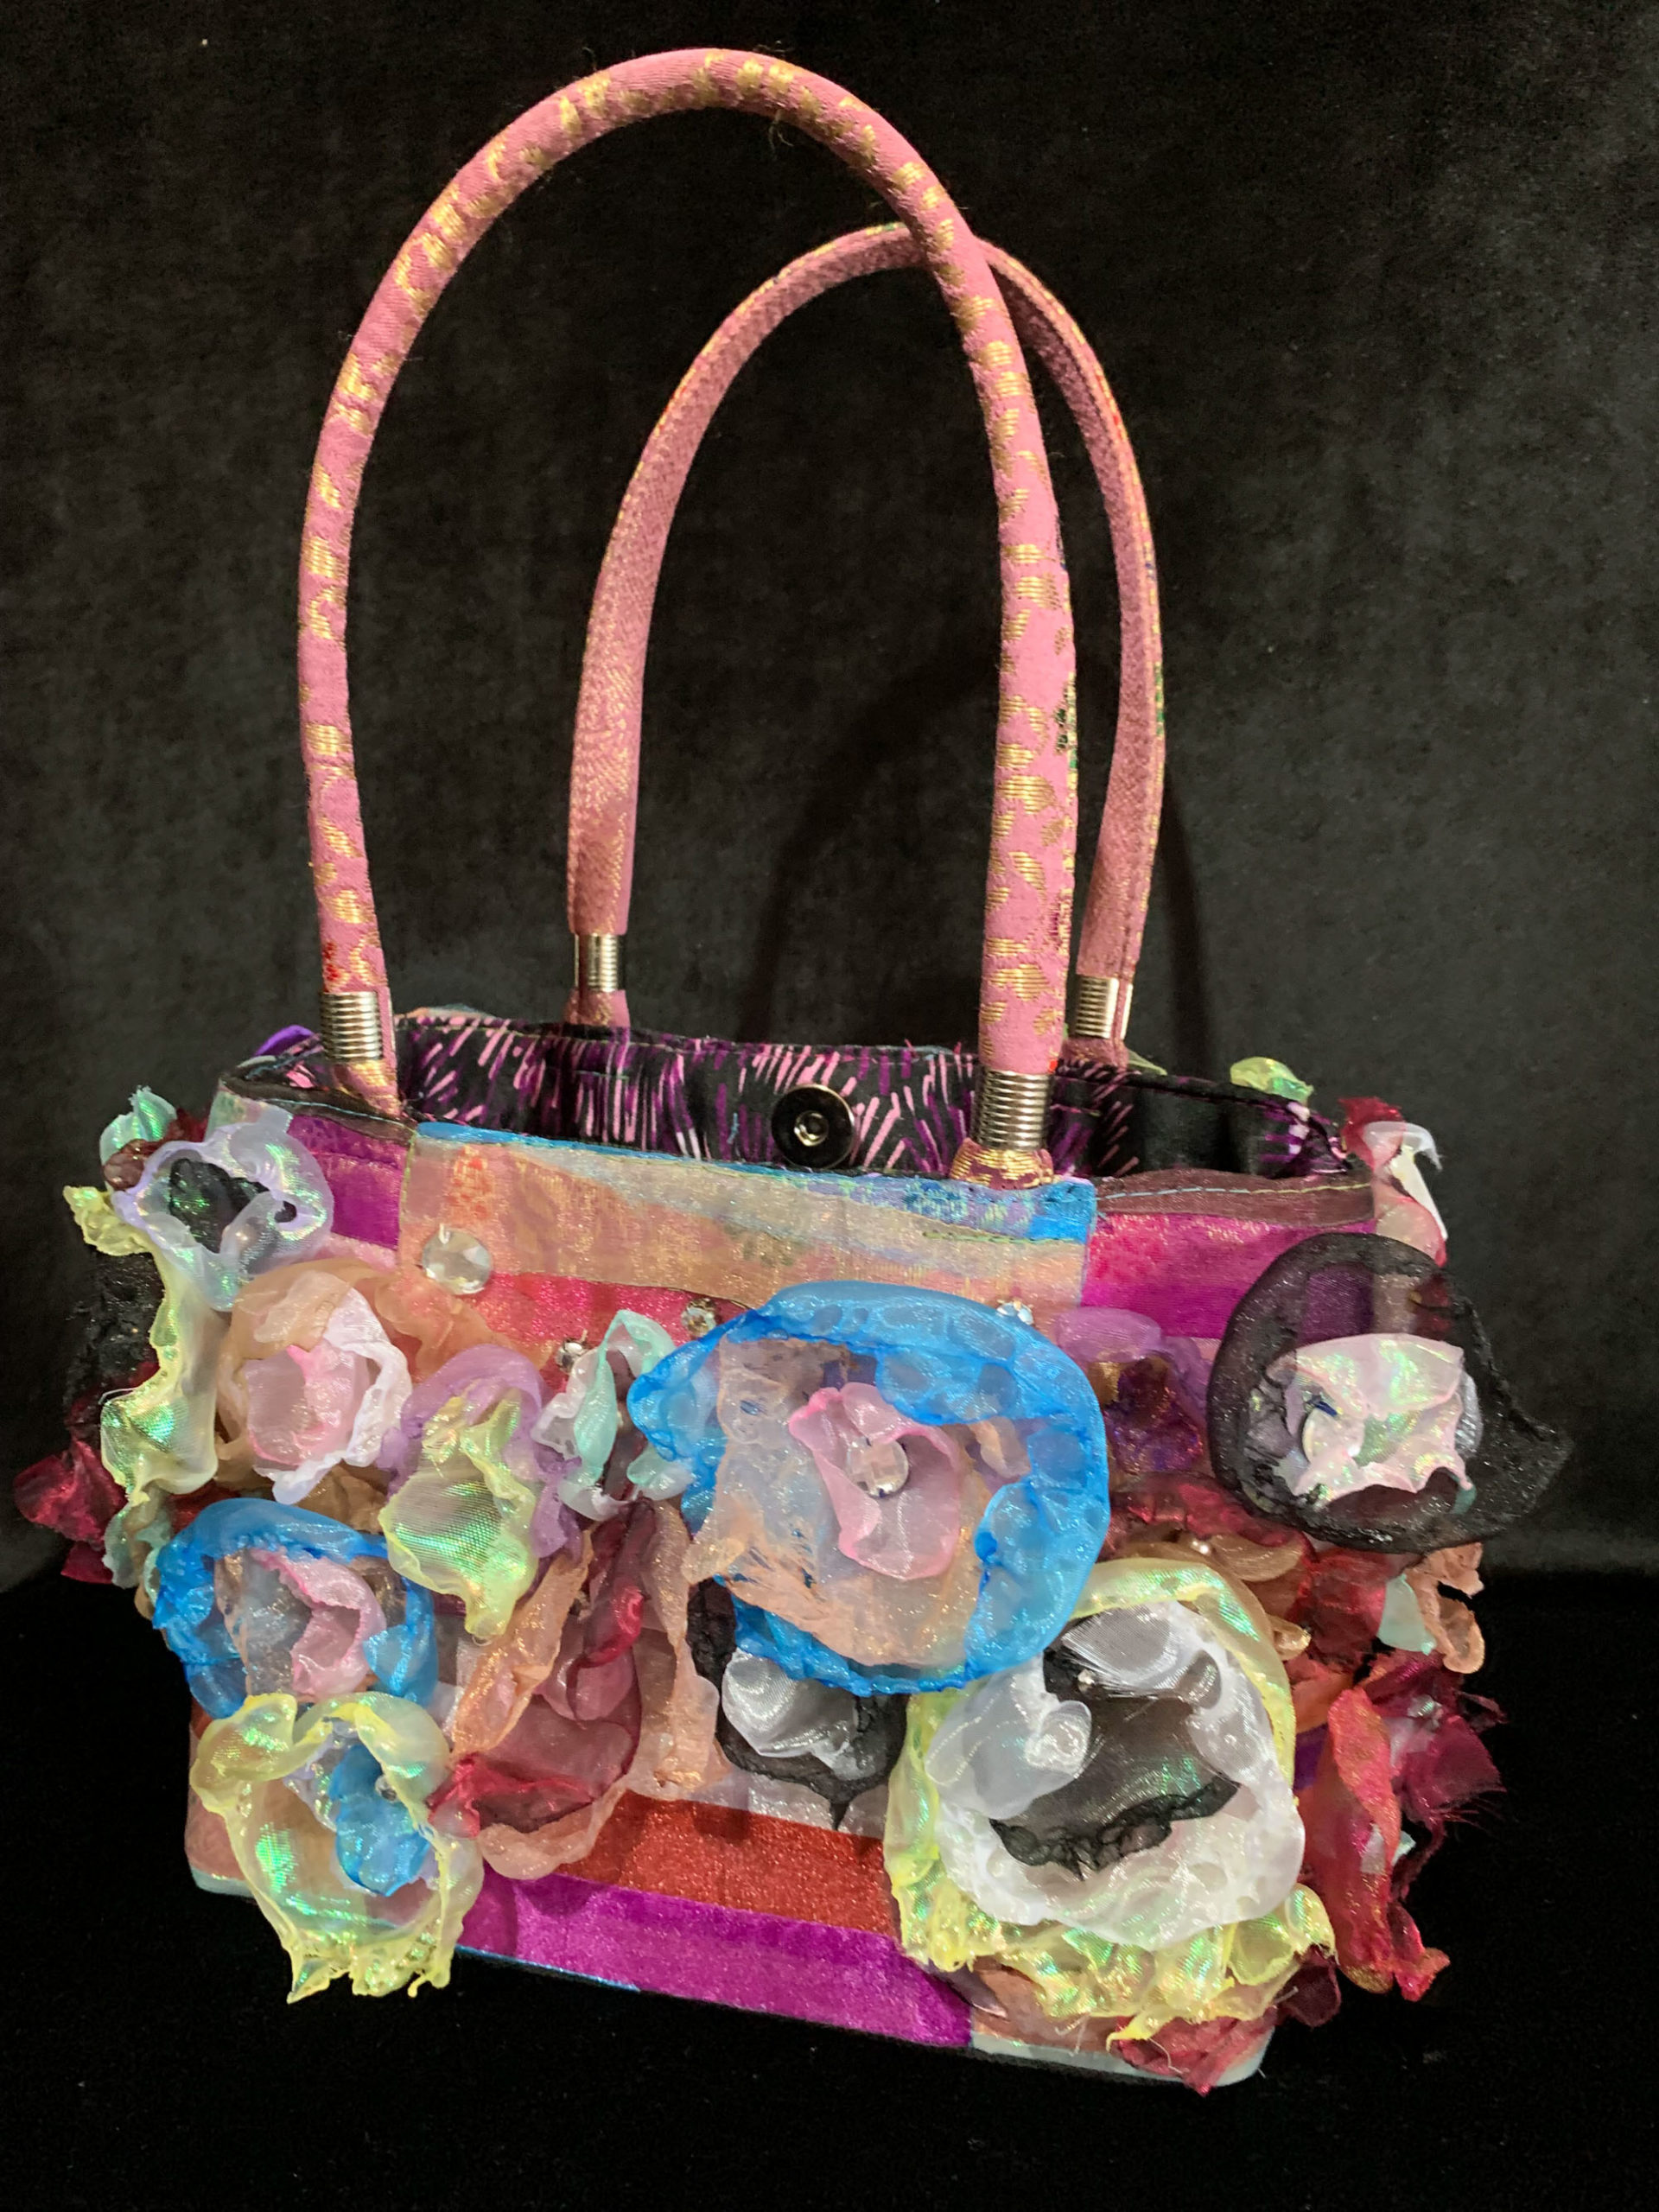
Because I’m a matchy-matchy person, I needed a bag to go with my outfit.
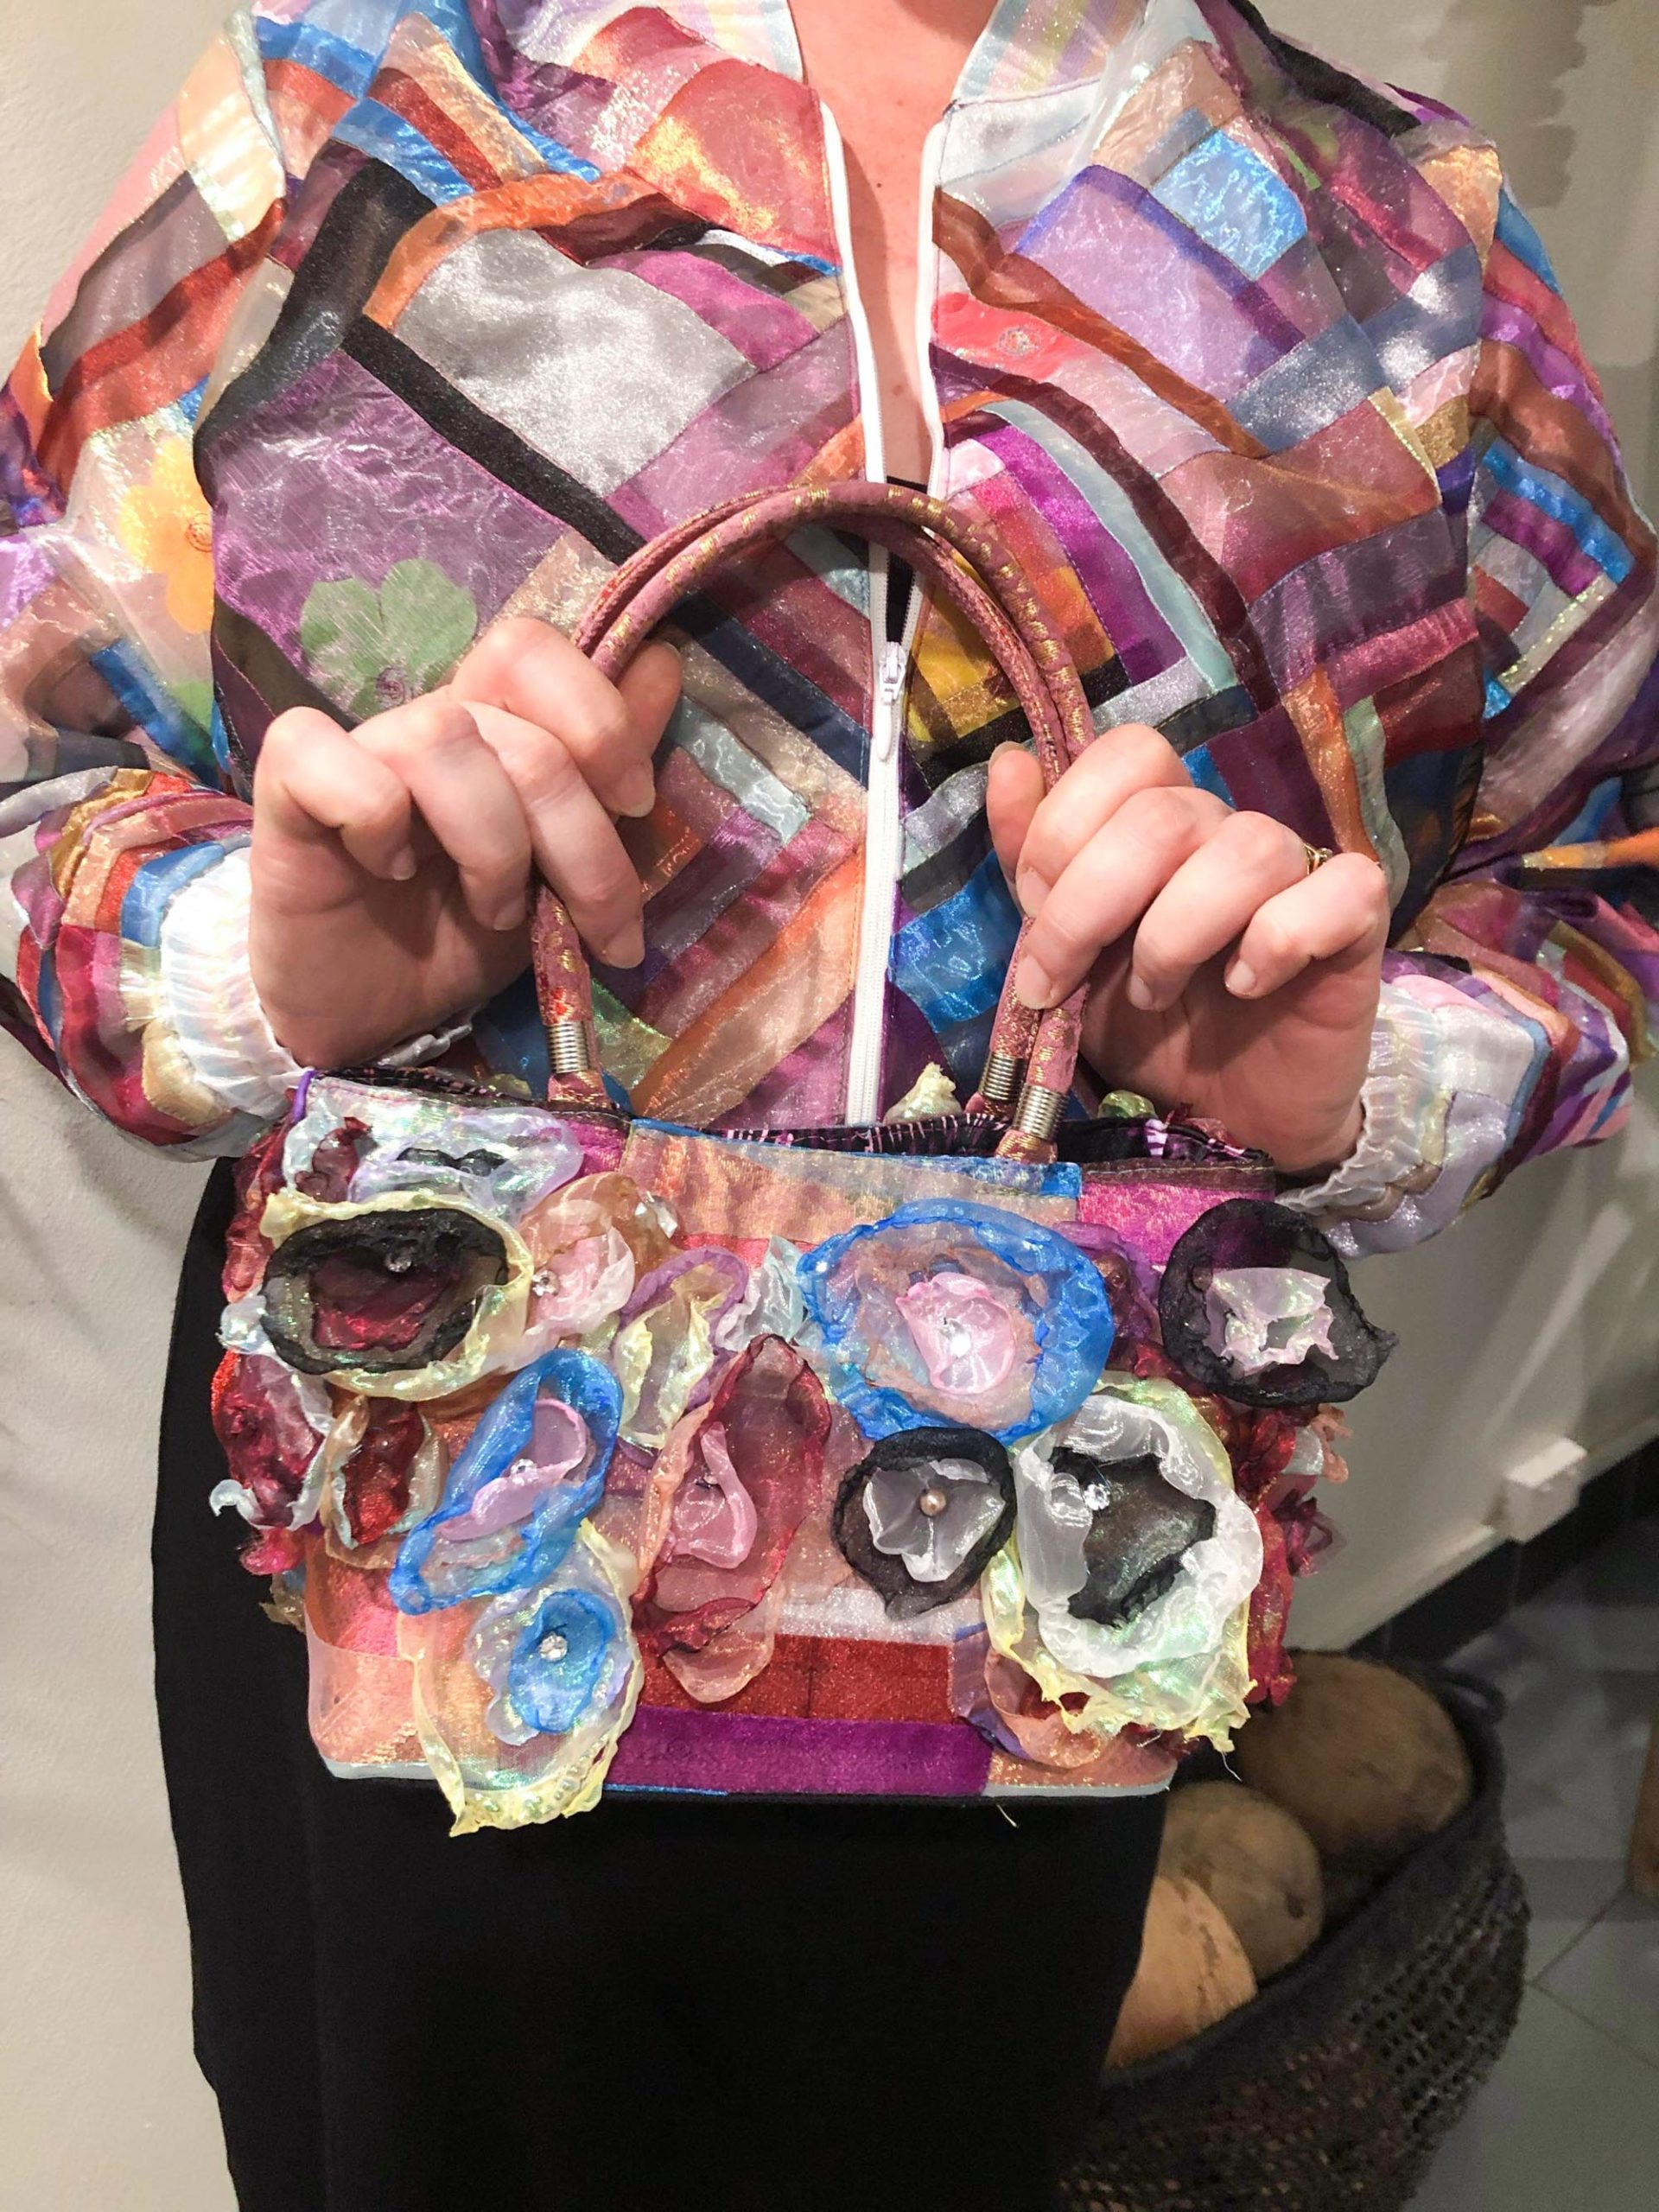
I picked up a small bag at the opp shop and deconstructed it. I used the leftover strips of organza to cover the bag.
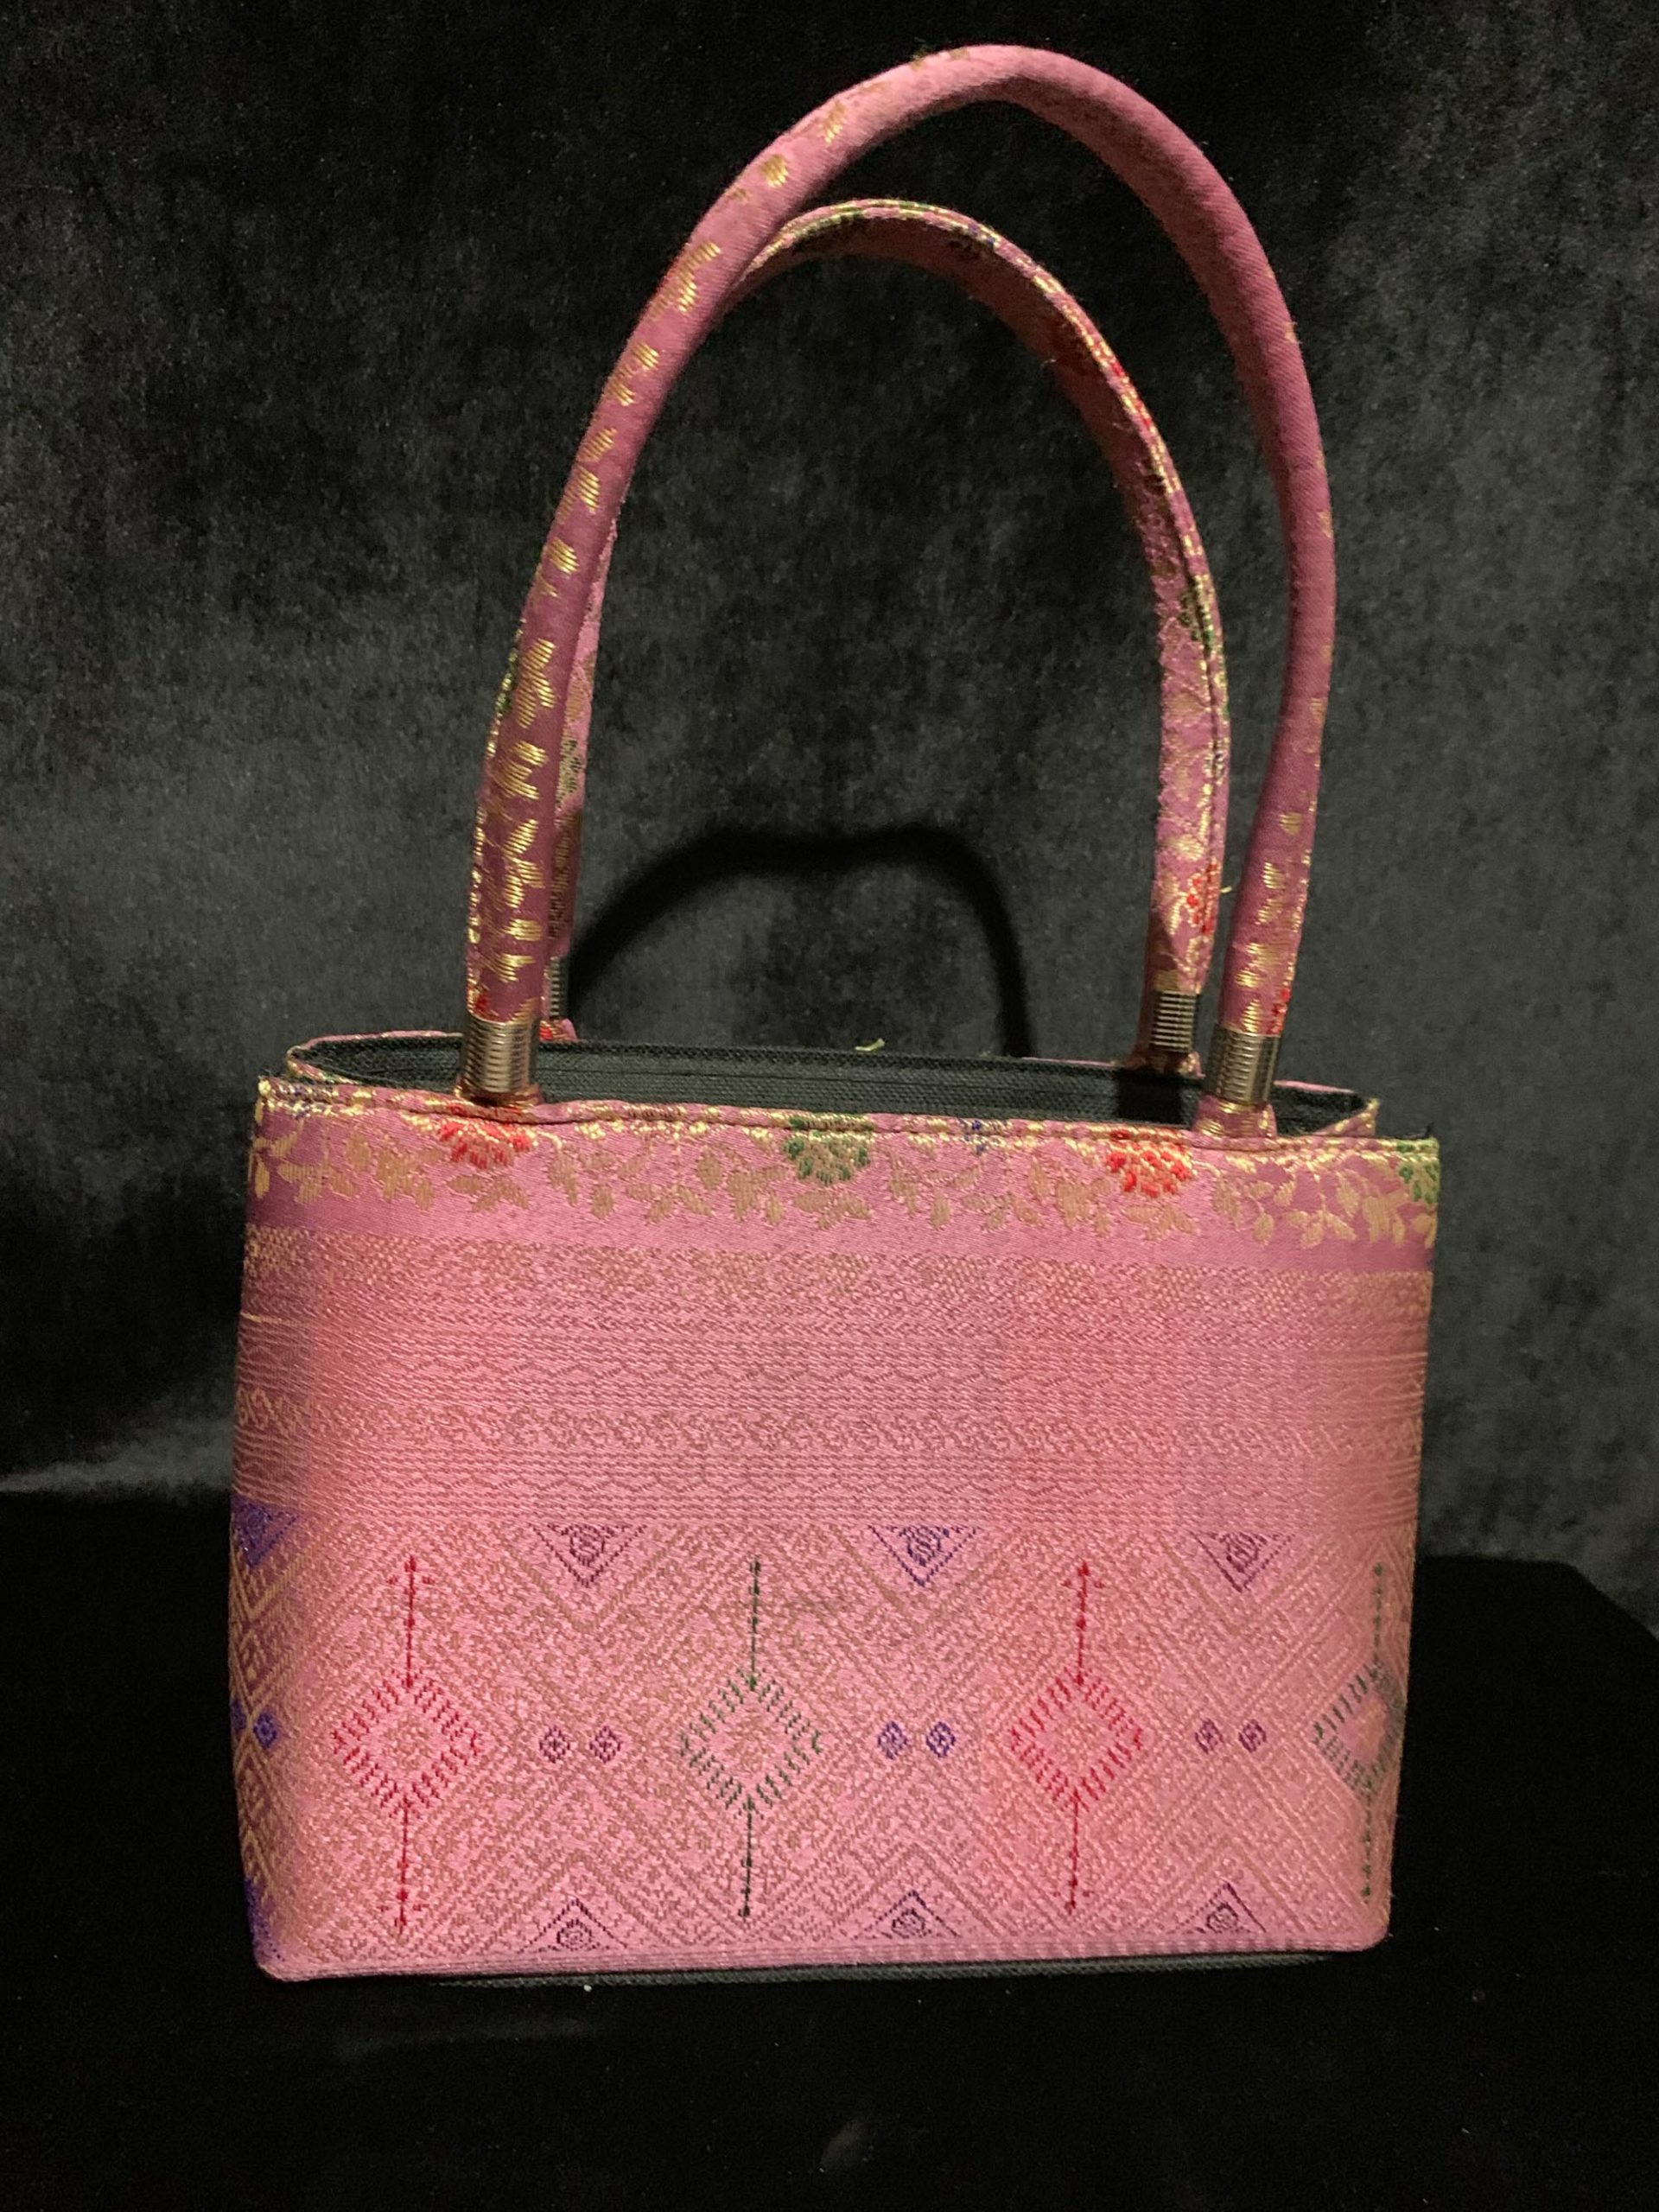
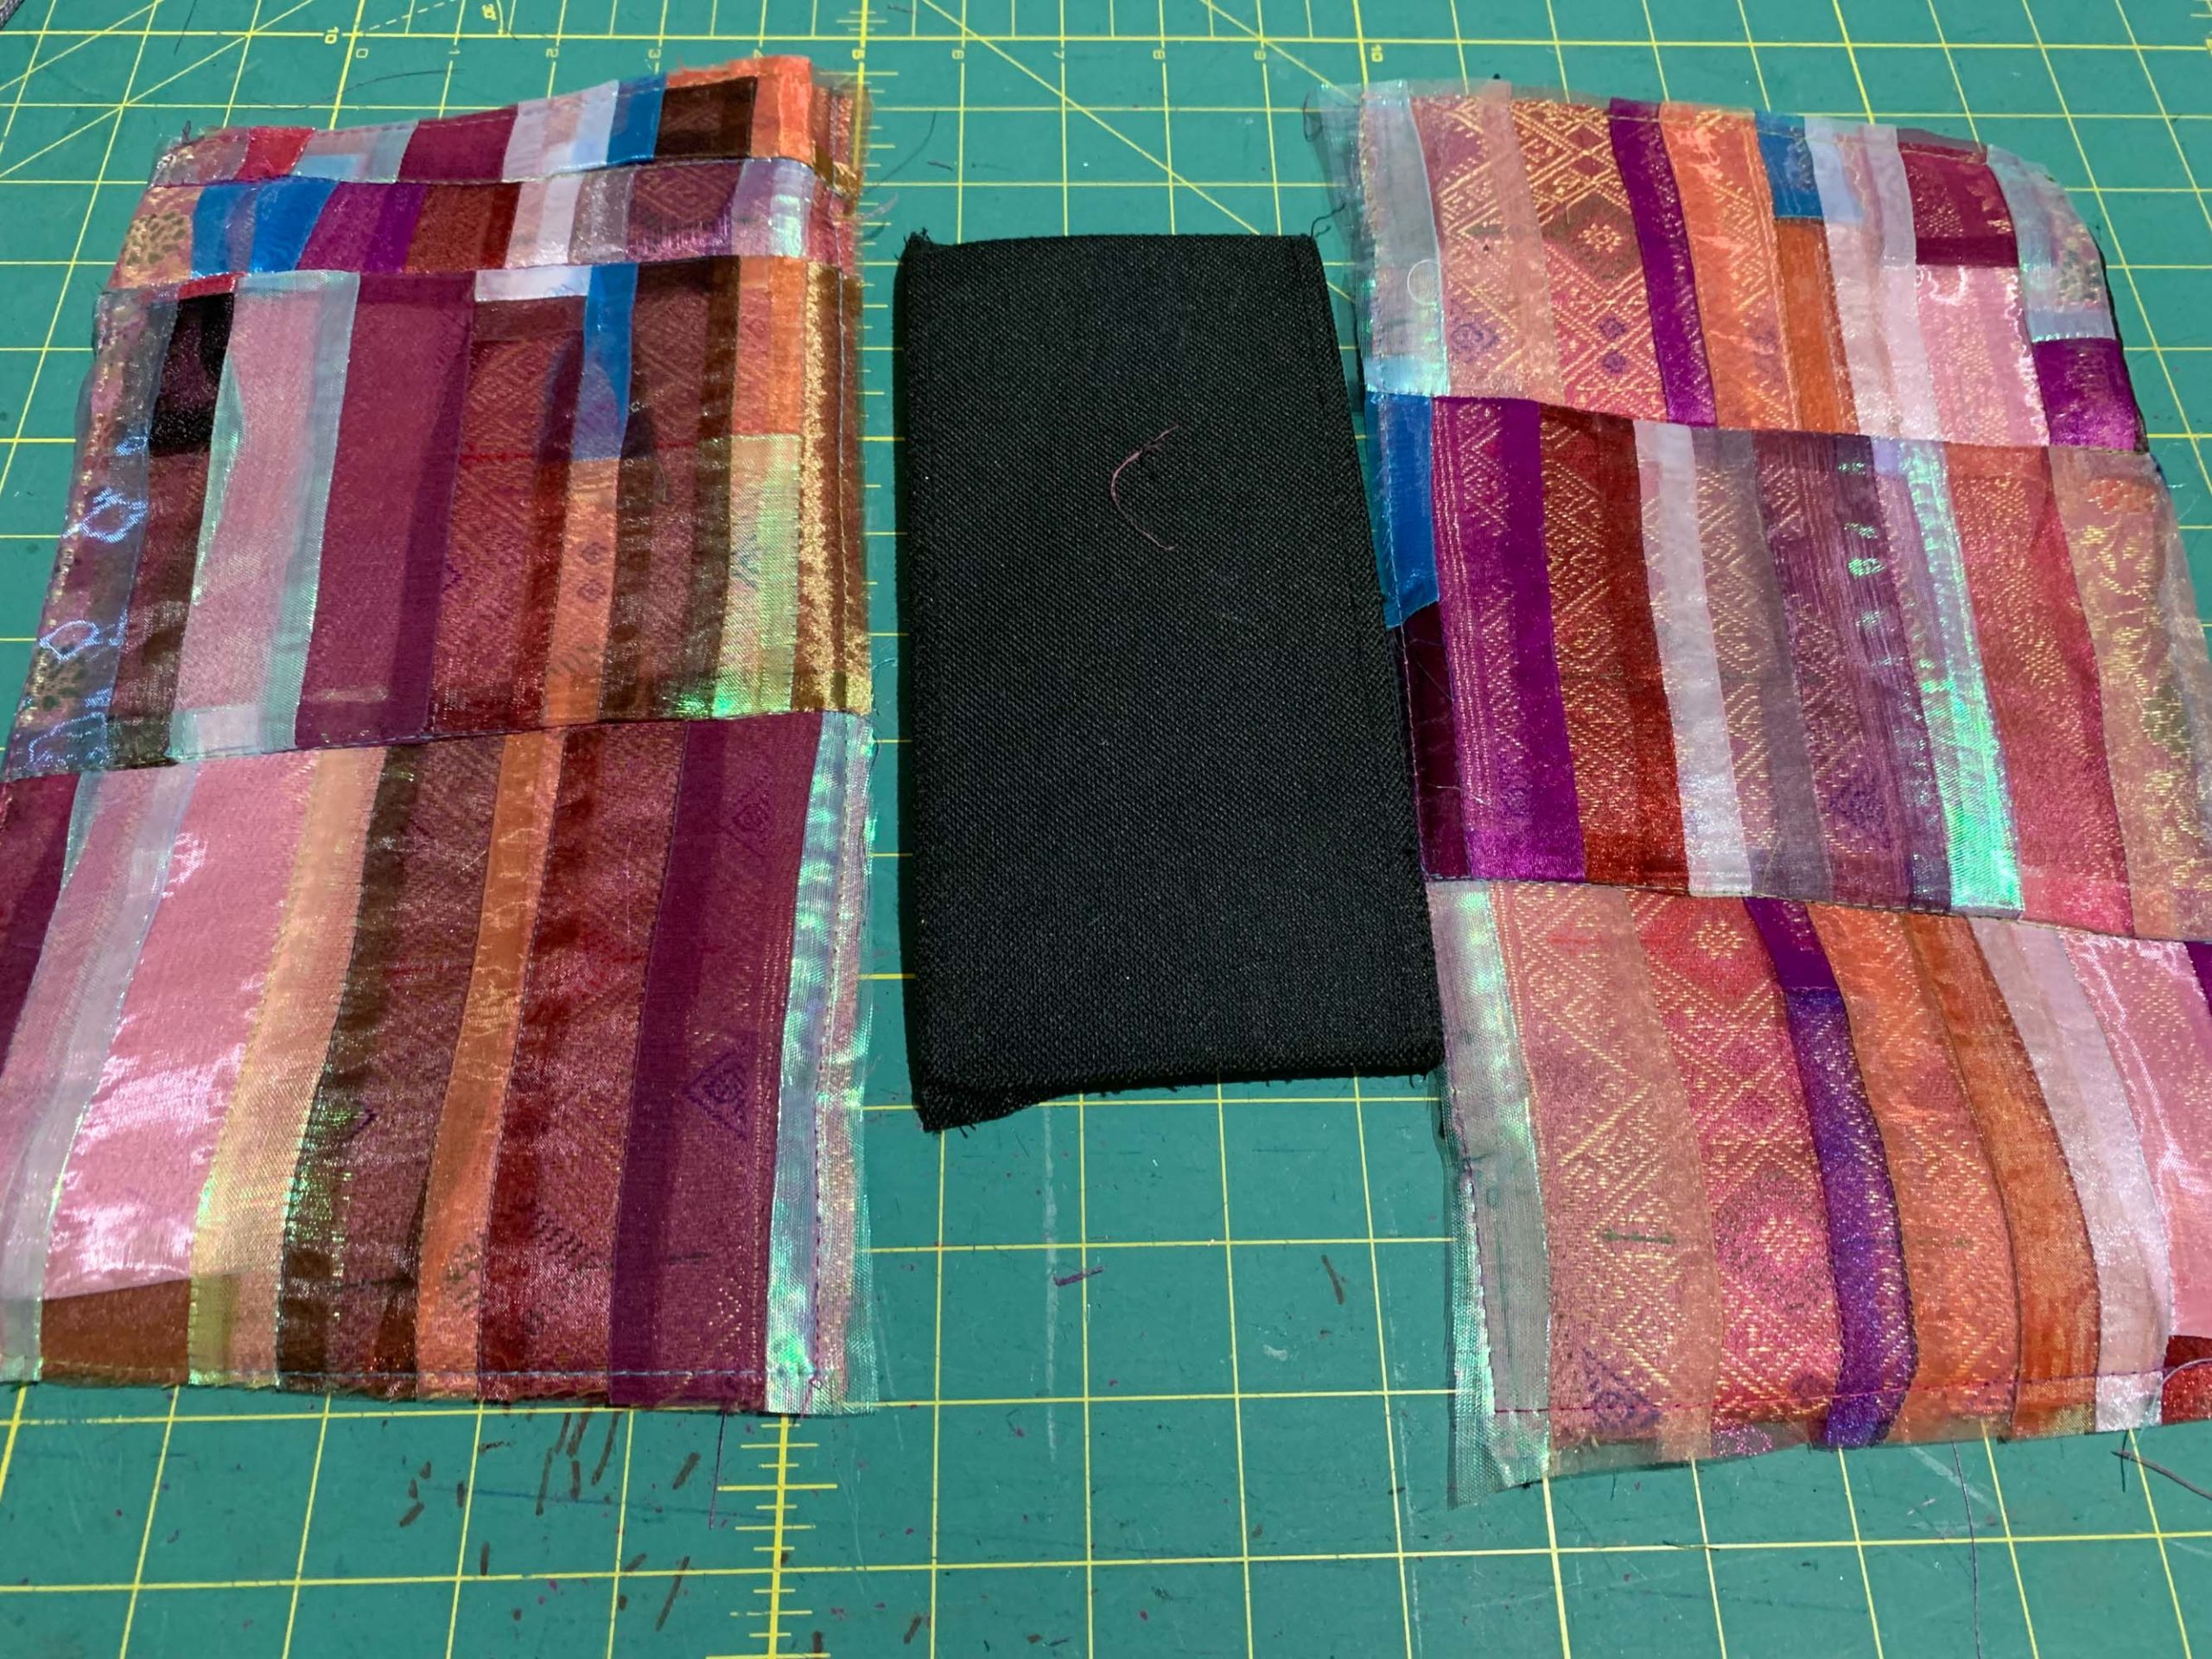
I made up a bunch of organza cup flowers and hand sewed them with bling all over to decorate and add extra texture. I sewed the bag back together, made a new lining with extra internal pockets, added a magnetic closure and used the original handles.

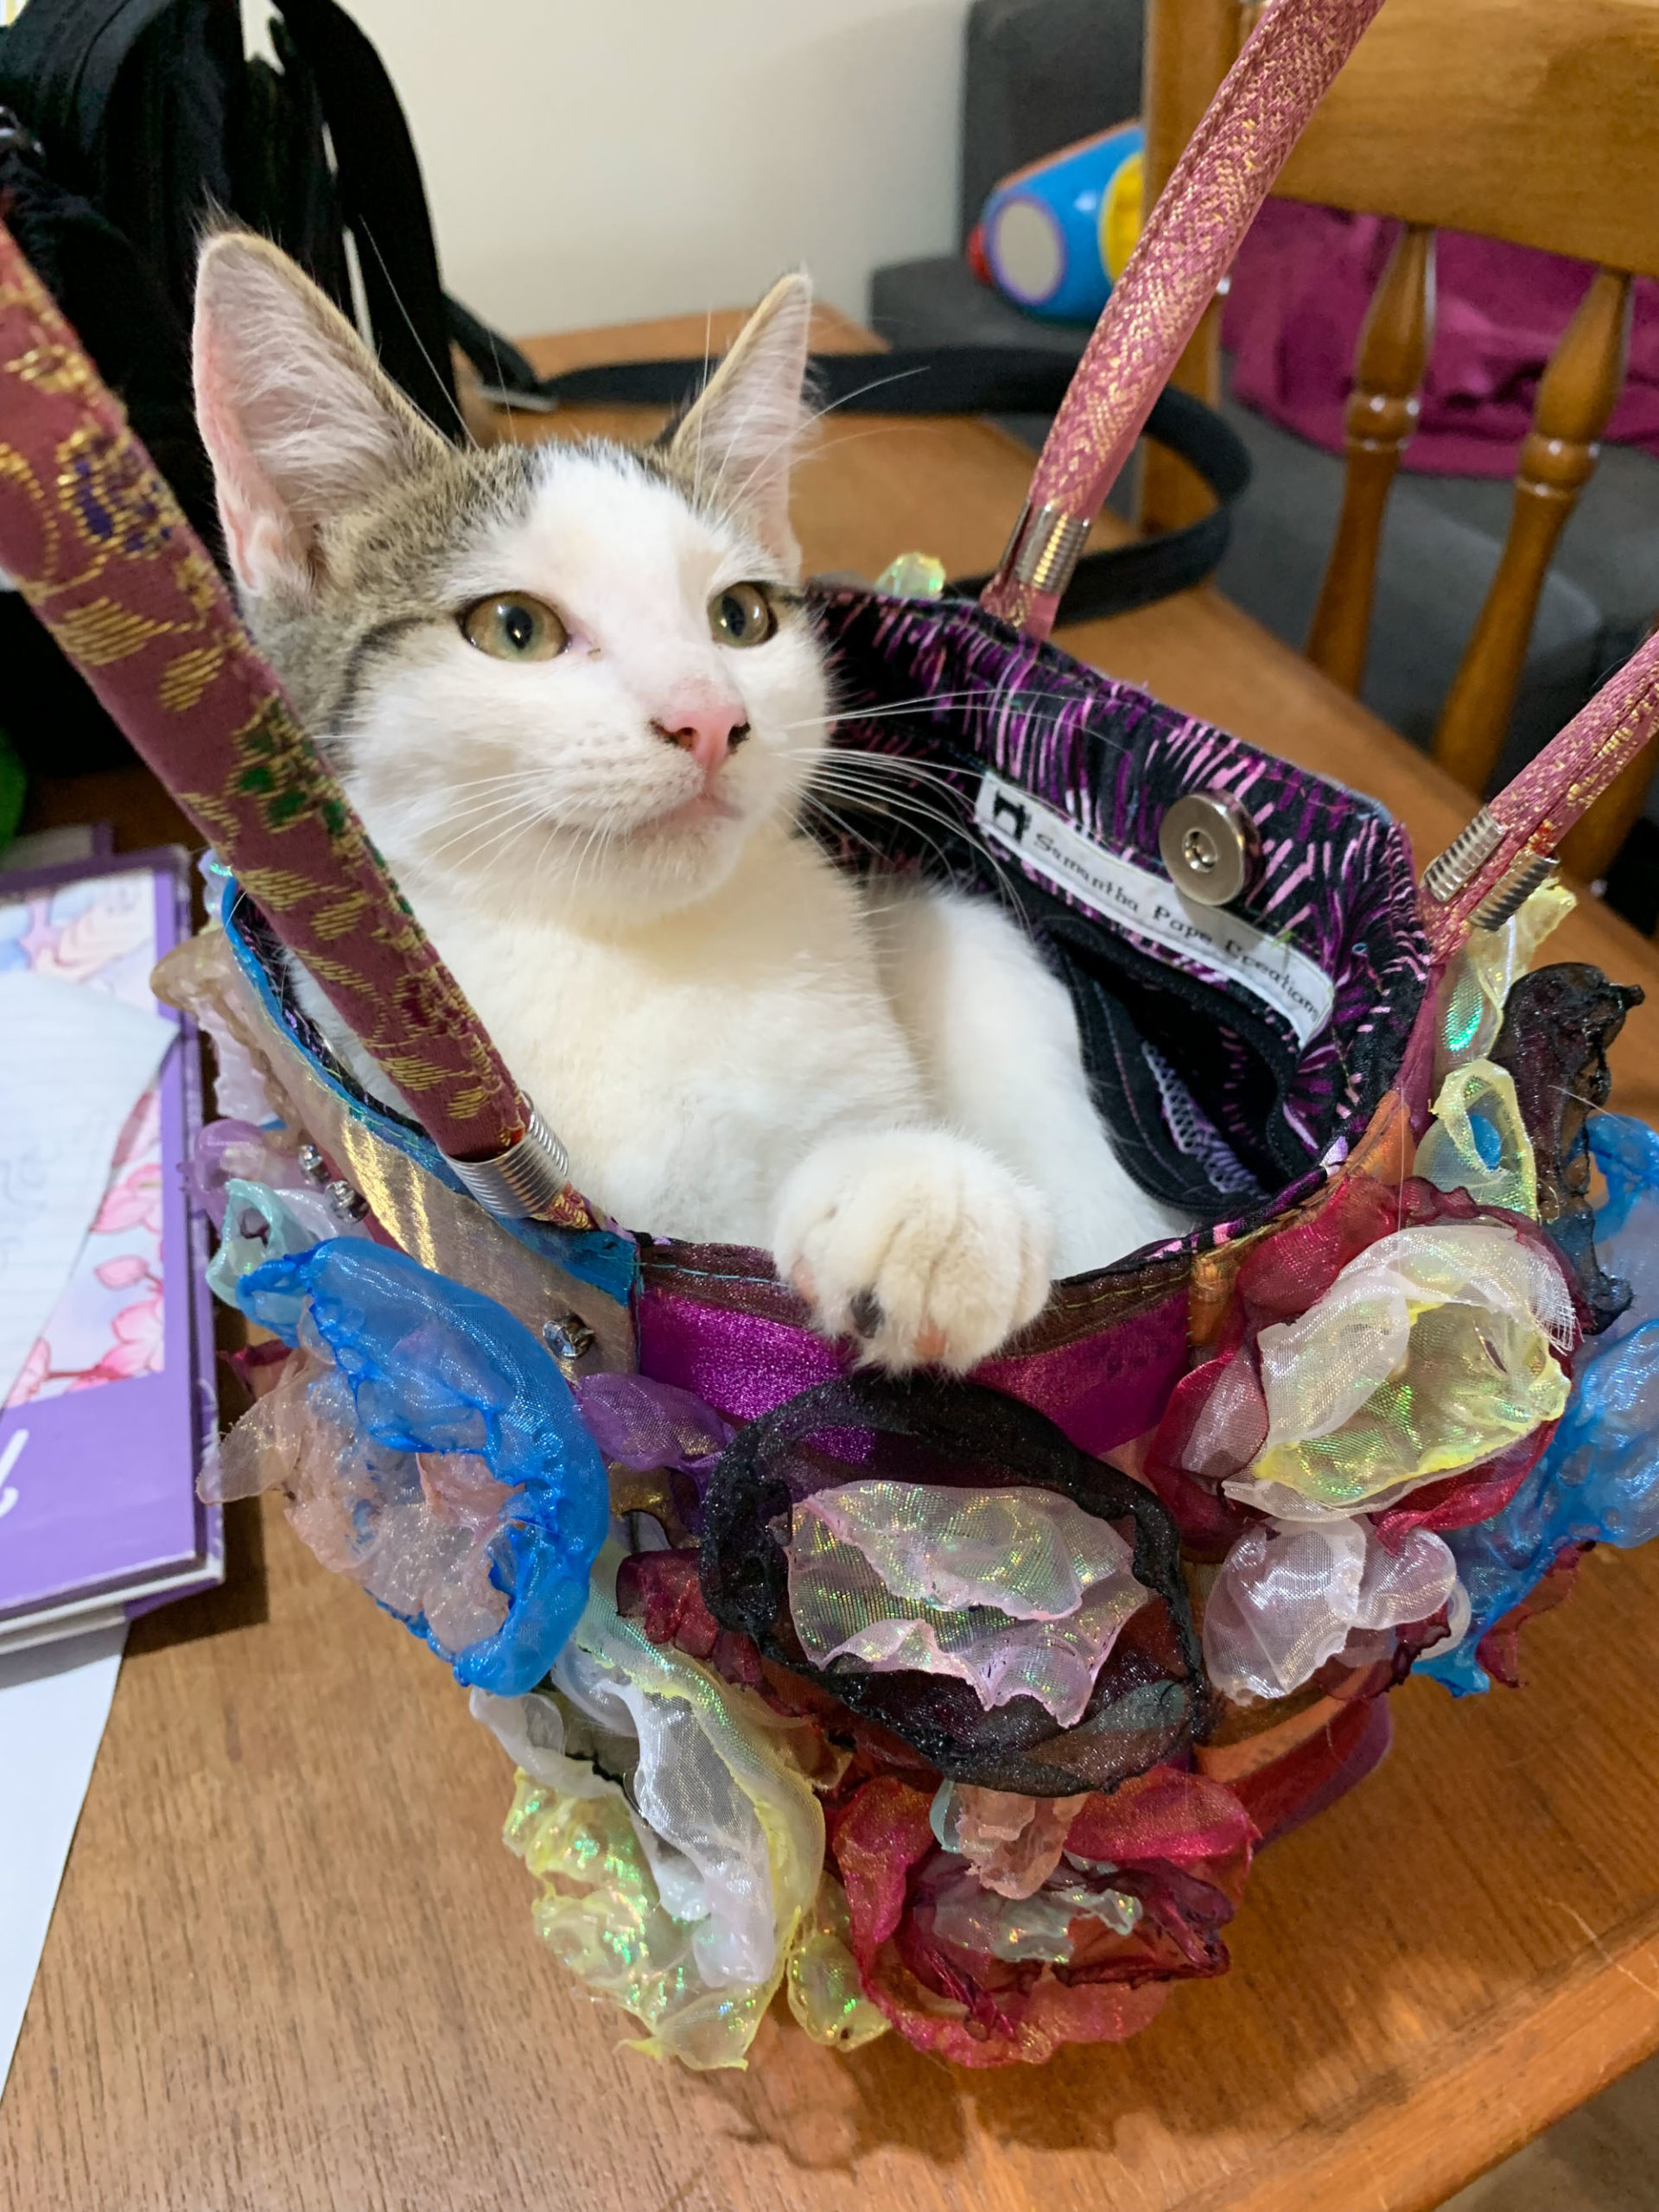
I had my new bag cat scanned for approval!
The patchwork you created out of organza is incredible. What tips do you have for sewing with organza?
I like organza for its variety of colours and finishes available. I use it a lot in costumes because it gives great stage presence. If I see a colour or texture I like on sale, I will buy 2-5 metres to add to my stash for future use.
Here are my tips for working with organza:
- Heat is the enemy when it comes to polyester organza. My tip is always wait for the iron to fully reach the set temperature then test your iron on a scrap of organza first! At work I have had to creatively repair peoples mishaps with too hot irons on their clothes.
- Use a new needle because a blunt needle will pull the fibres.
- Don’t sew a narrow seam allowance as it will probably pull out. Use a wide seam or a french seam which is sewn twice for extra strength and neatness.
- Polyester organza is not at all suitable for tight fitting clothing, the seams will stress and pull if any tension is put on them. Go with georgette or chiffon instead for a sheer appearance.
- If you can justify the cost silk organza is a very beautiful fabric to work with. The colours are not as bright or shiny as polyester but the finish is crisp.
- I use a piece of white silk organza as a pressing cloth because it will take a very hot iron and you can see through it to what you are pressing.
What did you enjoy most and least about creating your Kimball?
I am not a planner. When I started this Kimball, I had an image in my mind of the general appearance and just went for it. I made each the log cabin block without a plan for where it would go, and once I had a pile I just started creating the fabric and enjoyed the ride. This is how my creativity works—I listen to audiobooks and go with the flow. That was my favourite part.
Construction is not my favourite. I did manage to plan the fronts so the diagonal lines match sort of at the zip and I did deliberately place a strip of silk organza in the position of the welt pockets to add stability and a solid grain line for the stitching.
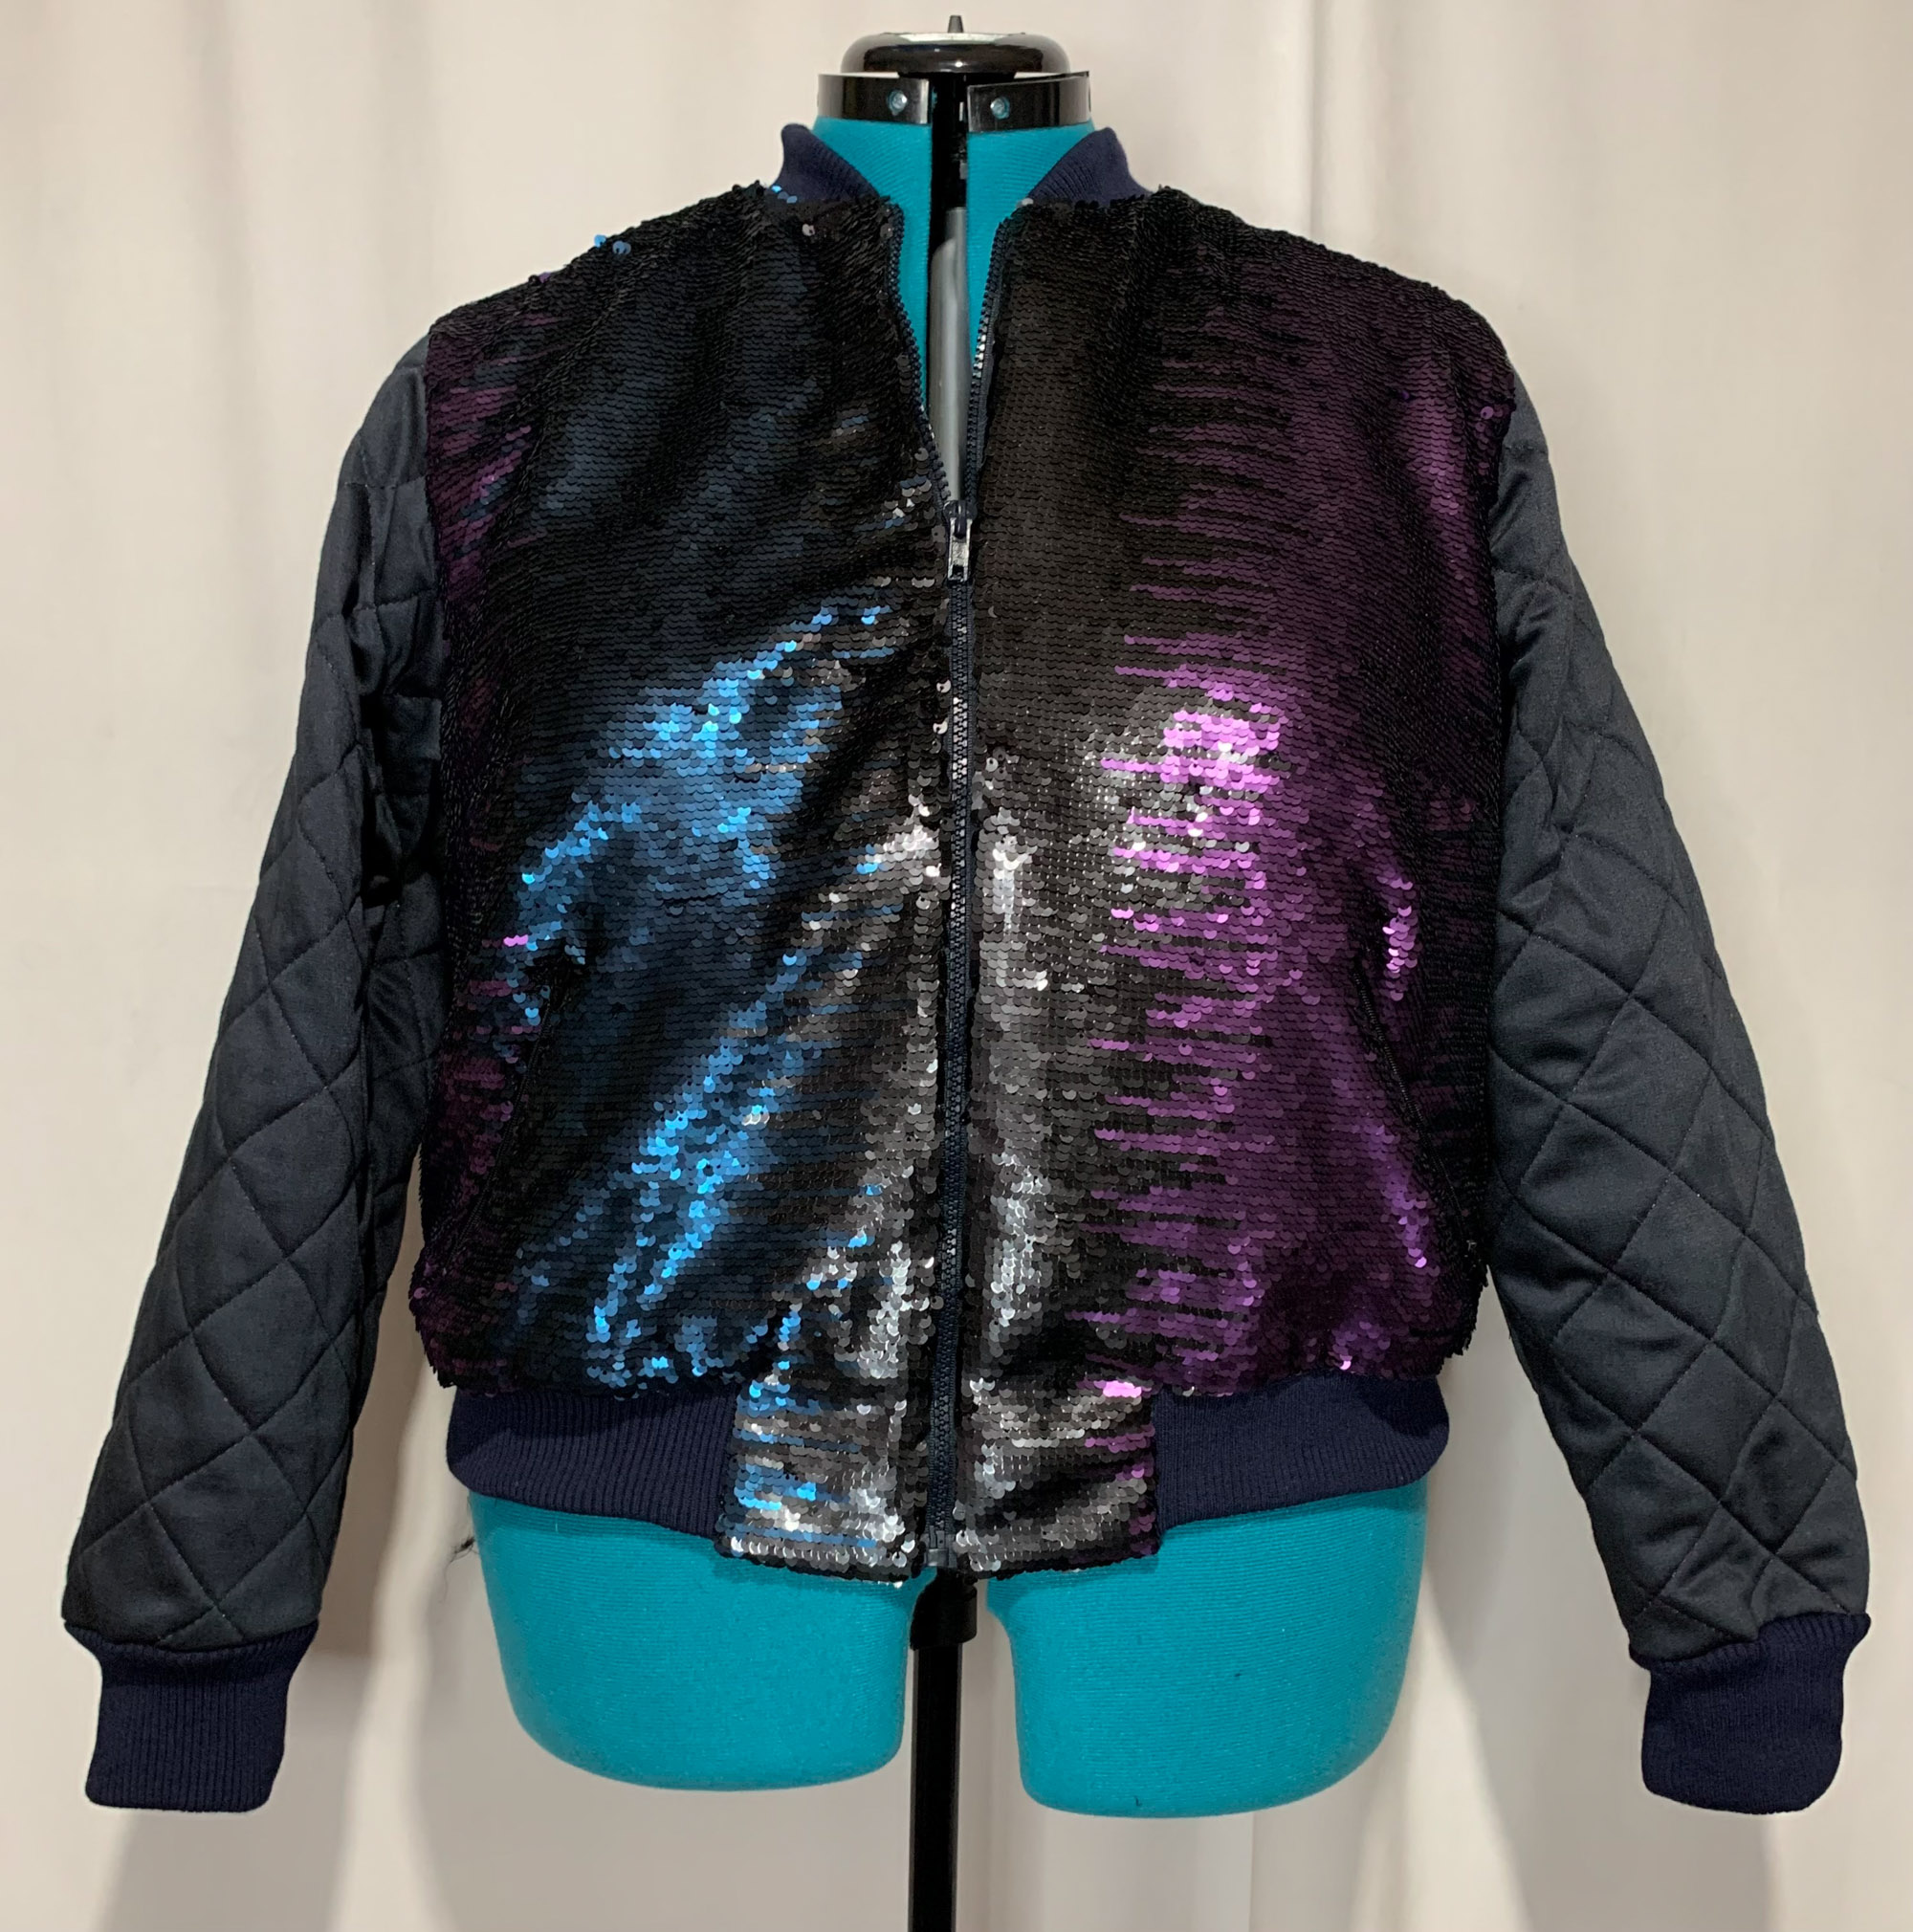
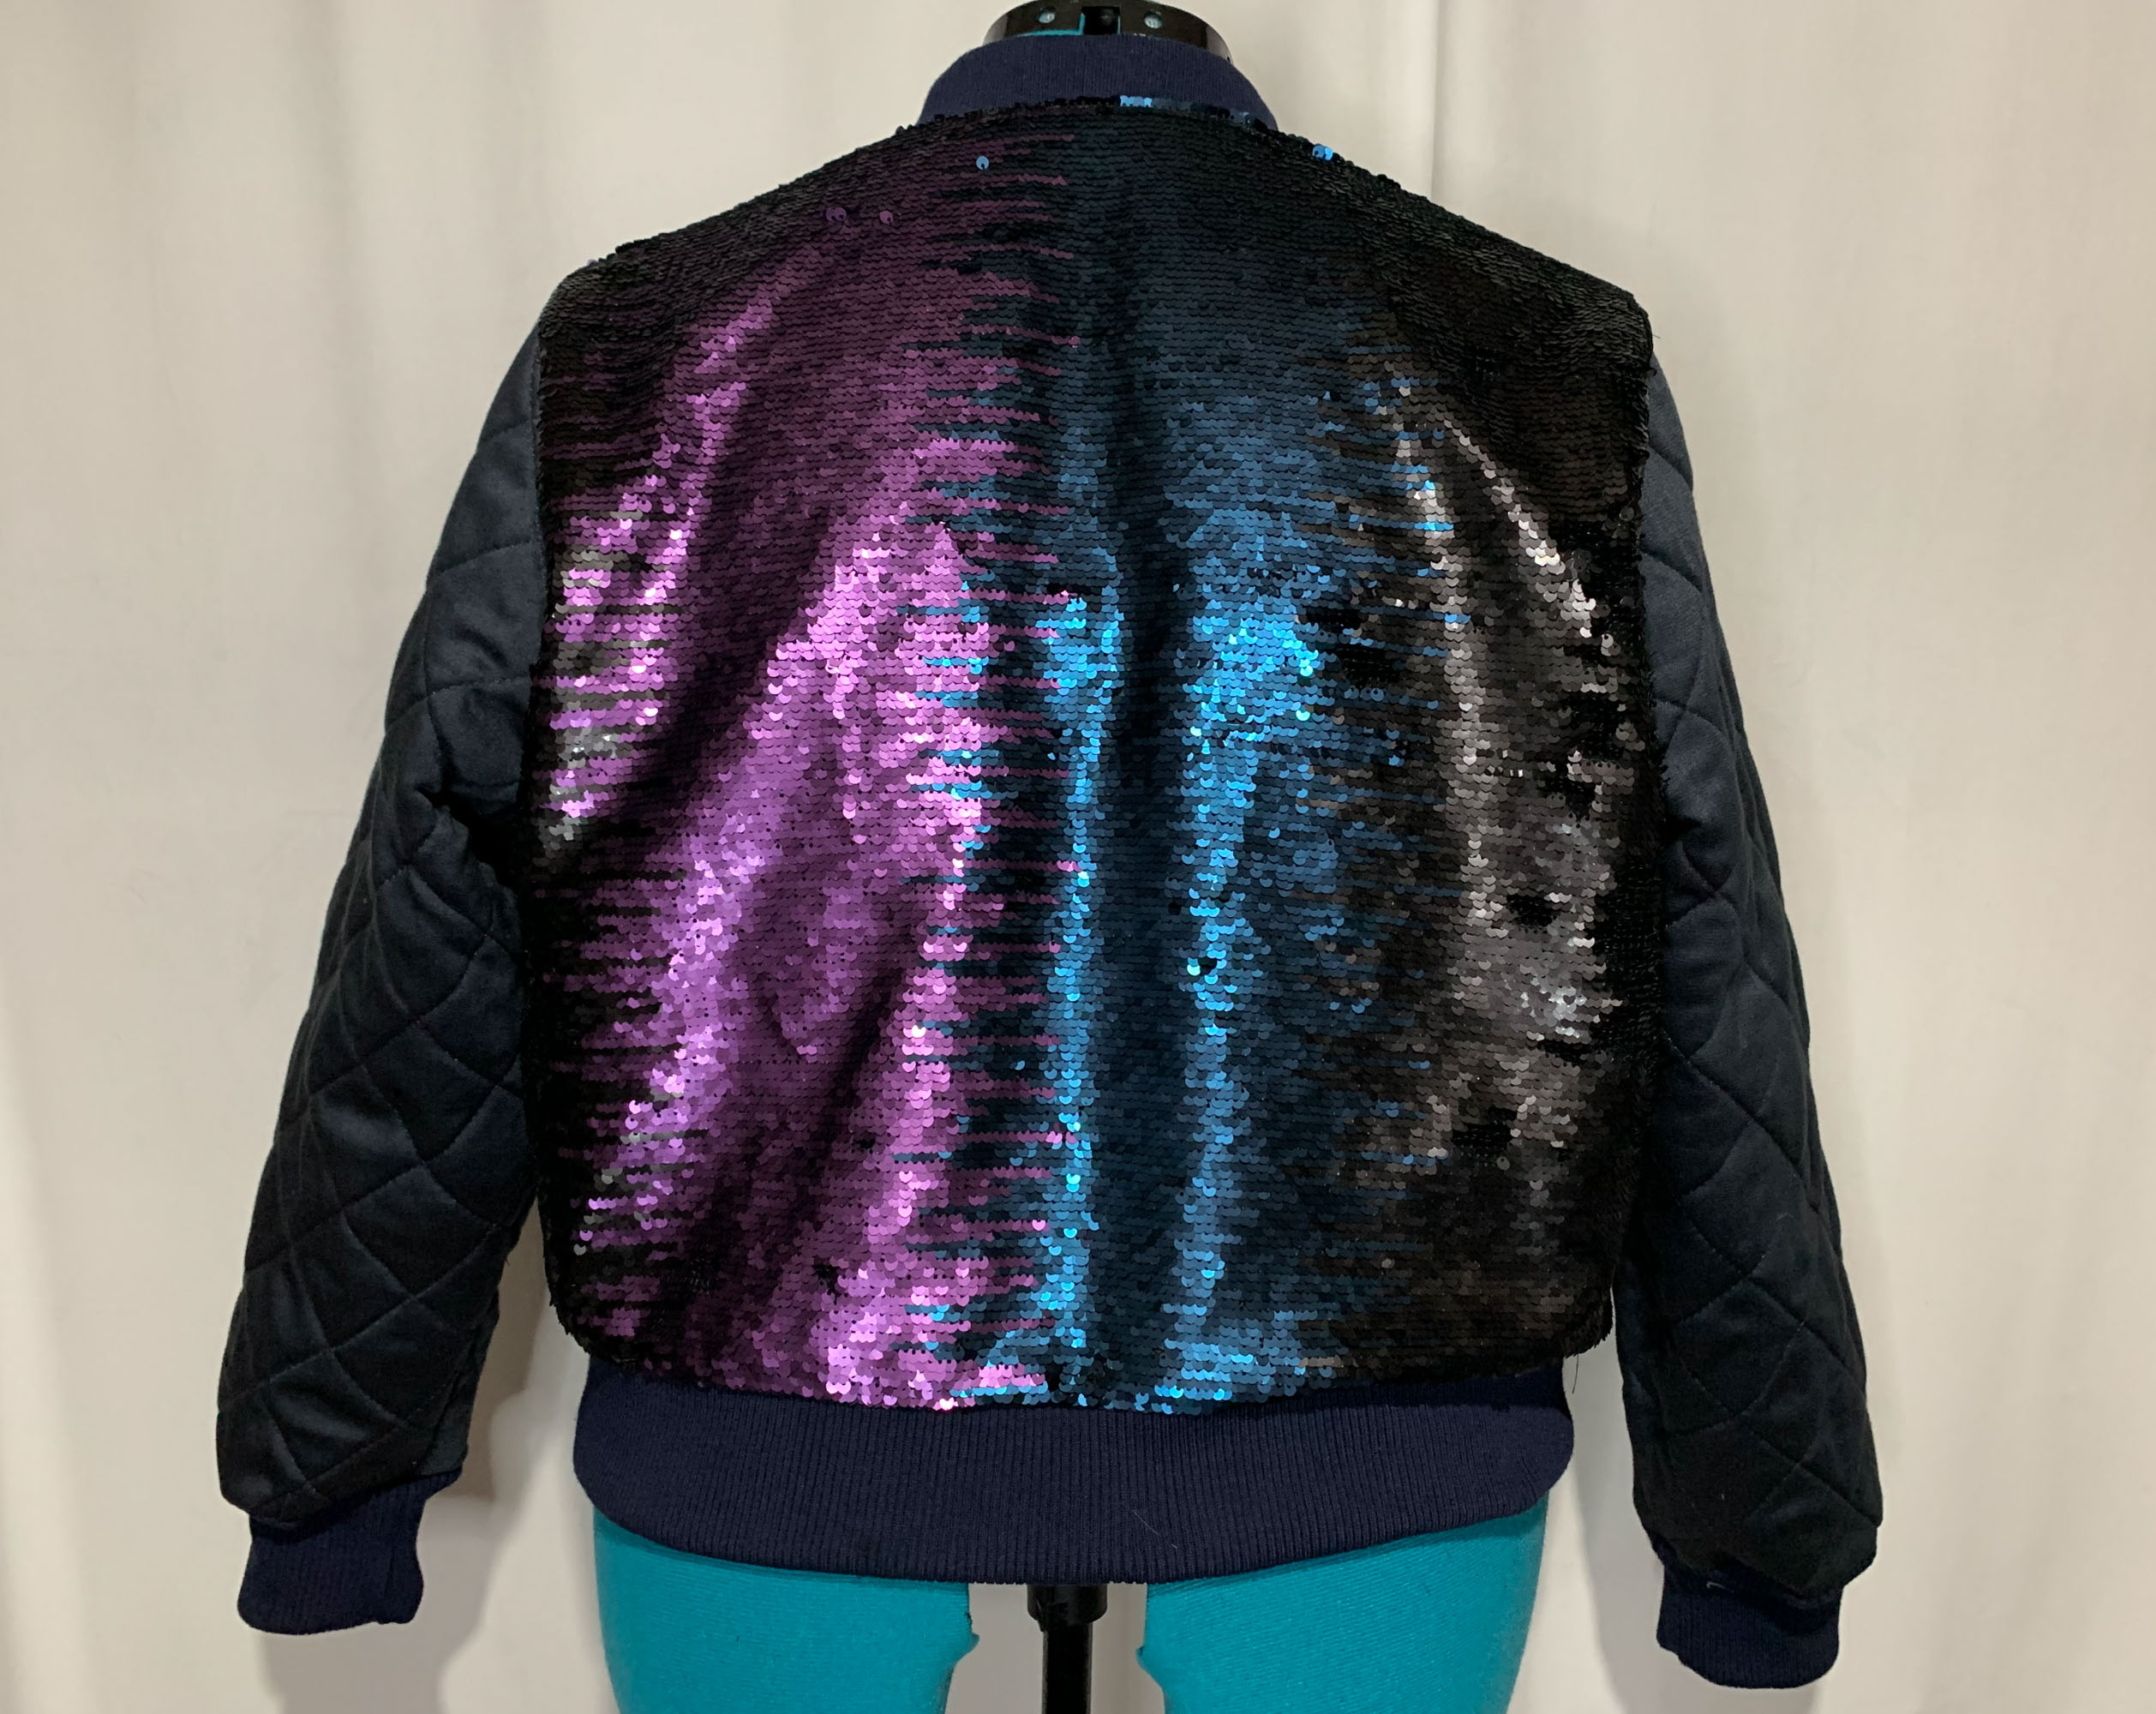
You’ve since made another Kimball. Tell us about that one!
I had some sequin fabric that I bought planning to make a dress, but when I got it the actual width of the sequin portion was only 70cm with another 60cm of just mesh. This limited my options as to what I could make. But when the Kimball came along, my size fit perfectly on the fabric, so it was destined to be.

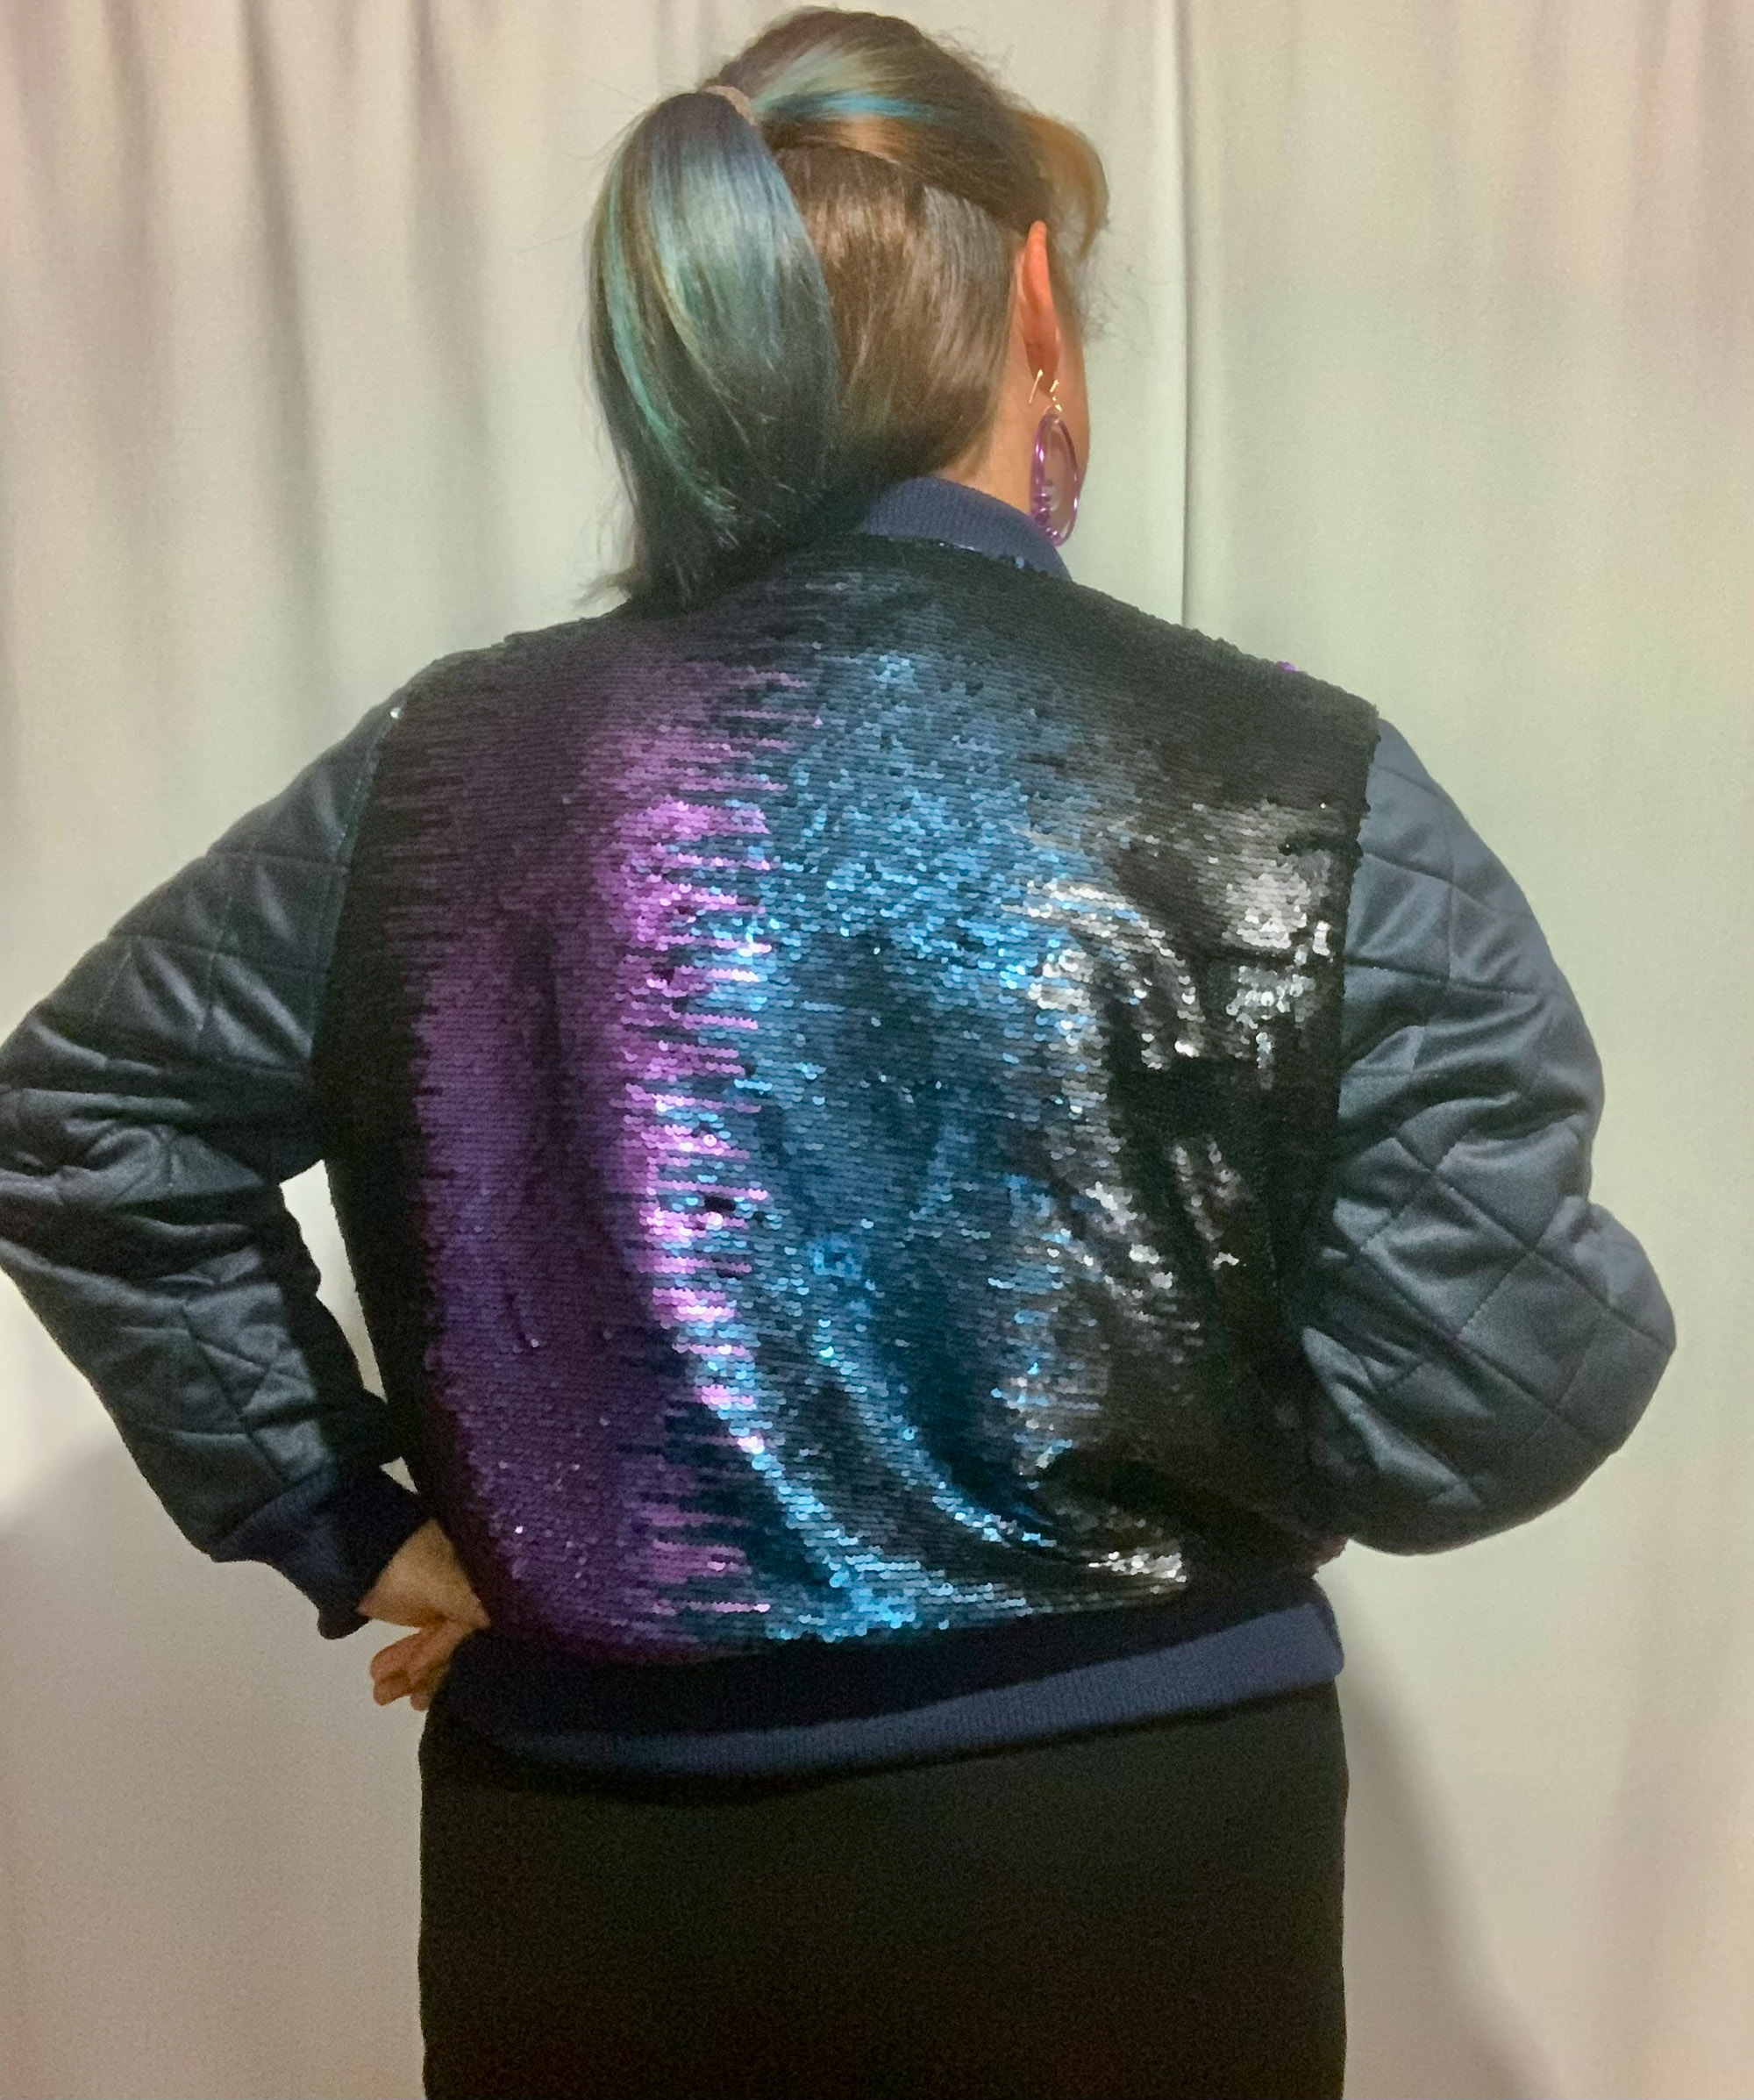
I cut out the fabric with the stripes going up and down. This meant my grainline was going around my body and the stretch was up and down.
To support the stretch mesh backing fabric for when I cut all the sequins away, I cut strips of interfacing 3/4” wide and ironed them to the wrong side of the fabric over all the seam lines, bust dart and welt placements.
Because the stretch was going down the body, I also fused interfacing completely over the back of each pattern piece. I made sure the grainline of the interfacing was in the direction I wanted.
I hand tacked the stitching lines of the welt pocket placement and the bust darts in a contrasting thread. I carefully cut and removed all the sequins from these areas.

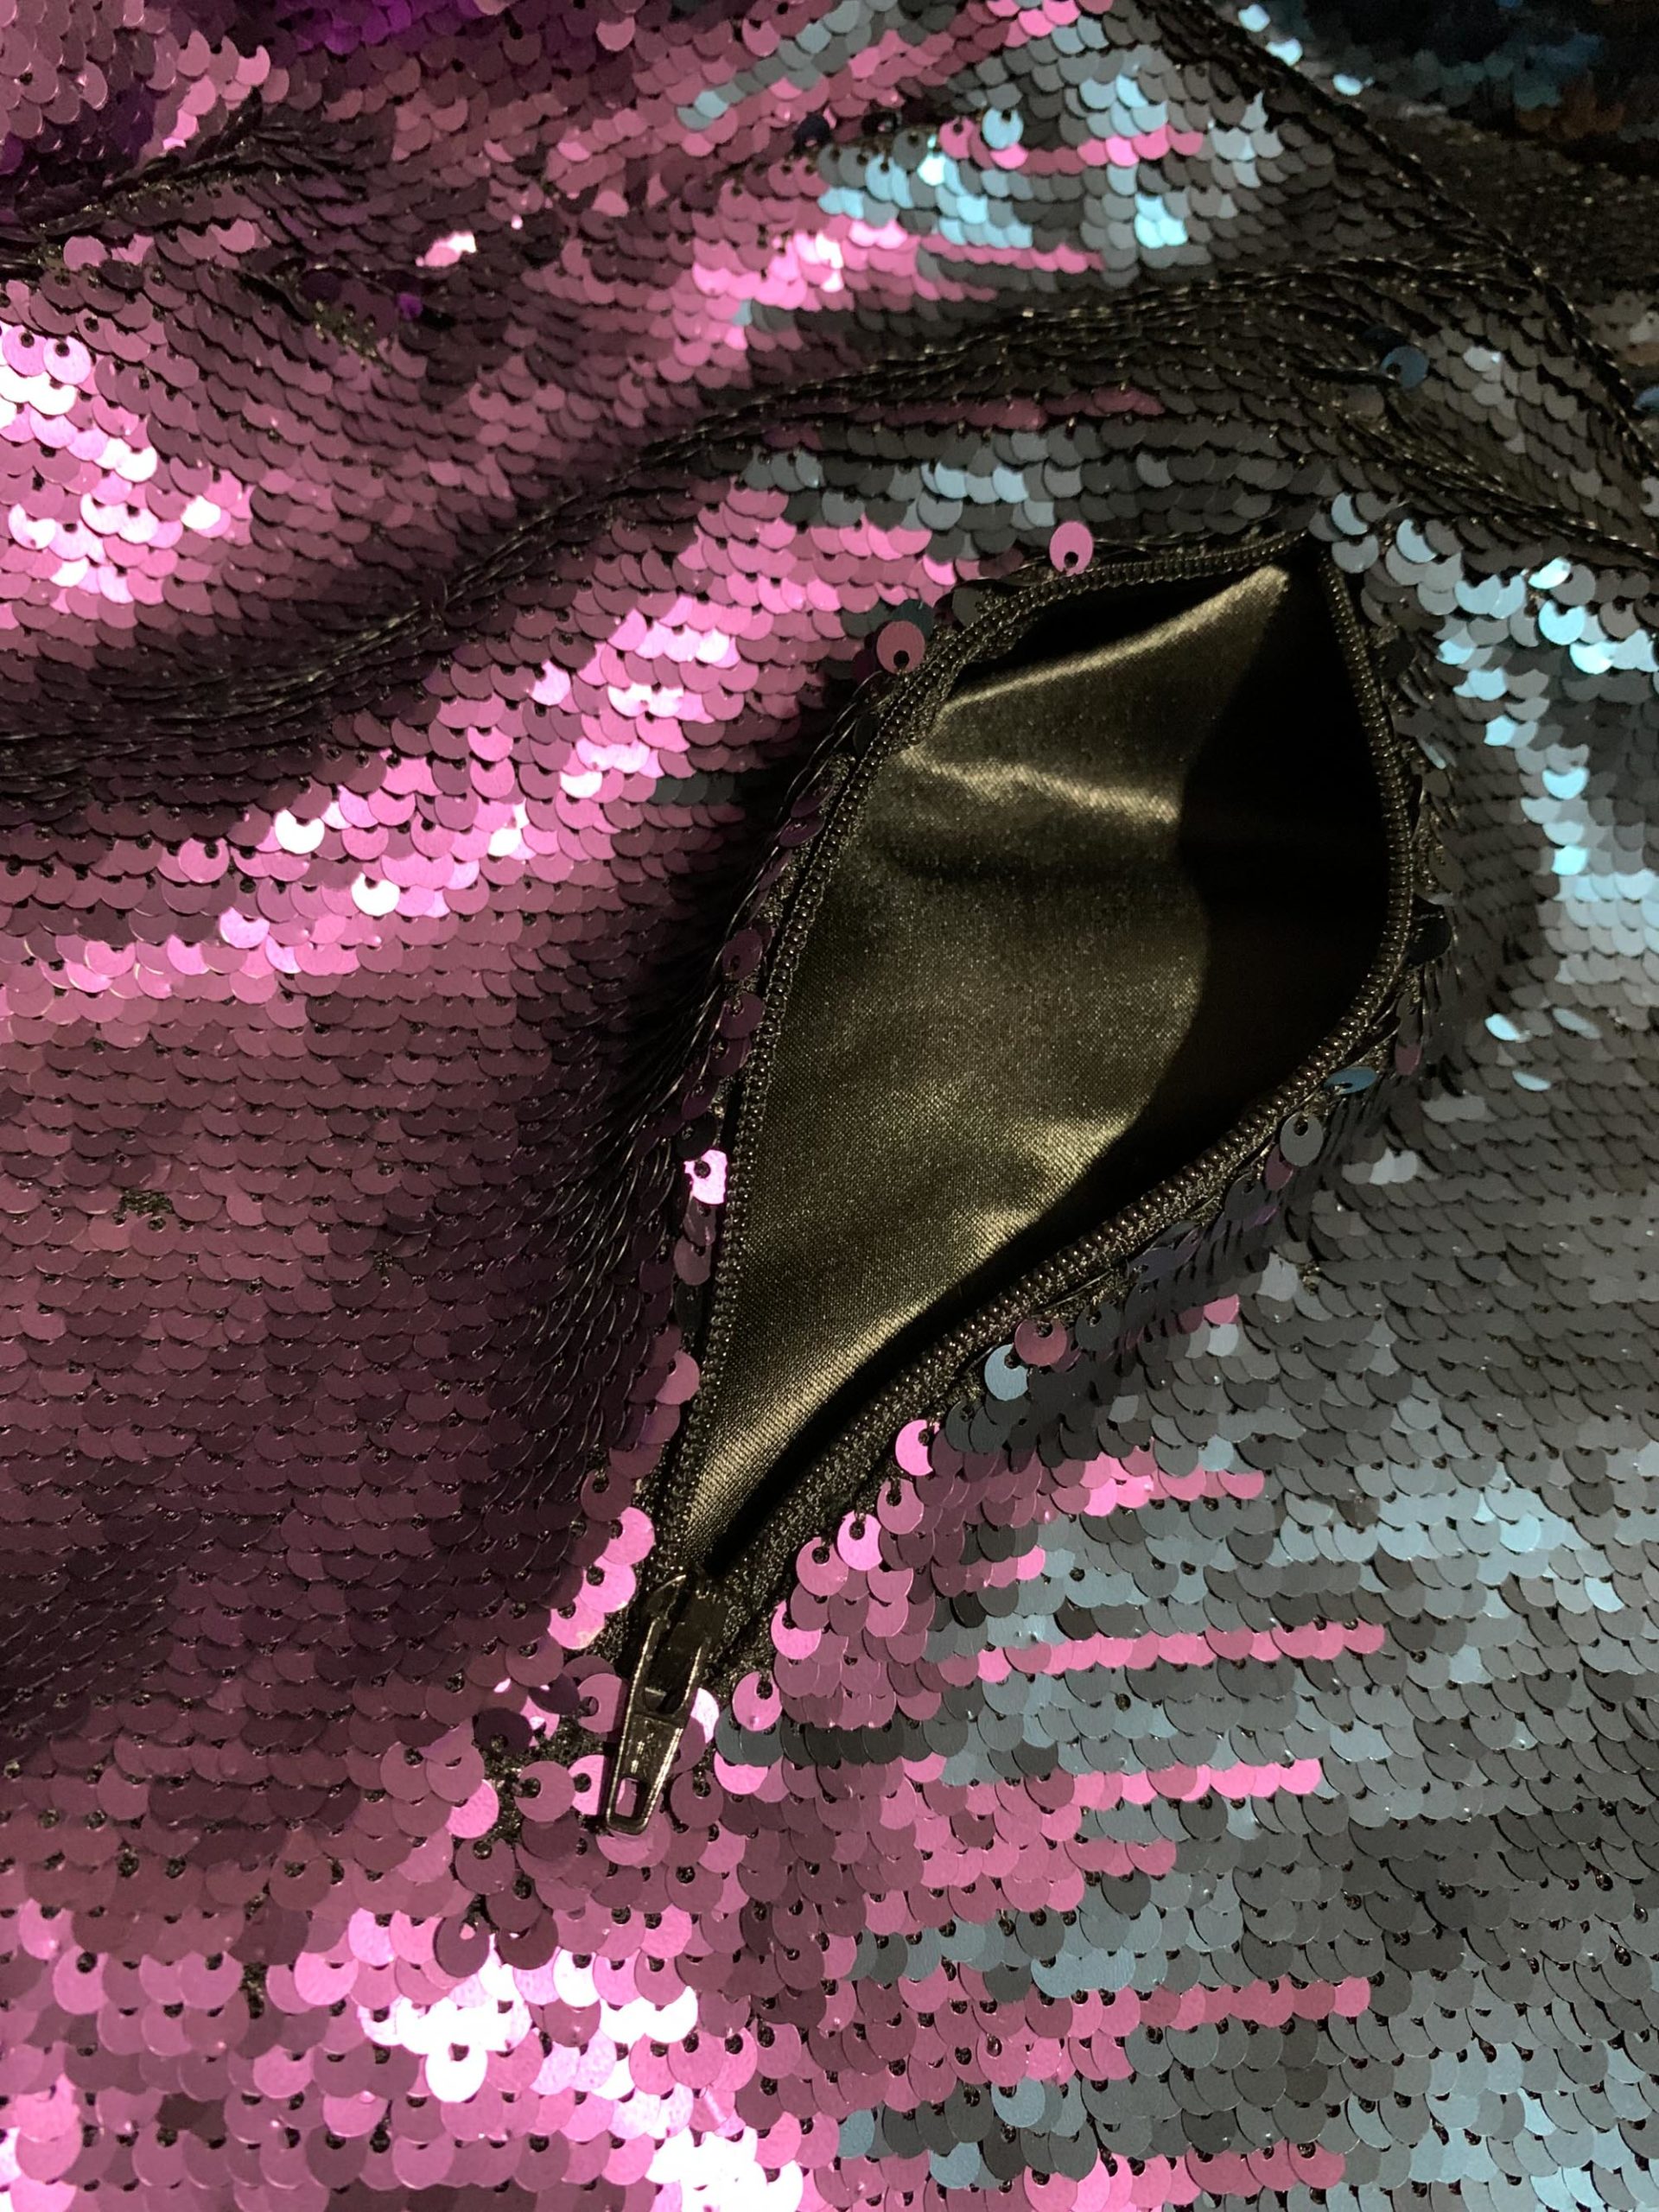
I used a wet look satin for the pocket bags.
I did not topstitch my zip in place because the sequins were to densely packed to make this possible. Instead, I hand sewed the zip in place.
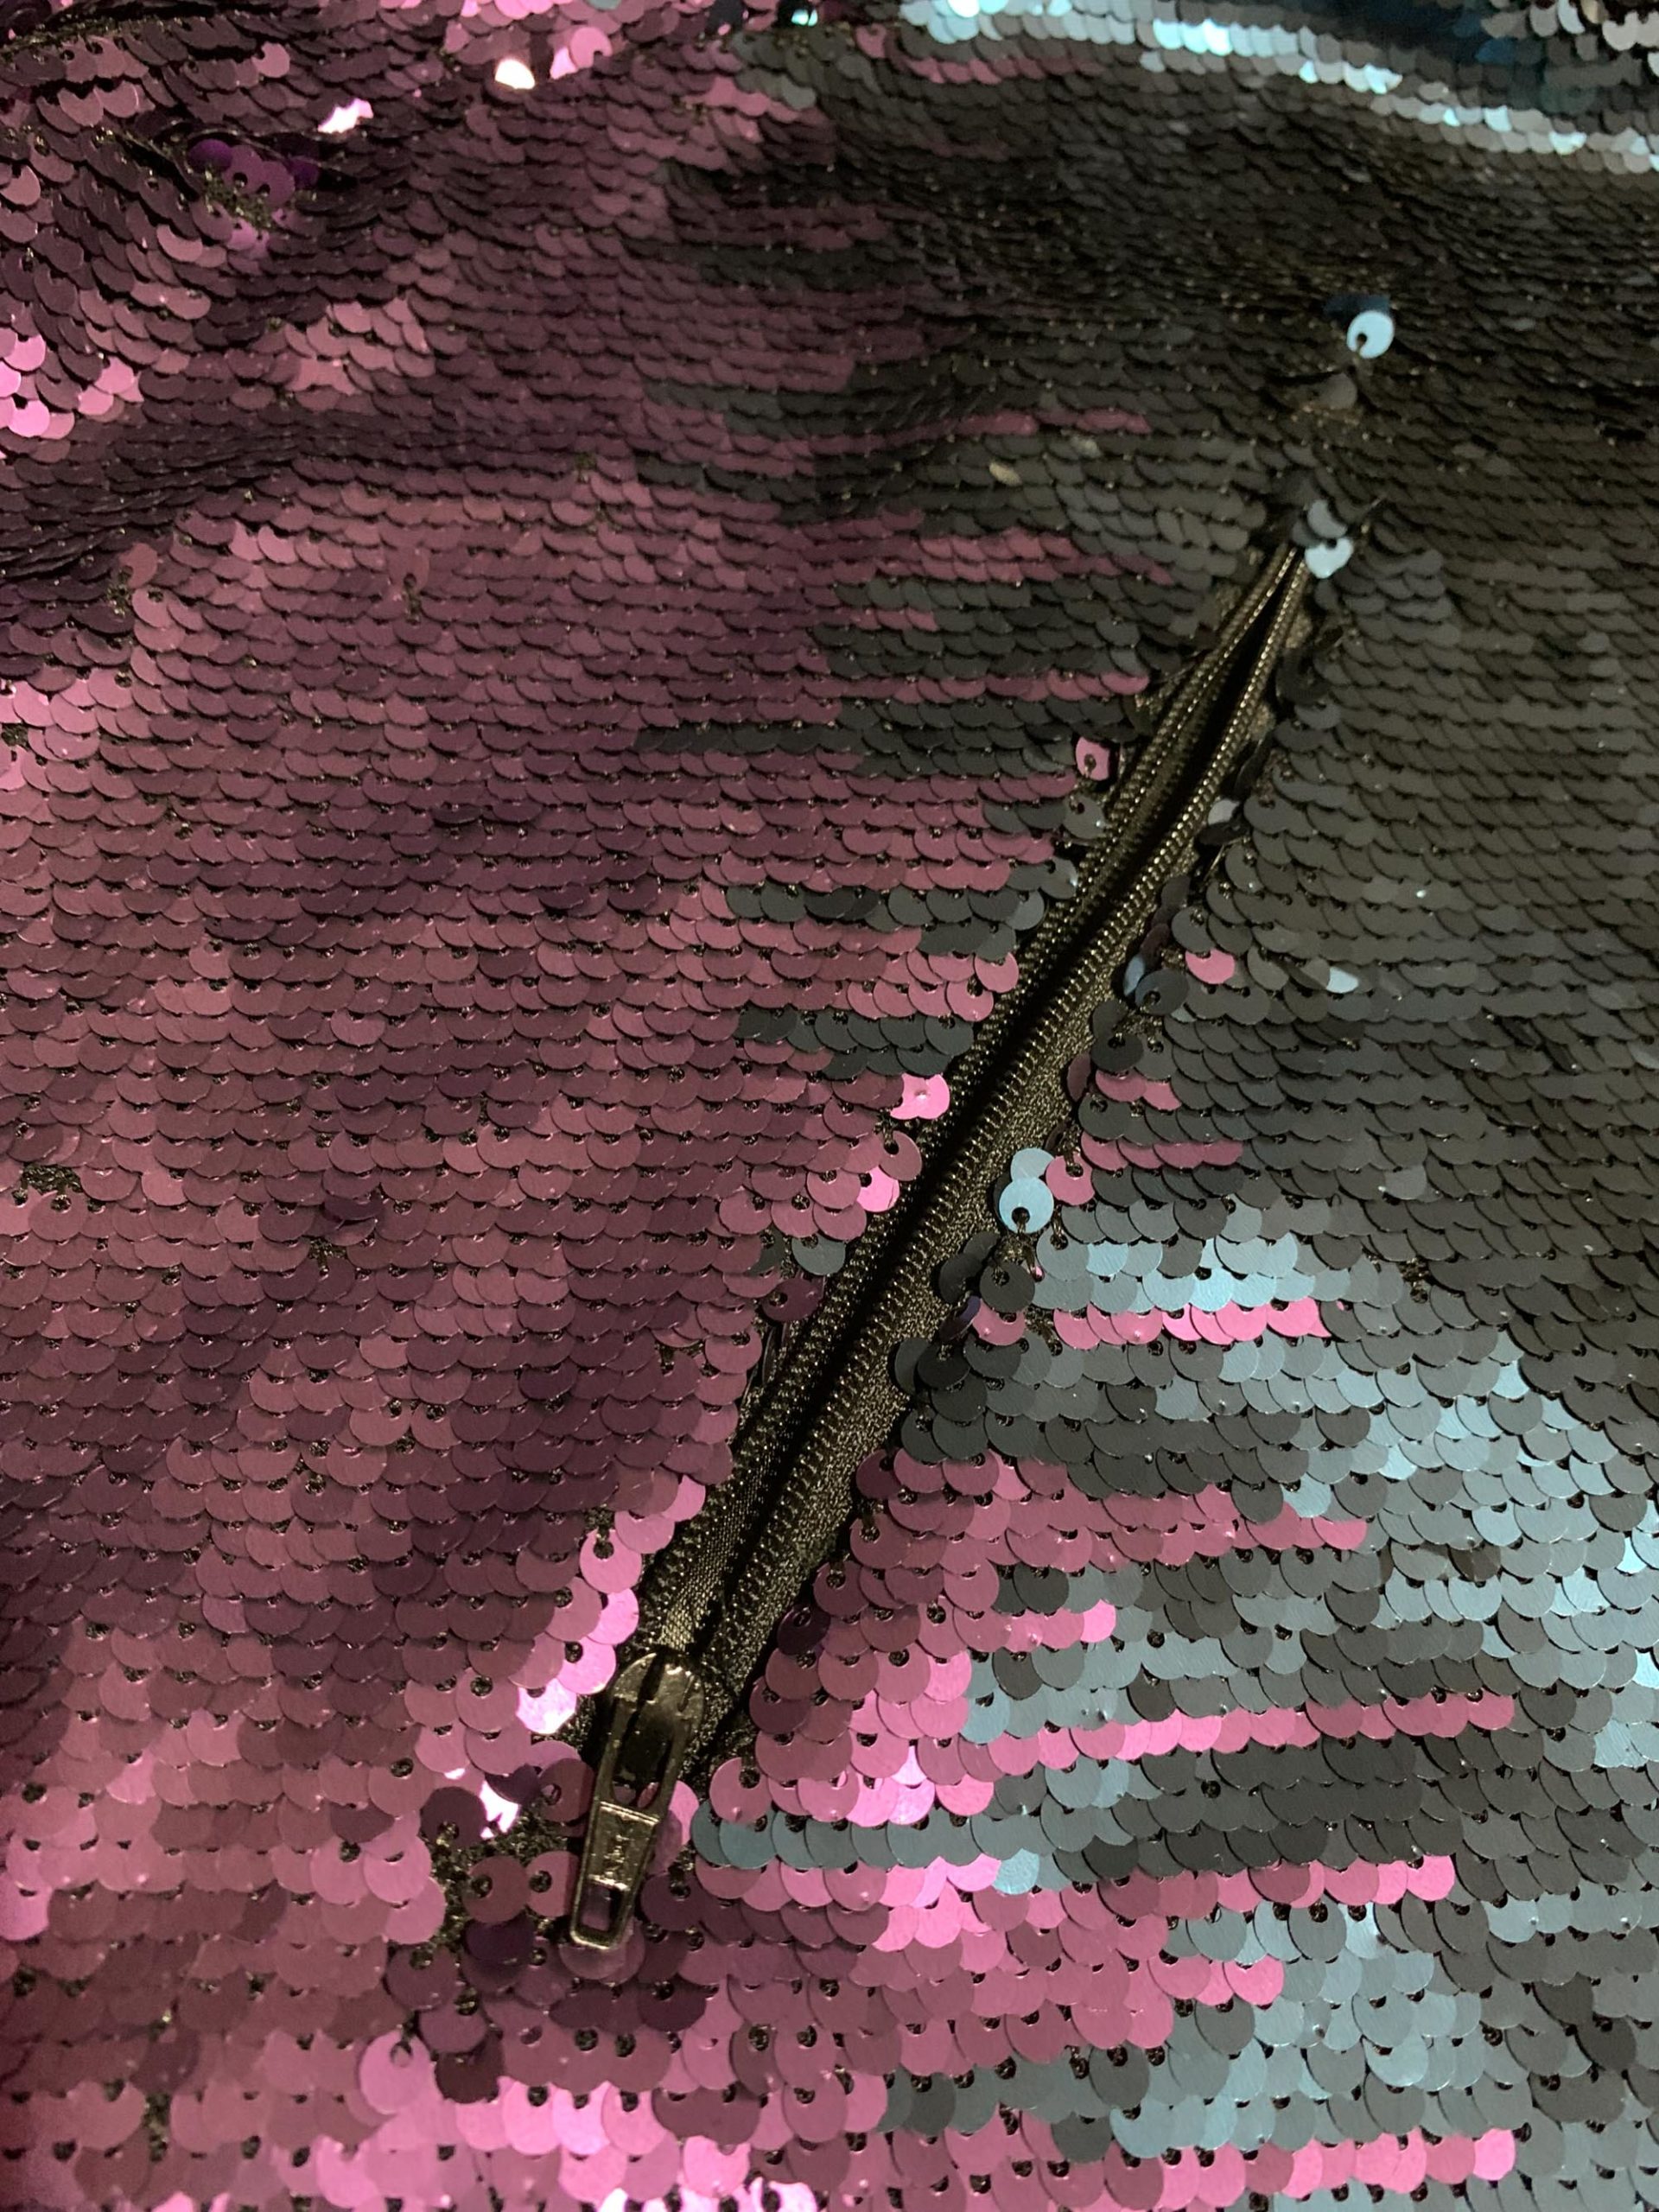
I meticulously removed the sequins from all the seam lines with snips and tweezers. I used magic tape (it peels off easily) to stick the remaining sequins down flat out of the seam line, then I topstitched in grey thread right next to the edge of the existing sequins to give myself a guideline to follow from the wrong side when sewing pieces together.
For the sleeves, I used a navy, slightly stretchy fabric with a brushed satin finish and quilted it with a variegated metallic thread. I used a thick navy rib for the bands.
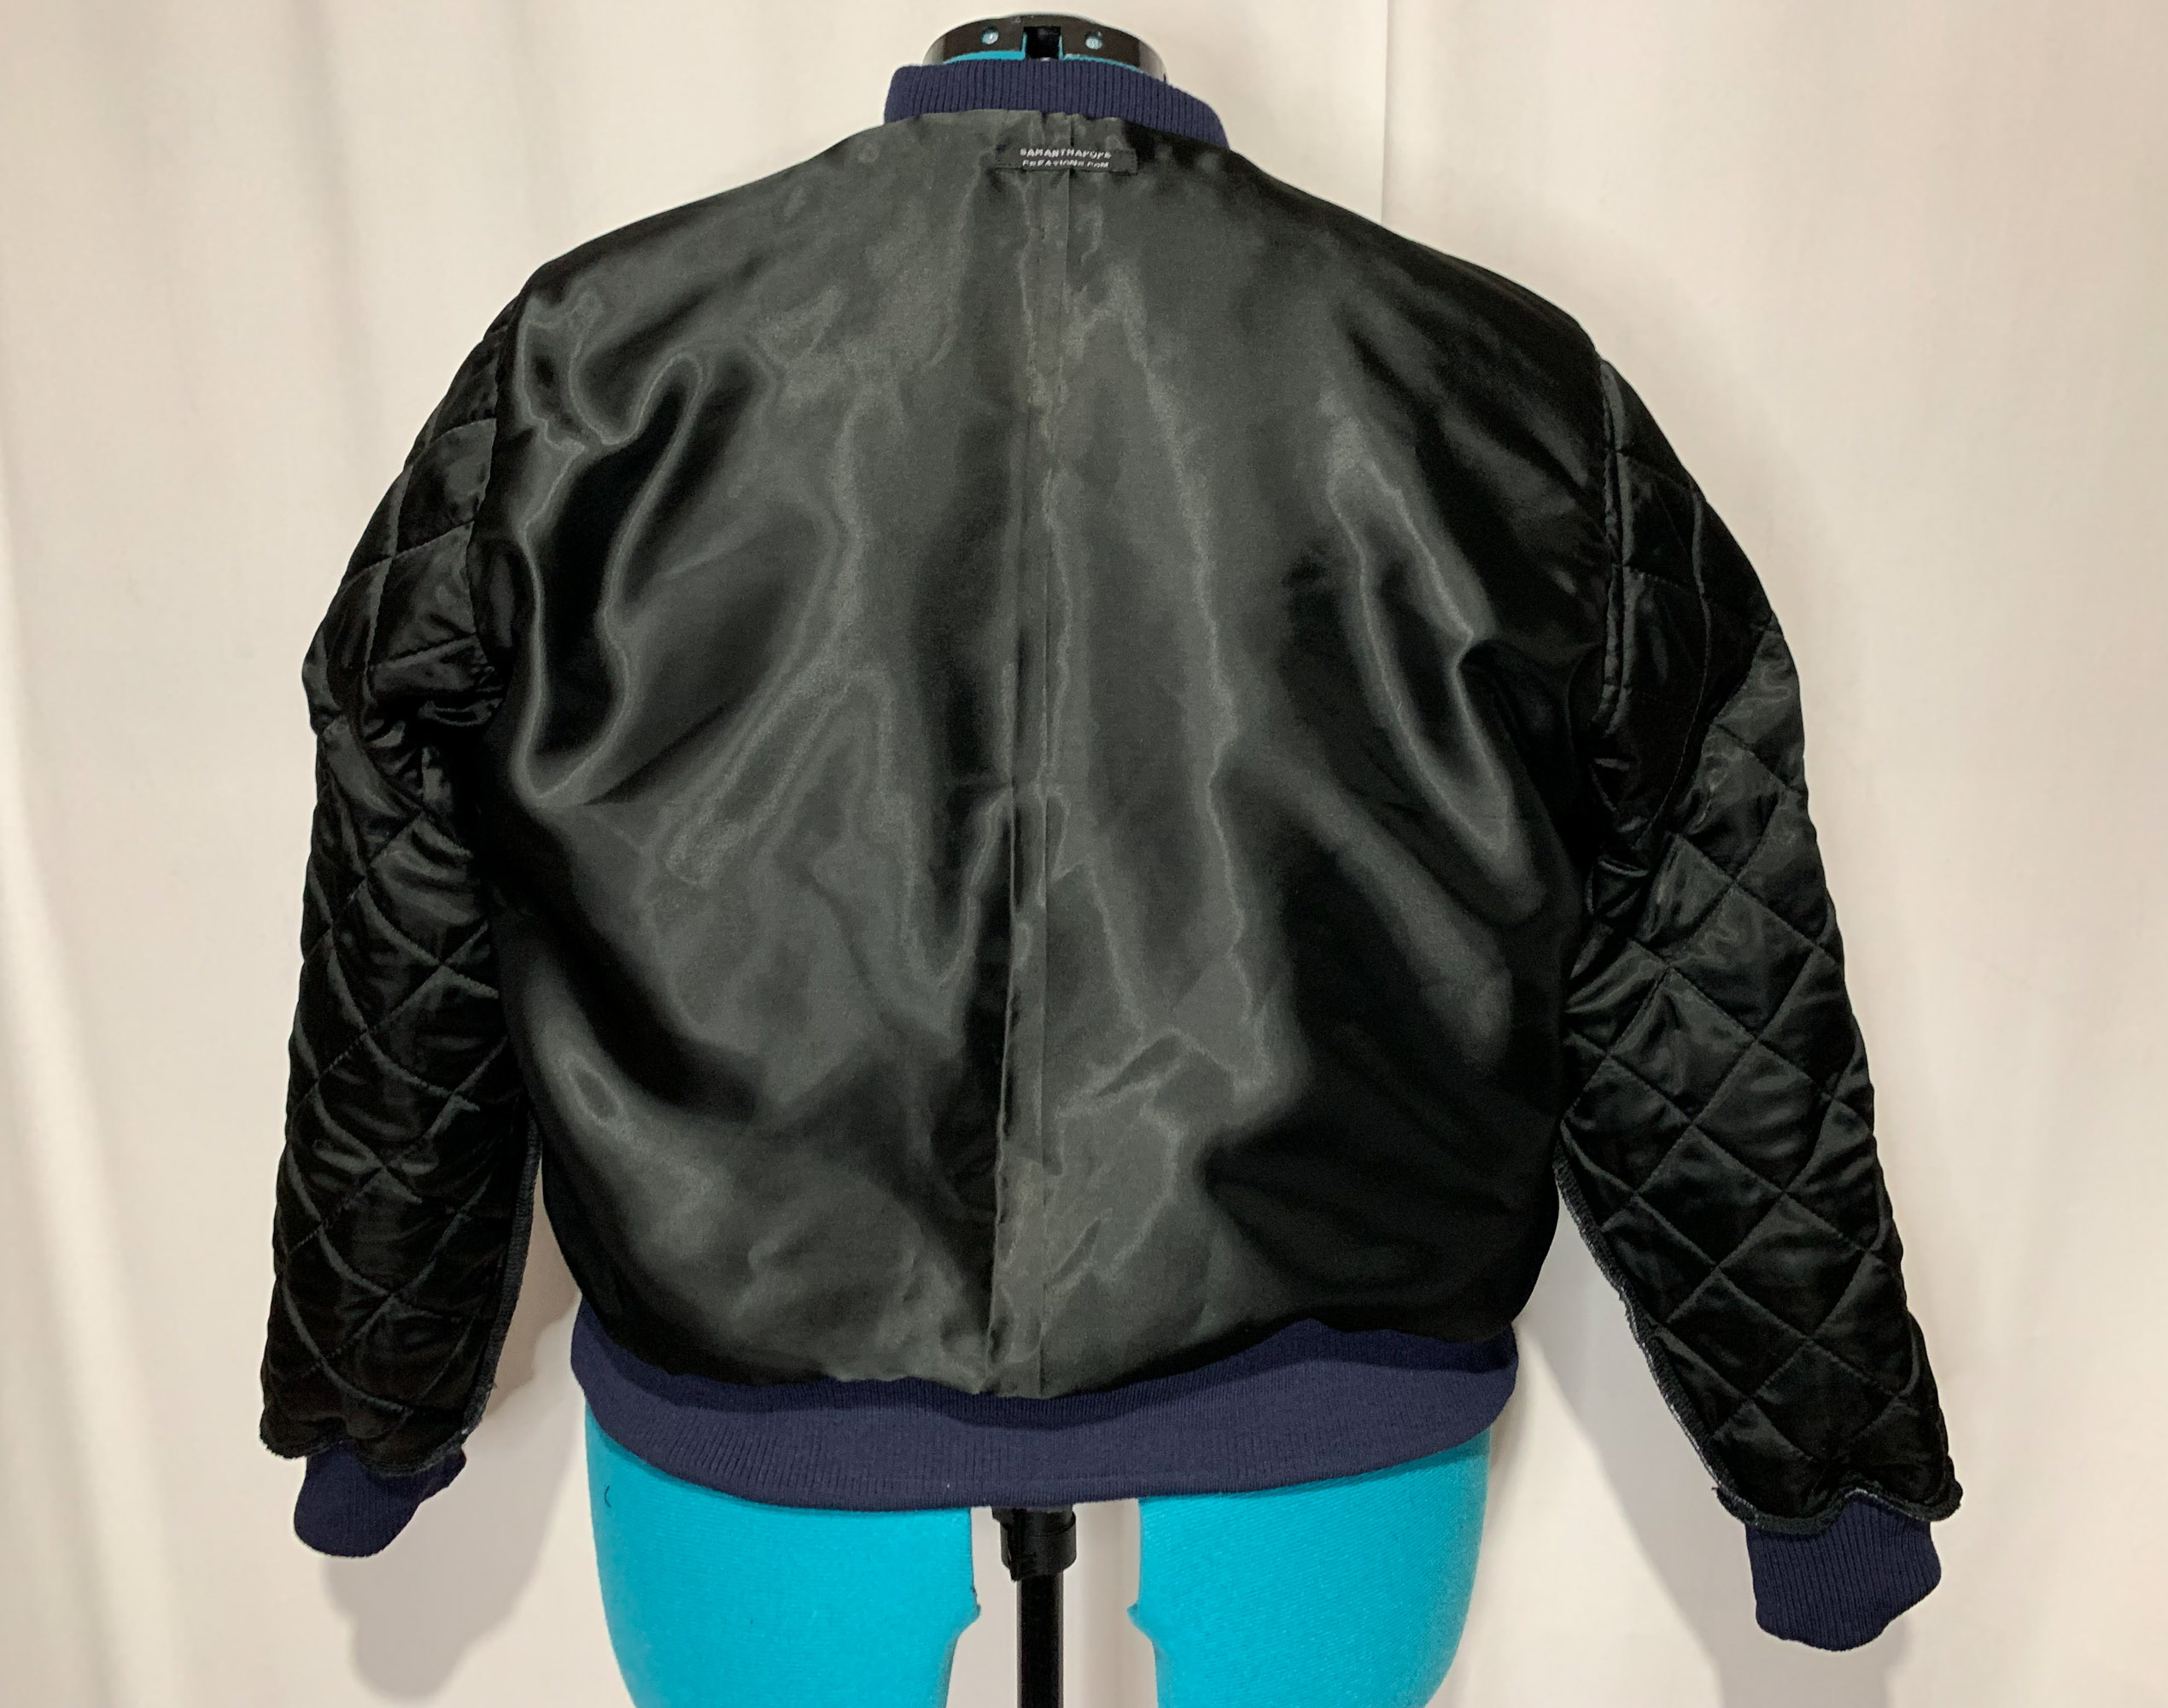
I lined my bomber with black lining machine stitched around the neckline and front facing. I hand-stitched it to the armholes.

Stunning! Have you made other Cashmerette patterns in the past?
The first Cashmerette pattern I made was the Chilton Trench Coat. I have always wanted a trench coat but wasn’t prepared to mess about with FBA on a pattern not designed for a G cup. I saw a review of the pattern on Pattern Review, and really liked the look of it so I ordered myself one.

I didn’t want to make a plain coat but something out of the box so I used a digital print sateen fabric. Here are the alterations I made:
- I felt the chest shield was too small for my bust size so I enlarged it.
- I made the belt & cuff belts with buckles instead of buttons. I used a built in pattern on my sewing machine to sew the eyelets.
- I added two extra belt loops either side of the centre back seam where there were none before.
- I changed the epaulets from being sewn into the shoulder seams to threading through belt loops instead. I doubled the length of the epaulet from the pattern but made it with square ends instead of pointed.
- I made the coat 3” longer as I wanted it just below my knees.
- I added a coat hook to the collar stand just because I have always wanted to make a garment with this feature. Not the easiest thing to sew as it curves back on itself and has to be hand sewn into seam.
I love my coat, it is great for transitional weather.
The second Cashmerette pattern I made was the Upton Dress with princess seam expansion pack bodice, sleeveless version and I added a large half circle skirt.
I made this in heavy stretch reversible sequin fabric. It took a long time to sew because I had to remove all the sequins from all the seam lines! I loved the final garment and felt incredible wearing it to the opening night of my theatre company production of Priscilla Queen of the Desert for which I was the Costume Designer.
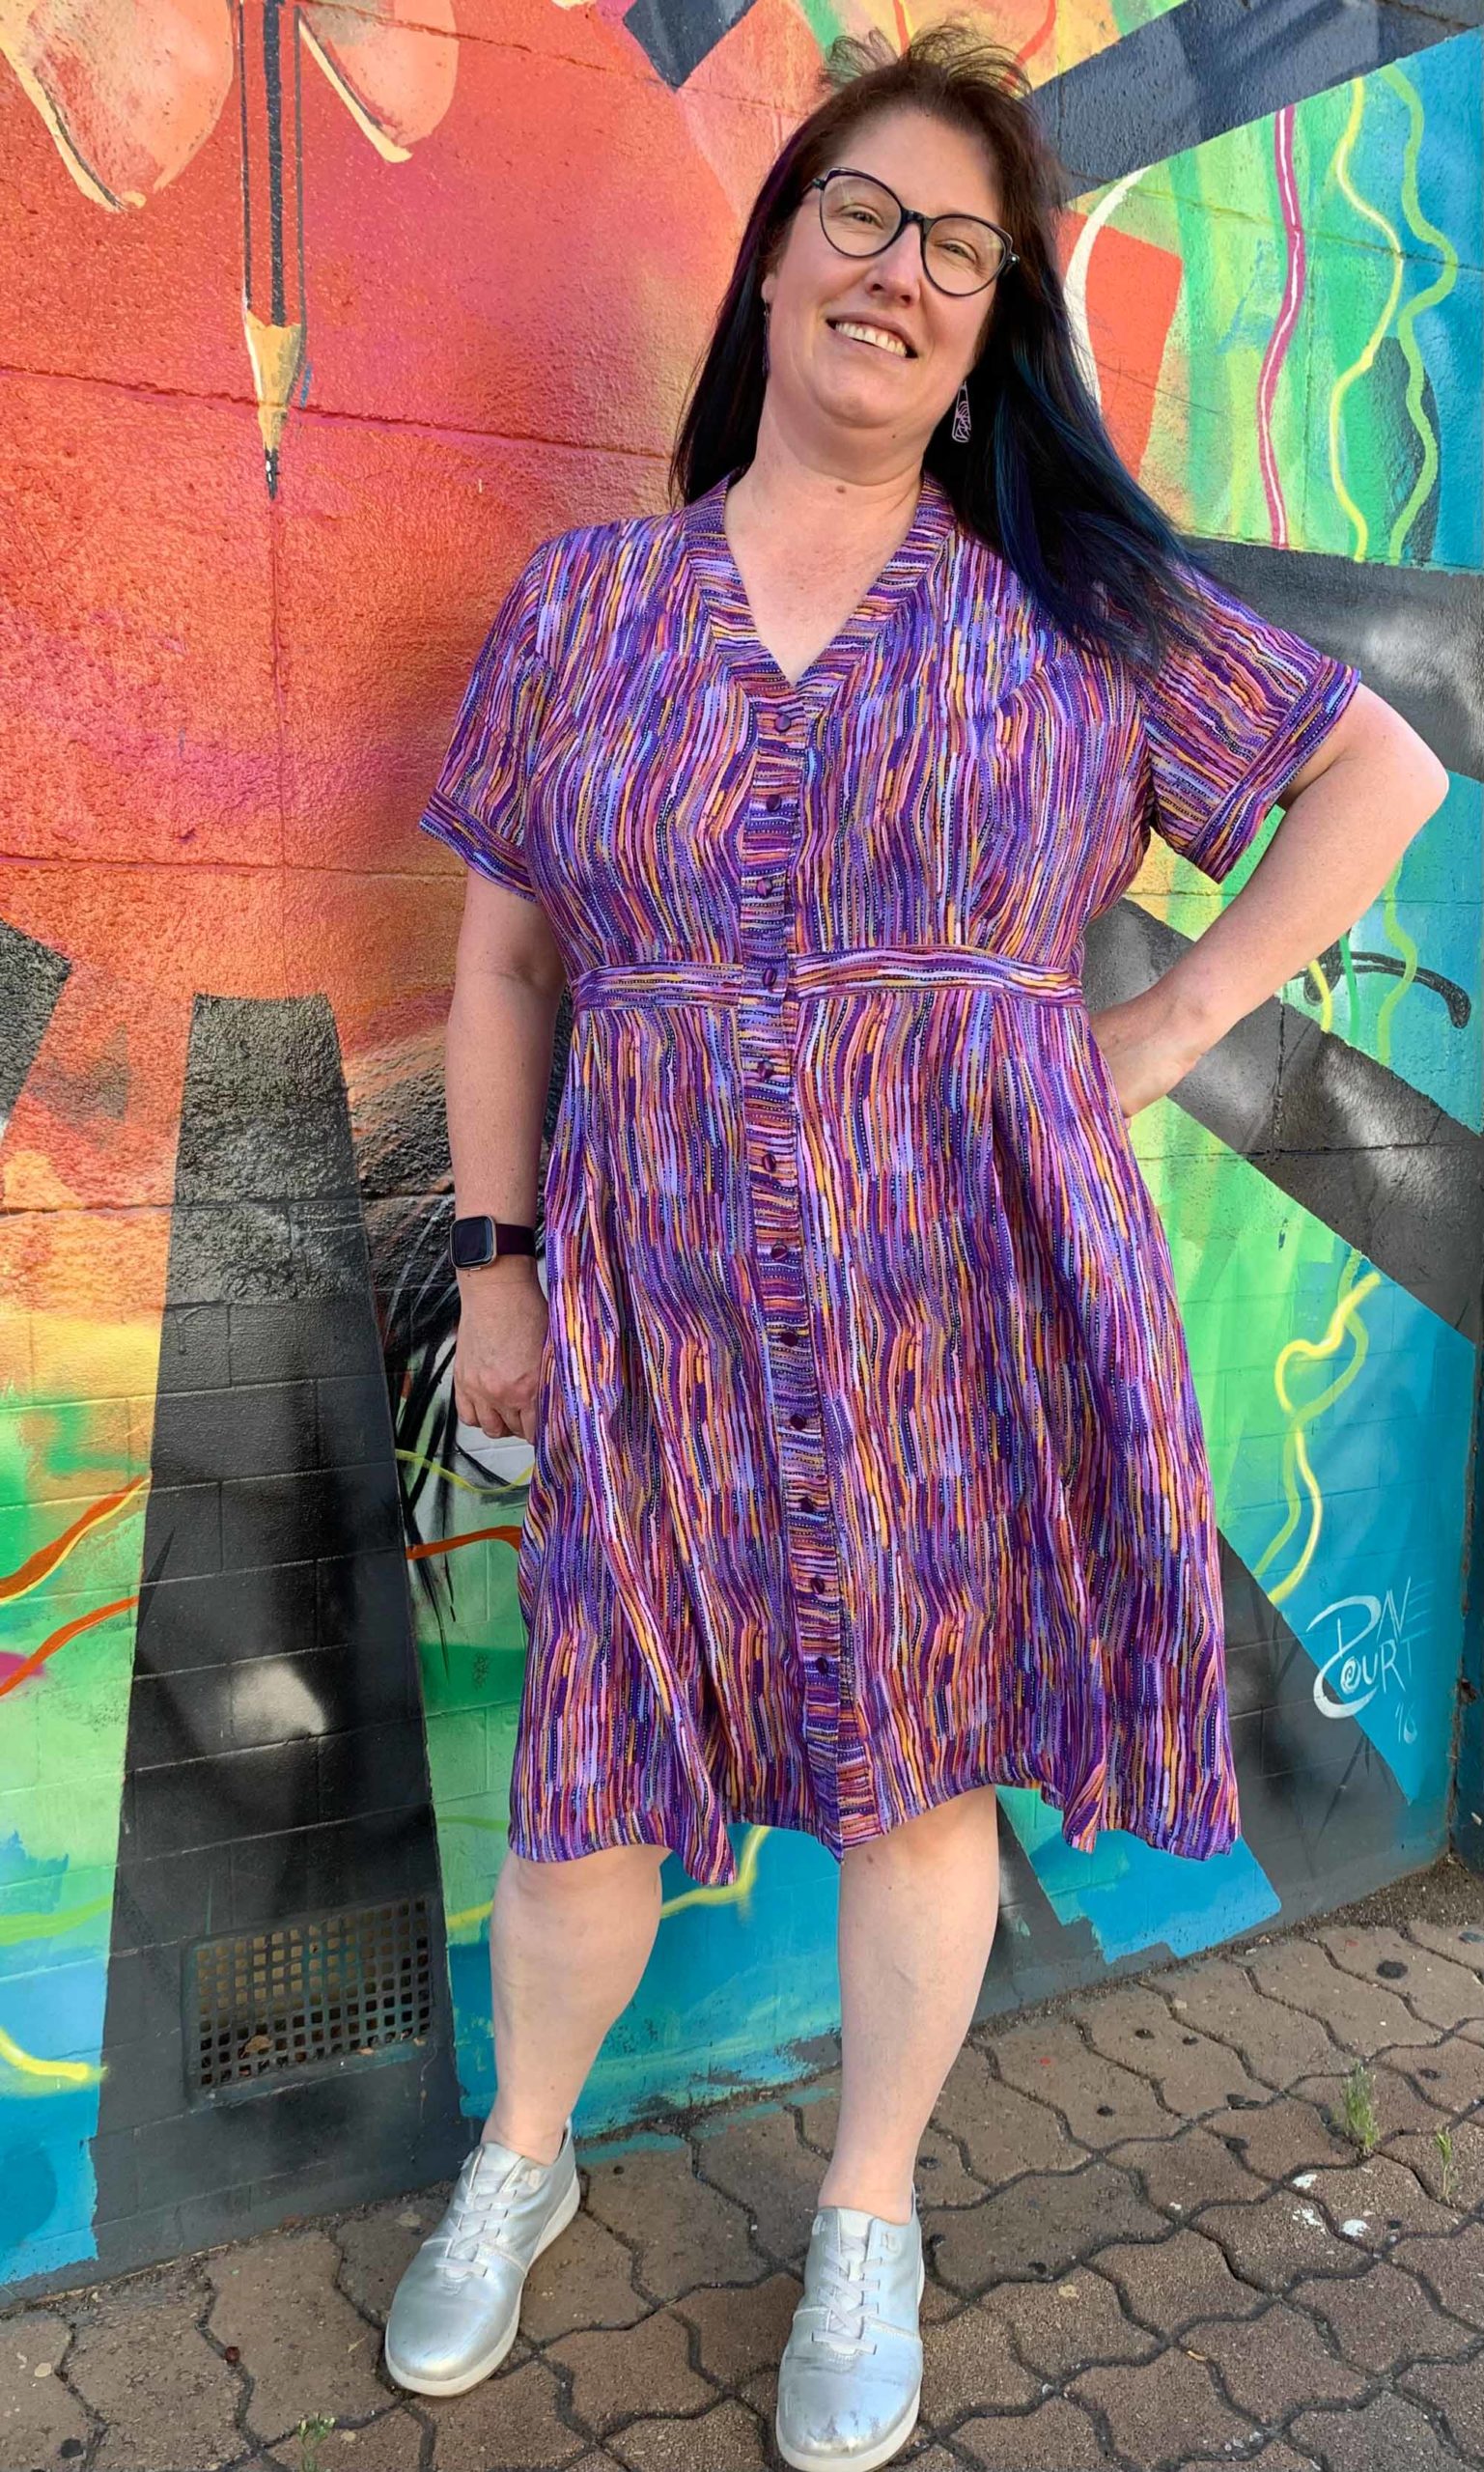
I have made the Lenox Shirtdress in an indigenous Australian rayon print.
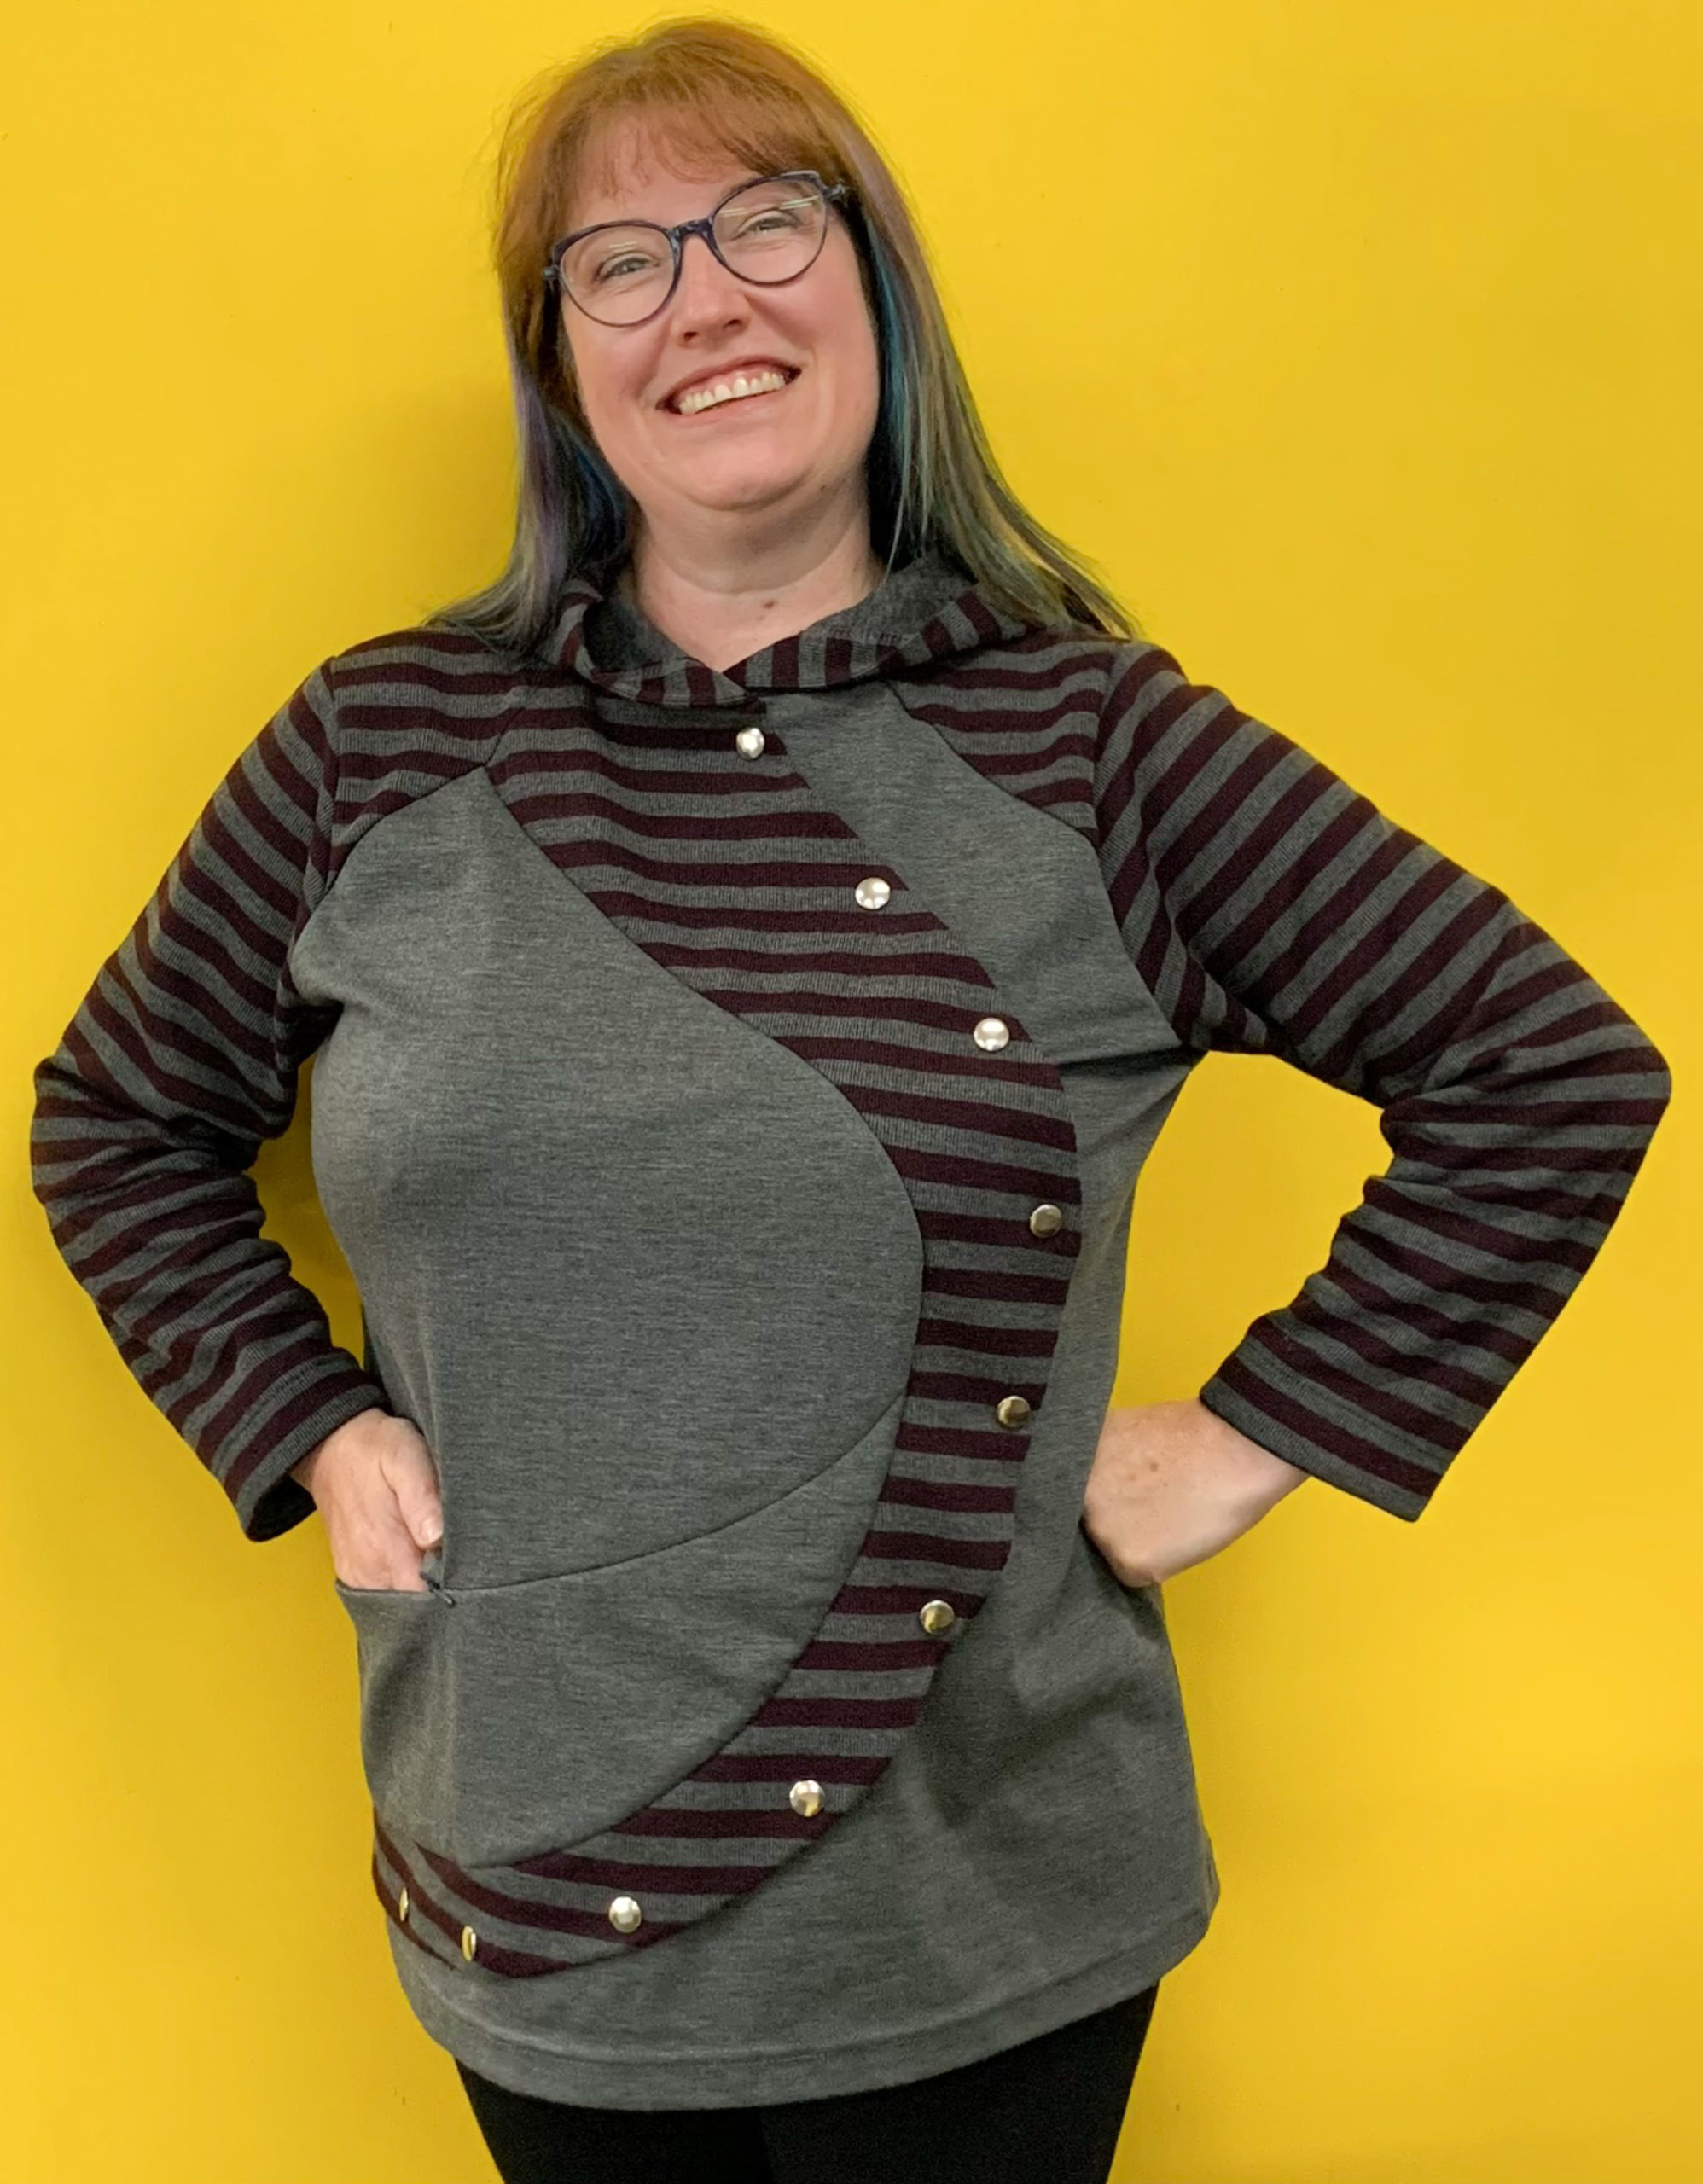
Most recently I hacked the Concord T-Shirt and made it into a hoodie with a curved front accent and snap neck closure.
What’s next on your sewing list?
I definitely want to make bathers—or as everyone else calls it, a swimsuit.
I don’t sew pants, so I think it would be good to try jeans because they scare me a lot! It’s important to sew outside your comfort zone because how else do you learn new things?
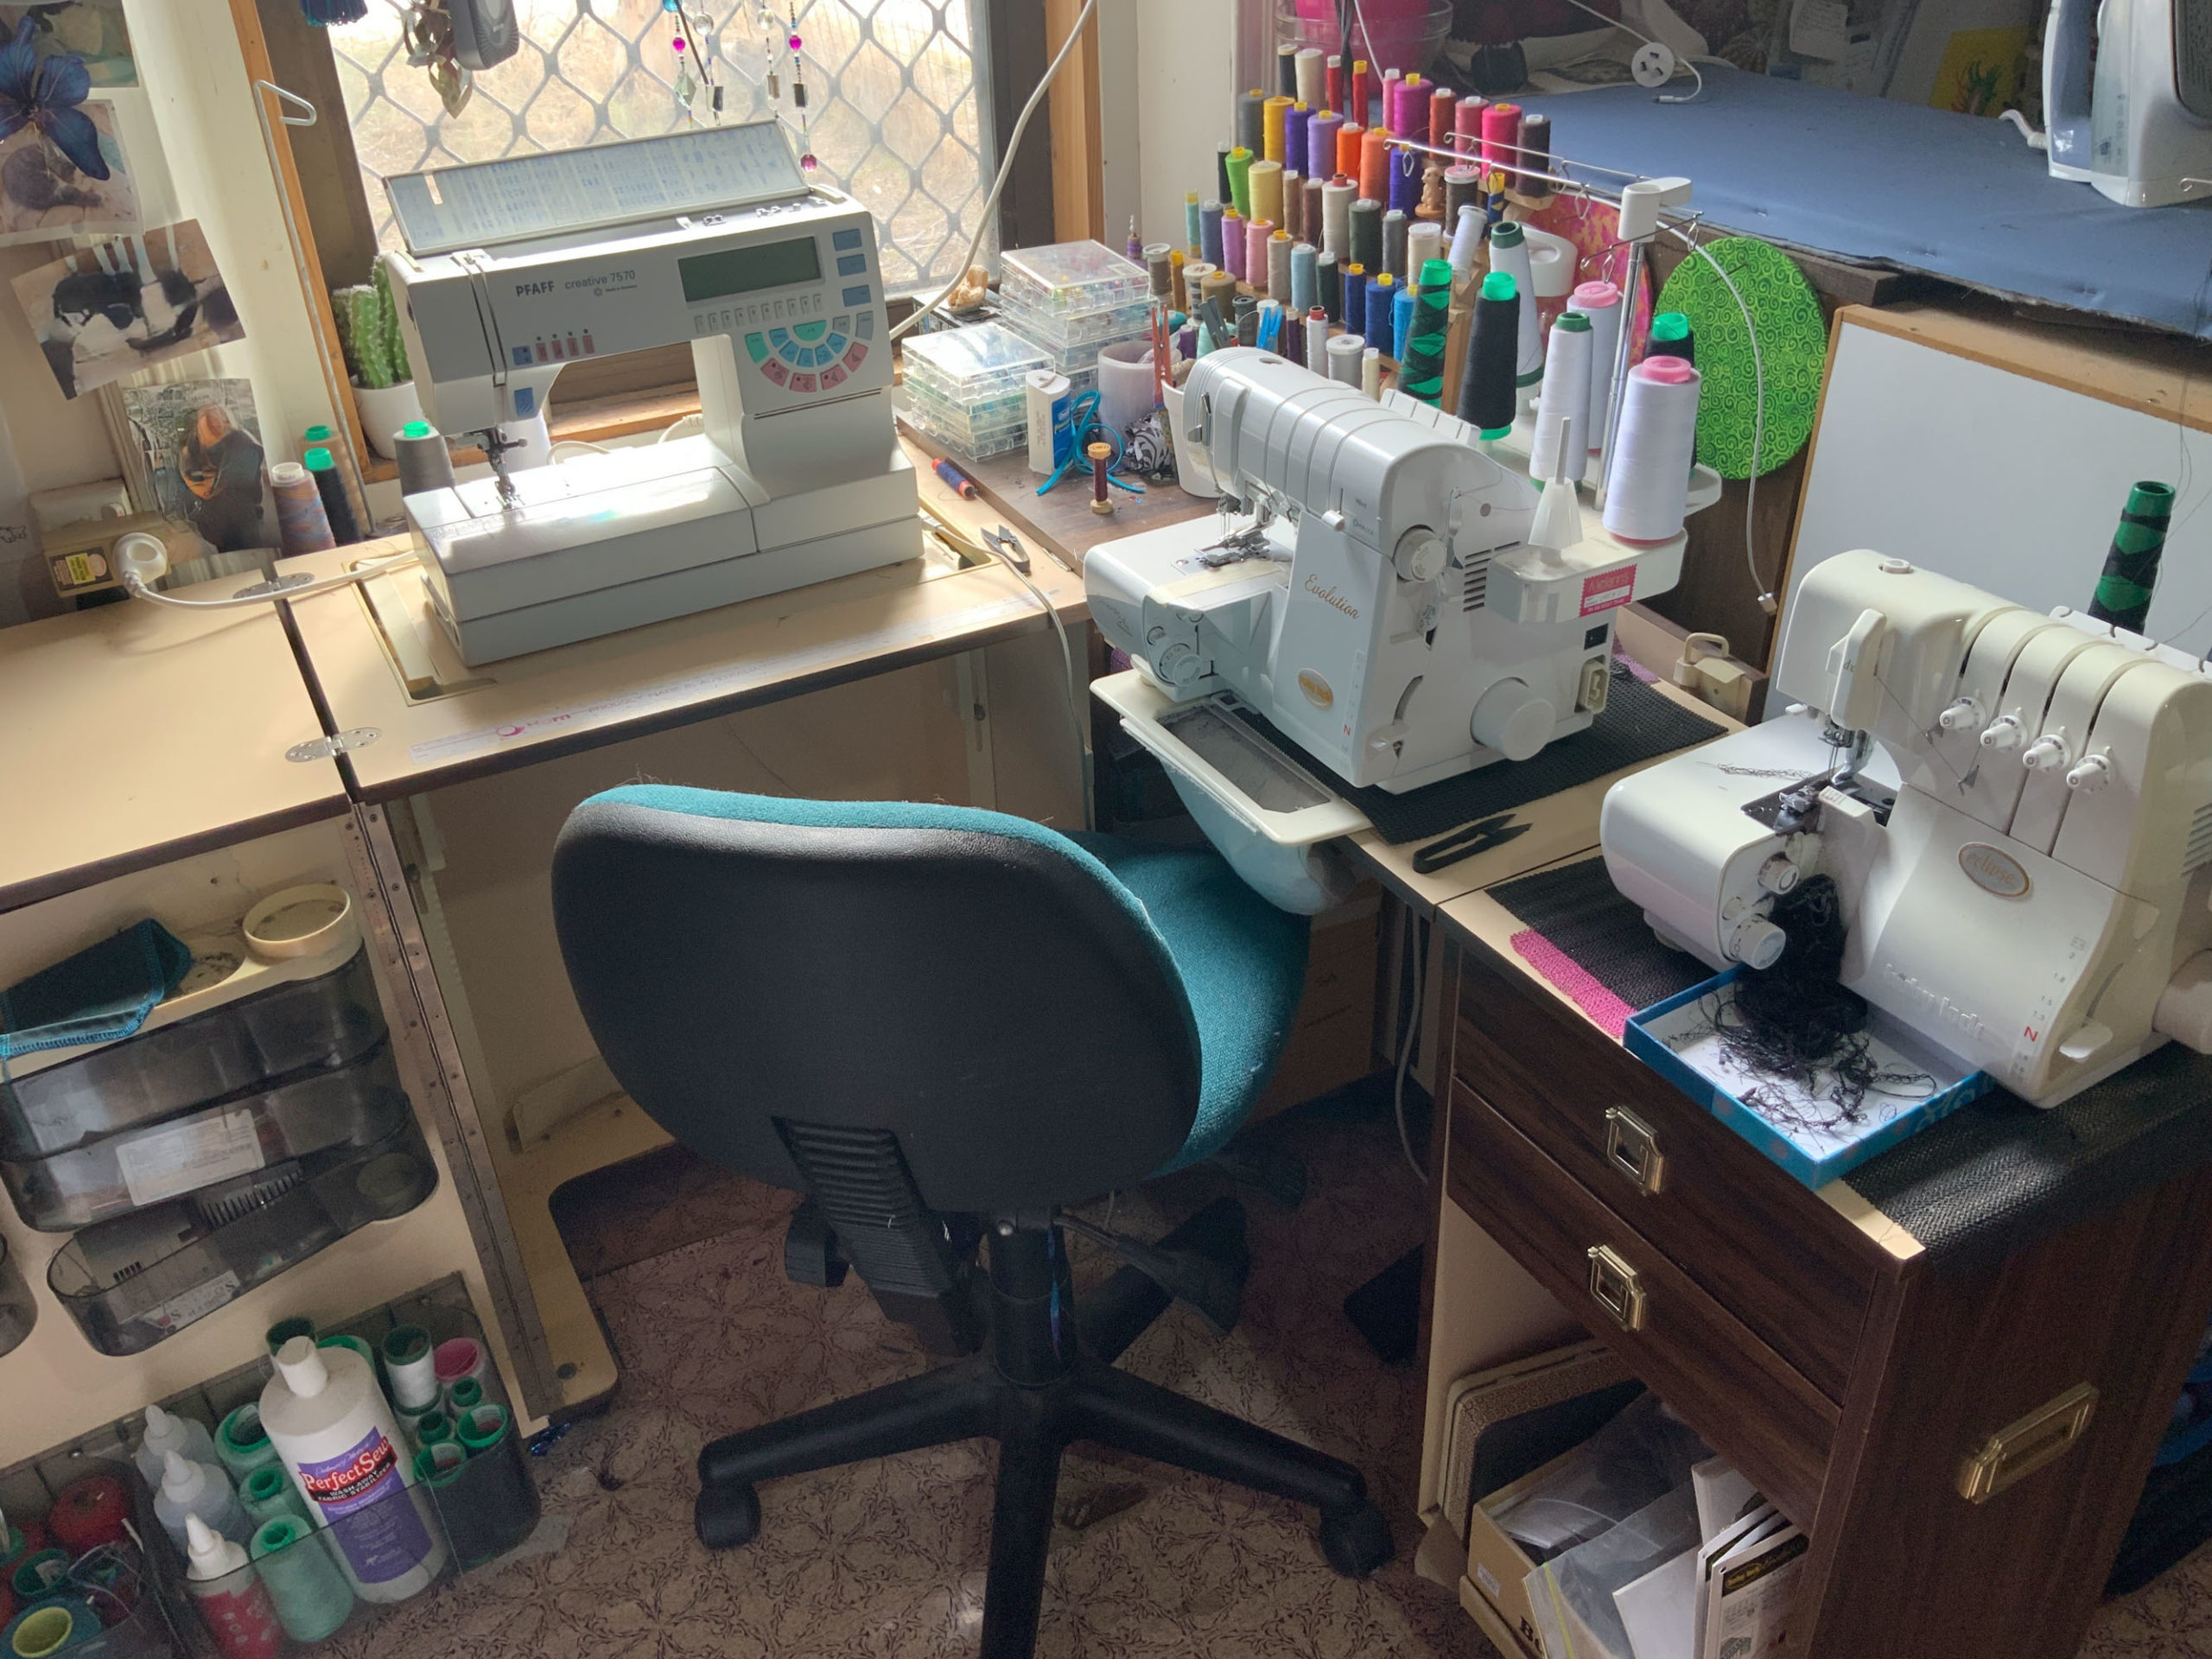
Tell us about your sewing space.
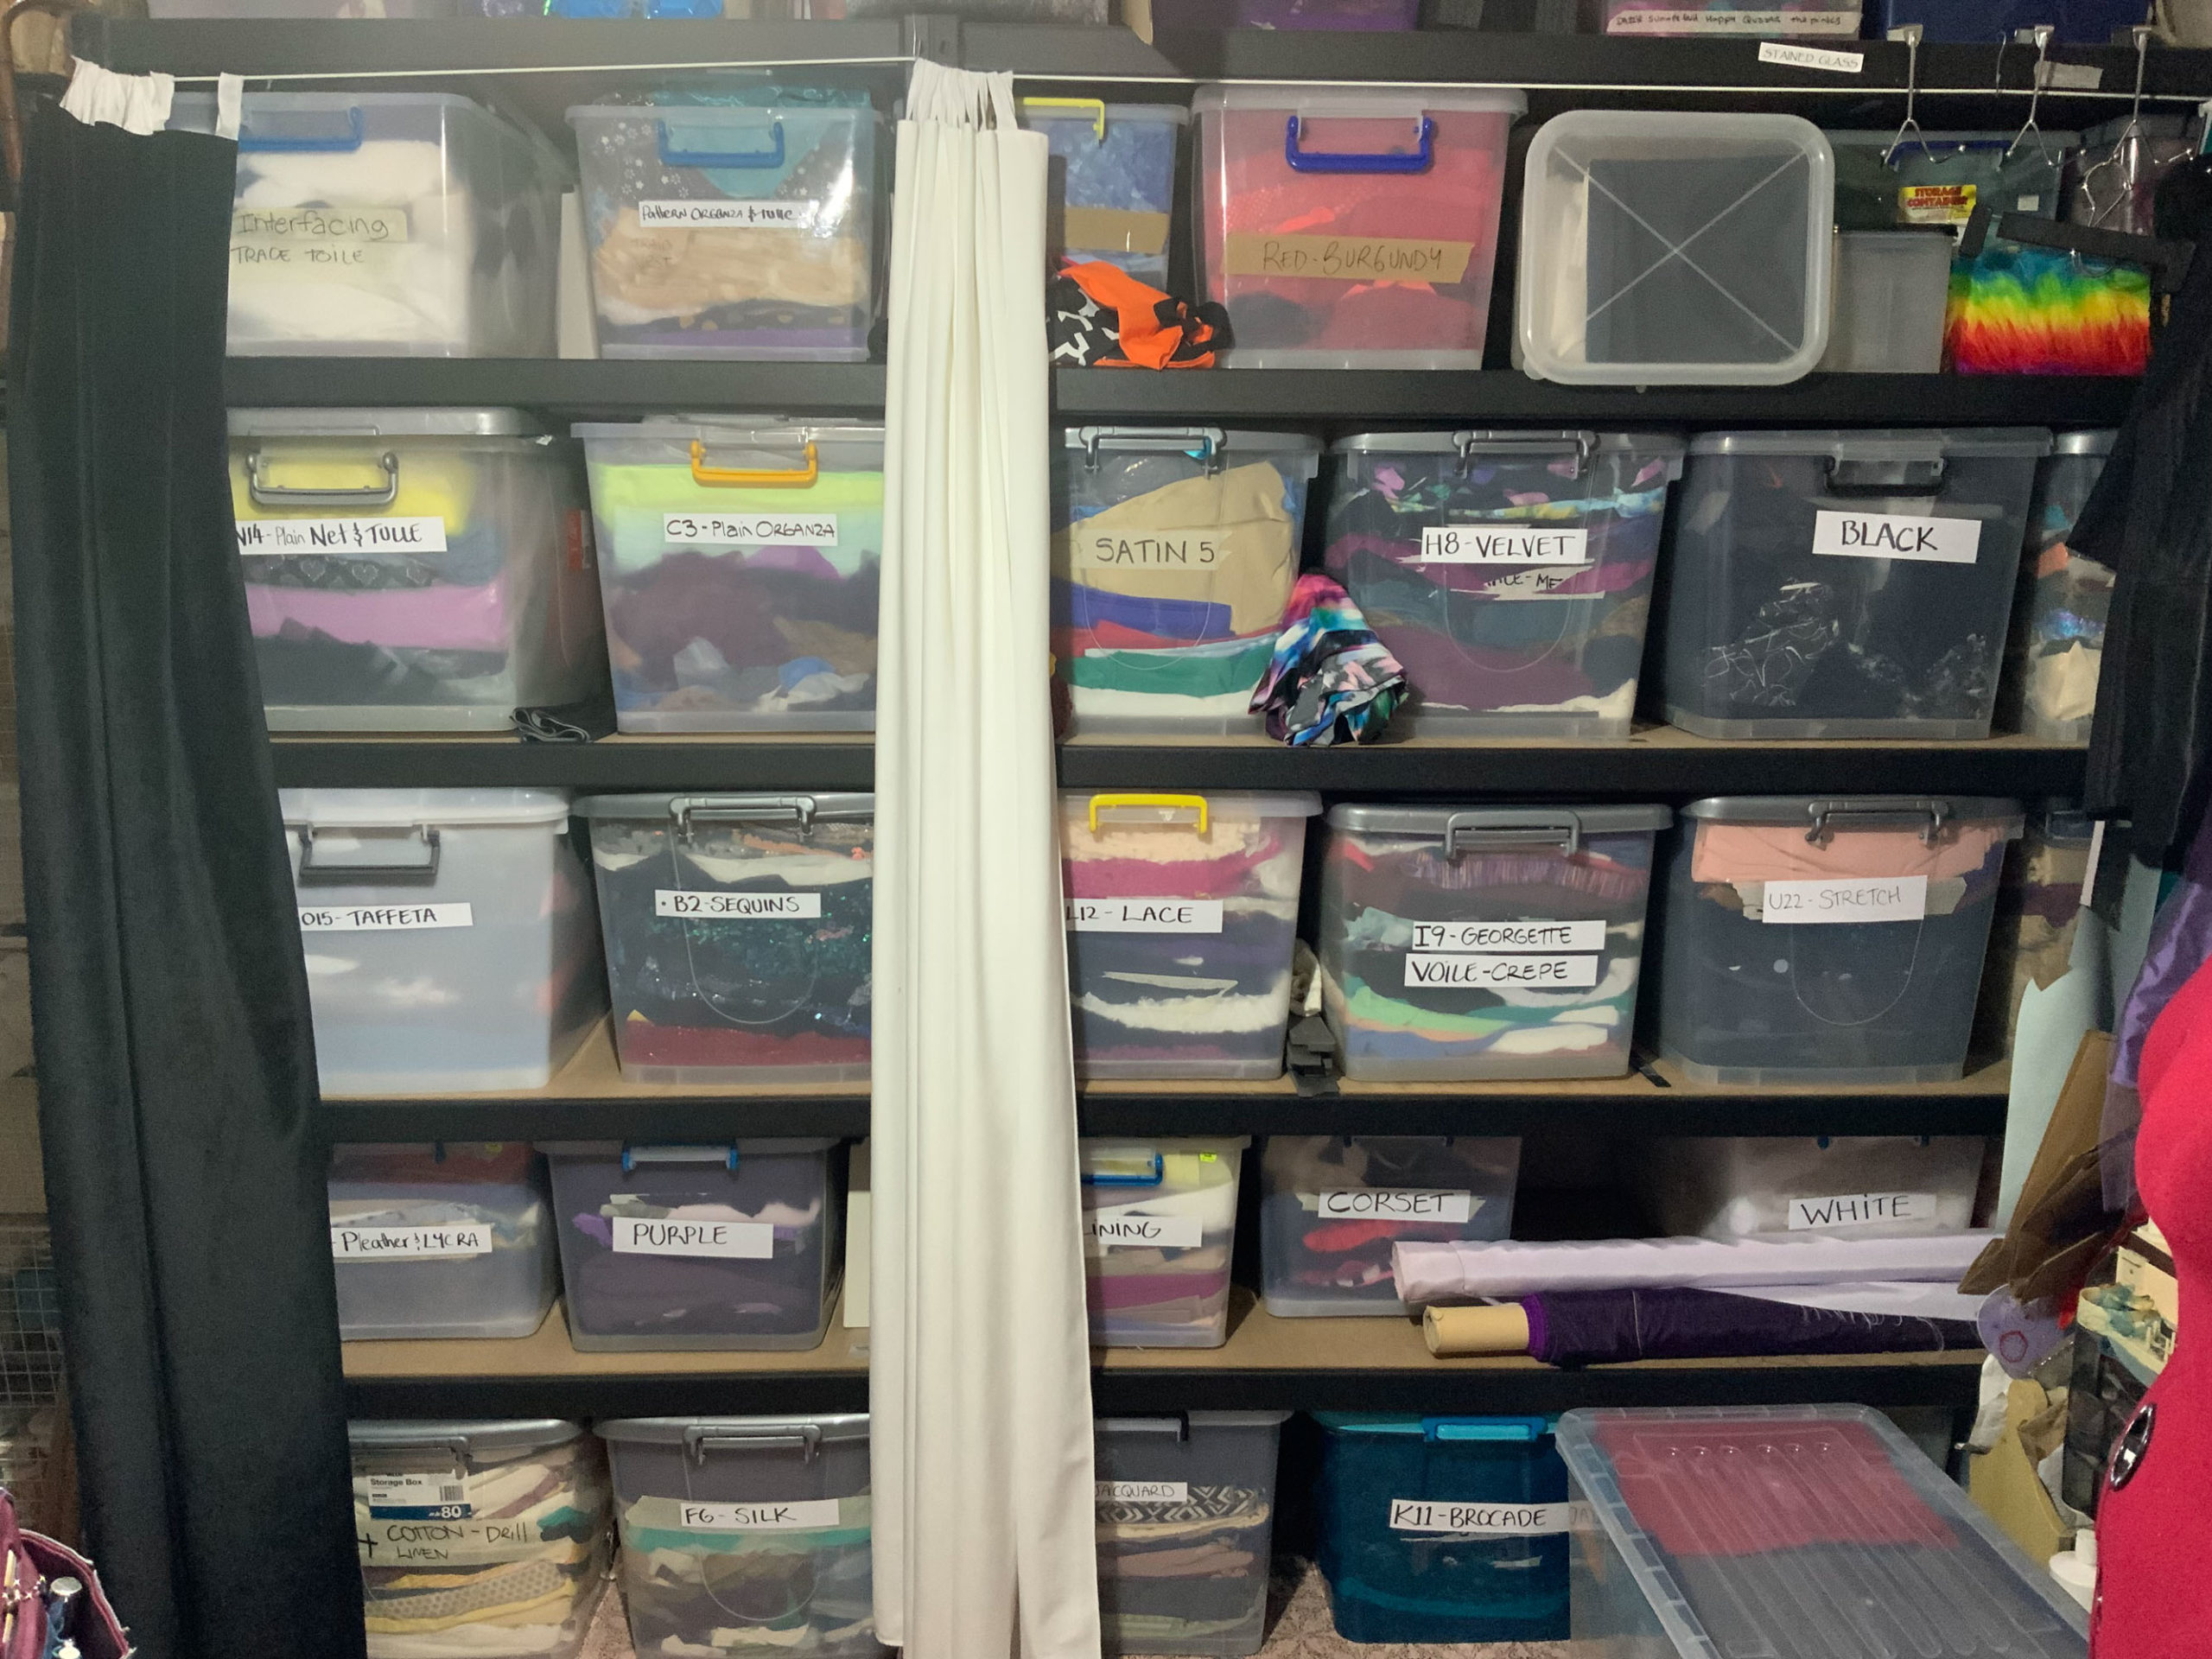
I live in a stone cottage built in 1918. My sewing room is 15.6 square metres and I have collected a lot of fabric, notions, patterns, etc. over the years. Because of my extensive stash and the need to know exactly what I have and haven’t got, I have everything stored in tubs and labeled. I also have a digital catalogue on an app called Sewing Pattern, so when a director says to me make this, I can look at what I have on hand to use and go for it.
I use a Pfaff 7570 I bought in 1993 and a couple of Babylock overlockers.
Besides the Kimball, what else have you been up to in the Cashmerette Club?
I enjoy watching Jenny’s master classes, she explains techniques in easy-to-understand terms and I especially like that she lives on the edge! Lol.
I like reading about what other members are up to on Clubhouse. It is always inspiring seeing how someone uses fabric in a new way.
I’m very much looking forward to May’s pattern release!
Thanks so much to Samantha for taking the time to share with us the story behind her Kimball, and so much more! You can find more of what Samantha is sewing over on Instagram at @samanthapopecreations.
Ready to make your own Kimball Bomber Jacket? Join Cashmerette Club today at the All Access level, and you’ll get the Kimball plus many other curve-friendly patterns, fitting masterclasses, exclusive discounts, and more.


I think Samantha’s Kimball’s Jacket is absolutely gorgeous and gave me many ideas to make my own. She is an excellent seamstress and the costumes she makes and beautiful. Thank you for letting me join the Cashhmerette Club, I am excited to purchase new patterns each month, plus order patterns in the next couple of weeks that are not offered during the month of club. in addition, I would like to order the Master Class so that I can receive many types of information on fitting, sewing techniques and how to make your garments not look home-made. You are a wonderful designer and I love all your patterns that turn into gorgeous garments. Thank you and take care and be safe.
Incredible work Samantha! From another (displaced now) South Australian 😃
The pieced Bomber is true art! <3
Wow, what a seamstress! This was a great article and I am so impressed with Samantha. She inspires me.
All your makes in this post are such incredible works of art!
Samantha, I love every make. Taking a pattern and blinging it out to suit you takes talent. You do this sew well.👏🇨🇦