Adding oversized flowy sleeves to your t-shirt or knit dress pattern is a simple hack that creates a dramatic effect! Today, we’re showing you how to hack the sleeves of the Concord T-Shirt into bishop sleeves.

If you’ve been following our Great Concord Hack-Off, this is the winning hack! You all voted in head-to-head face-offs between 16 pattern hacks, and the bishop sleeve came out victorious (with 1,466 votes to runner-up lapped boat neck’s 697 votes). Flowy bishop sleeves are stylish and glamorous, but because this top is a t-shirt at its core, it’s super comfortable, too.
This hack is based on the Concord T-Shirt, but you could also use it on the Turner Dress, the Pembroke Tunic, the Washington Dress, or any knit garment that has long sleeves. It looks complex but it’s actually rather straightforward, and you only need to adjust two pieces: the sleeve piece and the cuff. So let’s get started!
Pattern Adjustments for the Bishop Sleeve
The great thing about this hack is that we only need to adjust two of the pattern pieces. You can use the same front, back, and neckband pieces that you would when making a regular Concord T-Shirt.
Let’s start with the cuff. First, I measure around my wrist (like a bracelet), which for me was 6 1/2” (16.5 cm). I then measured up my arm from my wrist to determine how tall I wanted my cuff to be. For me, that was 3 1/2” (8.9 cm), but you can make your cuff longer or shorter depending on how dramatic you want to go.
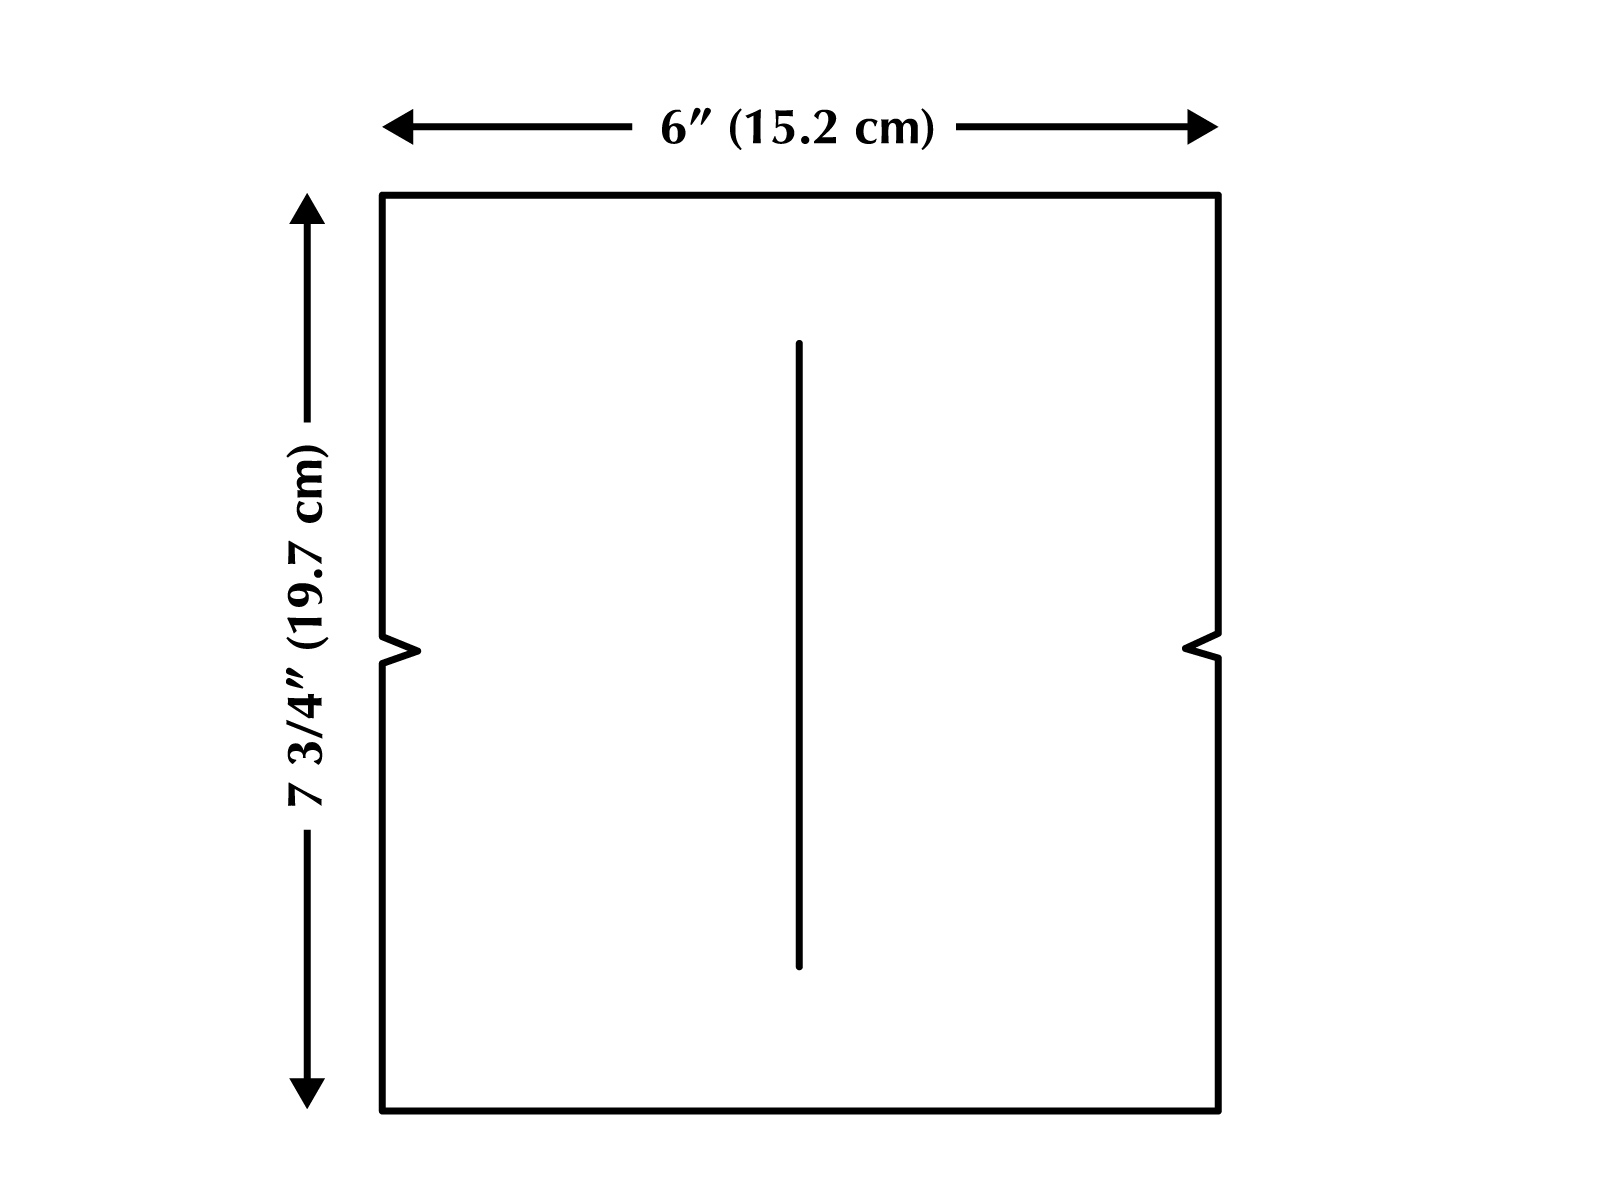
Now let’s turn those measurements into a pattern piece. You’ll be making a rectangle—here’s how to calculate the width and height:
Width= wrist measurement x 0.8 + 3/4″ (2 cm, that’s the seam allowance on both ends)
Height = desired height of cuff x 2 + 3/4″ (2 cm)
So for me, 6 1/2” (16.5 cm) around my wrist times 0.8, plus 3/4” (2 cm) seam allowances is roughly 6” (15.2 cm) width, and 3 1/2” (8.9 cm) height times 2 plus 3/4″ (2 cm) seam allowance is 7 3/4” (19.7 cm) height.
Make a rectangle out of paper or tissue paper using these measurements and draw in your grainline. I also find that it helps to add notches to the two sides, to remind me which are the sides and which are the top and bottom when I go to construct the cuff.
Okay, a little bit of math but not too bad, right?
Now let’s move on to the sleeve piece. We want to add volume to the sleeve that we’ll then gather in at the cuff. You may be tempted to just add that volume at the side seams, but we actually want to distribute it throughout the piece. The way we do that is through the slash-and-spread method.
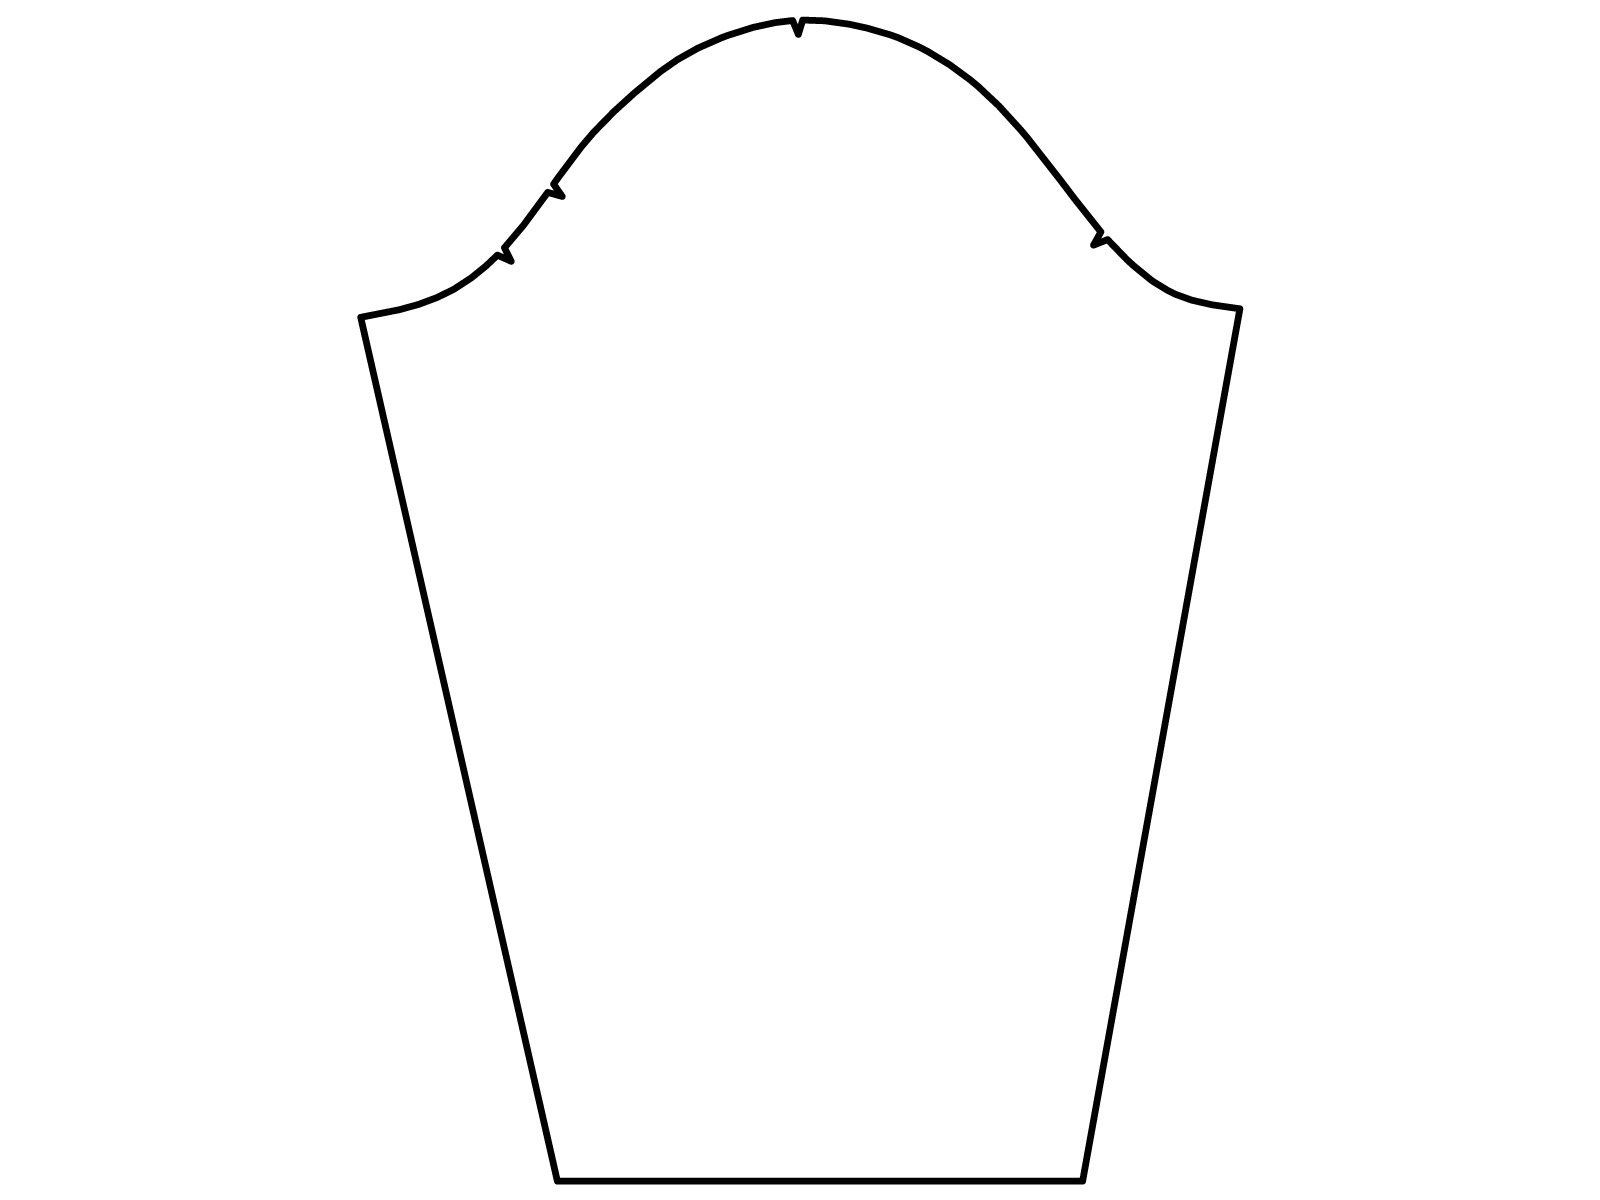
Here’s how that’s done: first, trace your sleeve piece onto another sheet of paper or tissue paper. When pattern hacking, you always want to preserve the original piece in case you want to go back to it at any point.
Before we start slashing and spreading, we need to consider the sleeve length. The long sleeve of the Concord T-Shirt already accounts for a 1” (2.5 cm) cuff—you’d think that if I made the cuff 3 1/2” (8.9 cm), I would need to shorten the sleeve piece by 2 1/2” (6.4 cm), right?
Not exactly. Some of the length of the bishop sleeve gets eaten up by the volume throughout the arm and the gathering around the cuff. In my first attempt, I shortened the sleeve that way and ended up with a too-short sleeve. In my next try, I didn’t shorten the sleeve at all, and it was about a half inch too long.
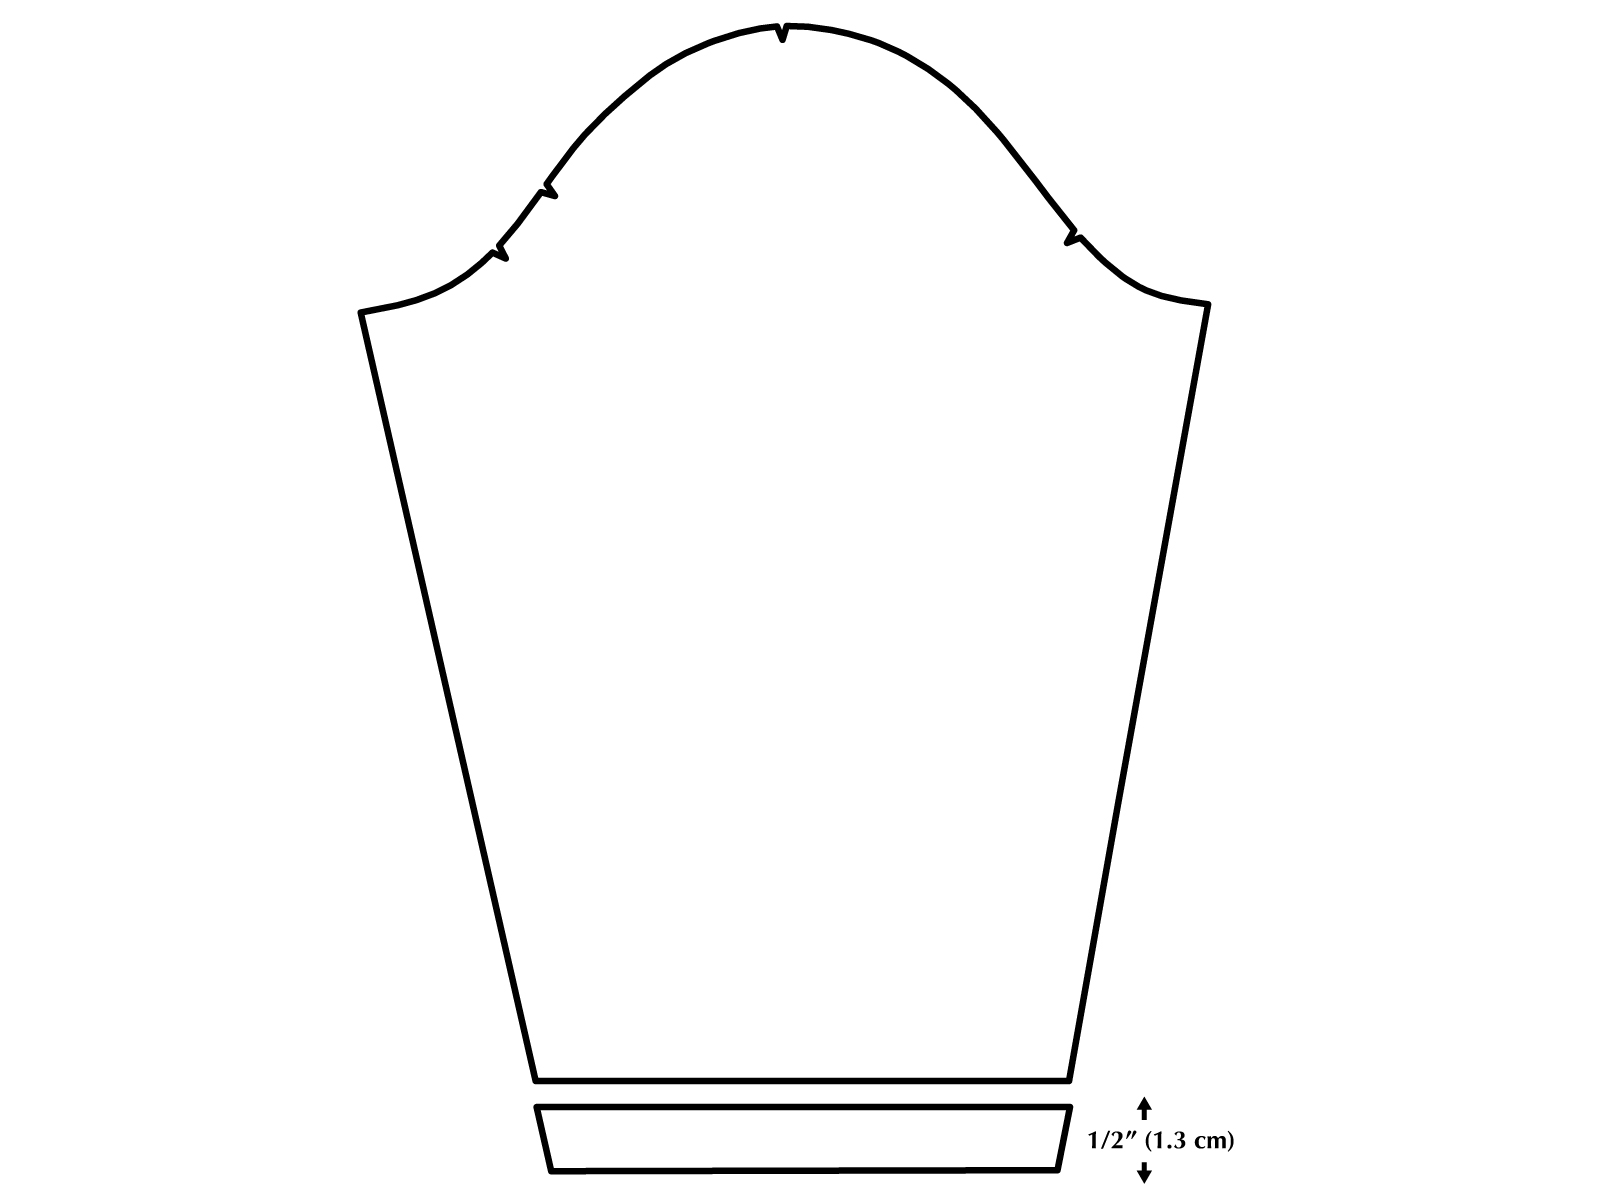
So if you’re going for a cuff the same height as mine, I recommend shortening it about 1/2” (1.3 cm). If your cuff is longer, you may need to shorten your sleeve more, and if your cuff is shorter, you may not need to shorten it at all, or you may need to lengthen it. This also depends on your arm length (do you often have to lengthen or shorten sleeves?) and your comfort (some people prefer their sleeves on the longer side, while others find they want their sleeves out of the way) so I definitely suggest making a muslin first to check the fit. You can always shorten you sleeve later, but it’s harder to add length after the fact.
When you’re working with a fitted sleeve, you should do your adjustments at the lengthen/shorten lines, but with this hack I can just remove the extra length from the bottom.
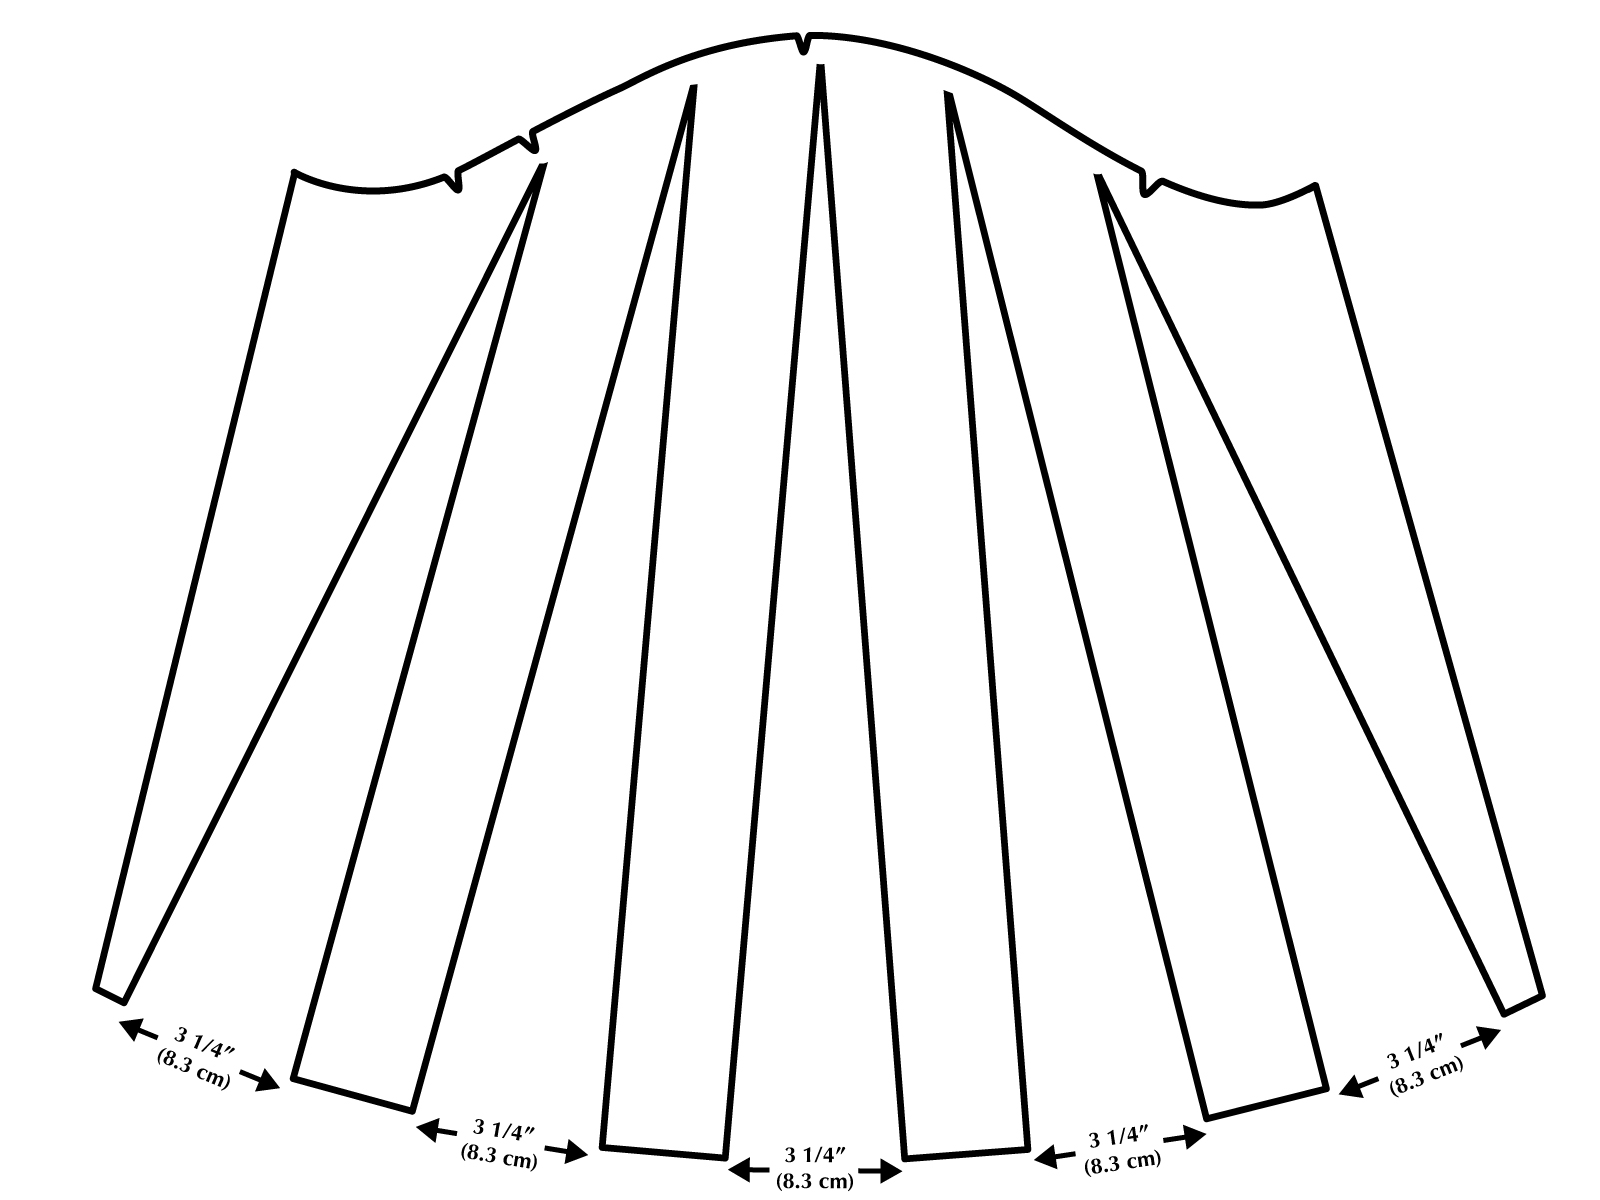
Now we’re going to draw vertical lines up the length of the sleeve, perpendicular to the bottom edge of the sleeve. For my sleeve, I drew five lines spaced roughly equidistant from each other.
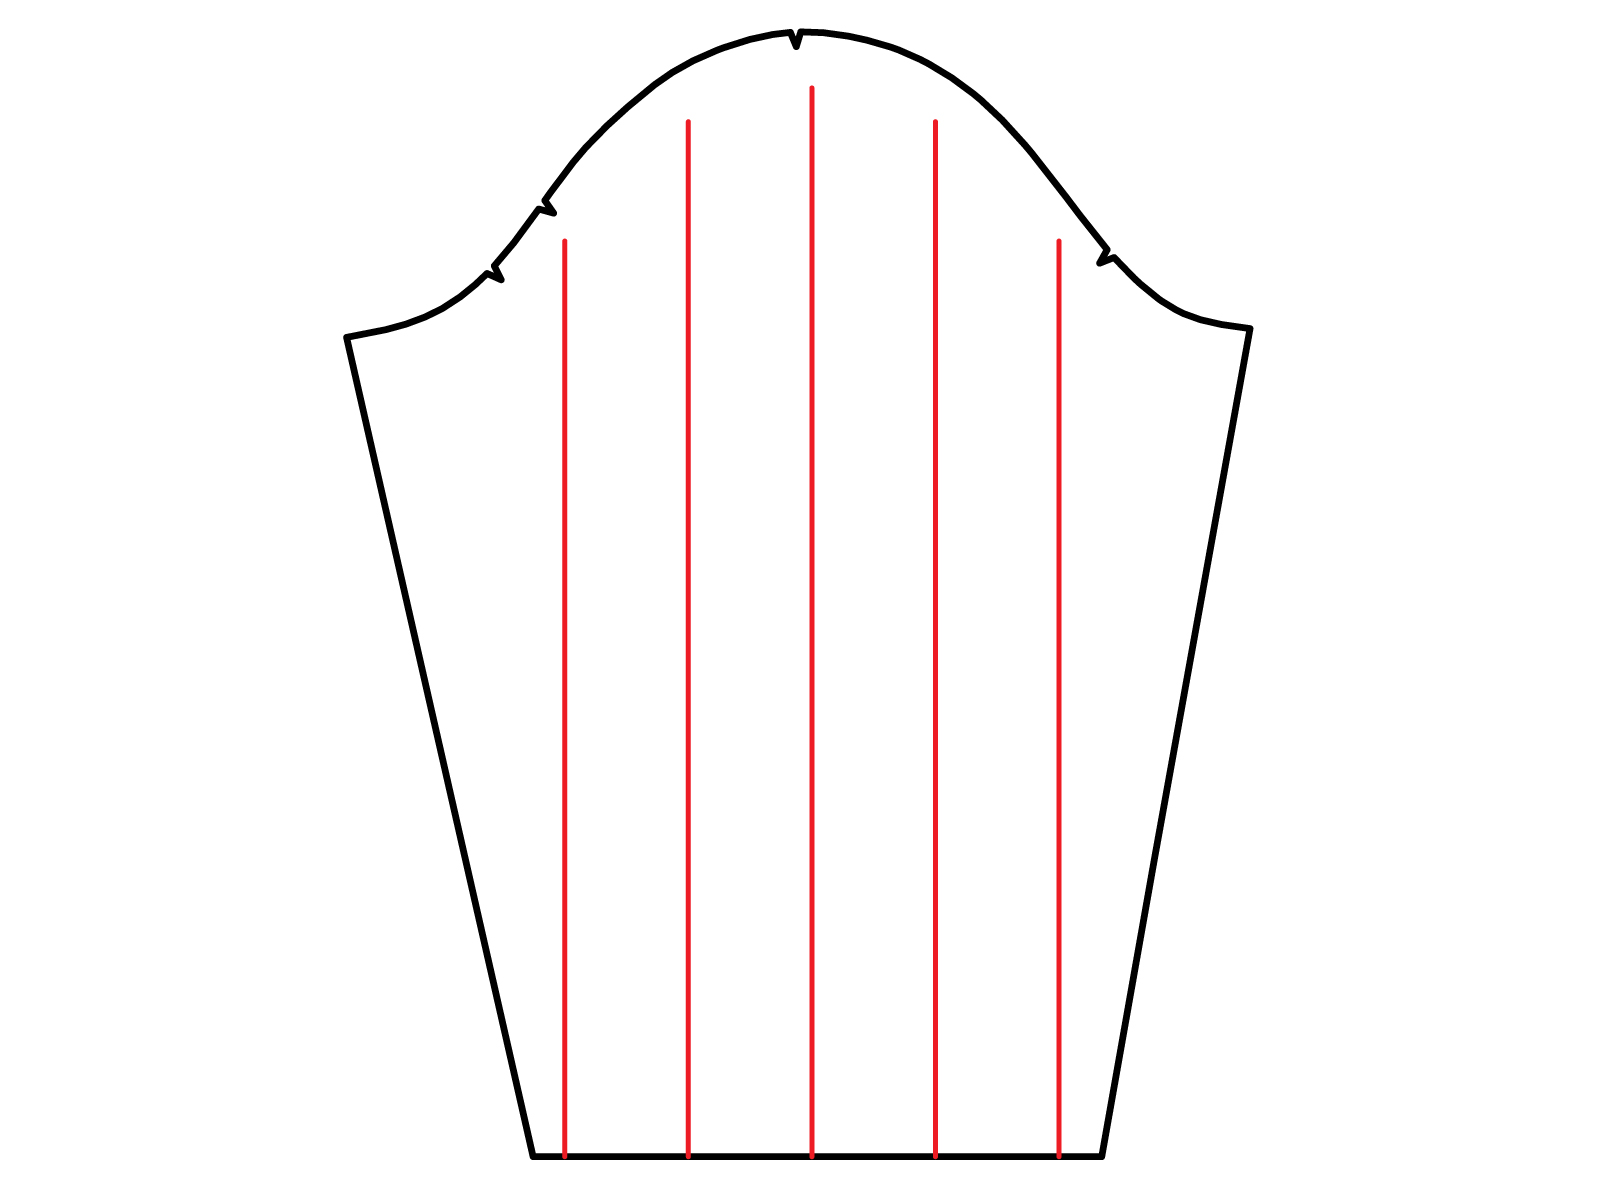
We’re now going to cut those lines, starting from the bottom and going up to but not through the seam allowance of the sleeve cap. This is important, because we want to preserve the sleeve cap seam allowance so that it still fits our armscye.
I find that it helps to tape down the sleeve cap to the table or my cutting mat while I’m doing this—once the slits are cut, the whole piece becomes a little unwieldy.
Now, we’re going to gently swing the sections of the sleeve open. The amount that you want to swing them apart is up to you;I tried several different amounts and found that 3 1/4” (8.3 cm) distance between each section (for a total of 16 1/4” / 41.3 cm of additional width) got me to the amount of volume I wanted without making it very difficult to gather and sew to the cuff. I recommend playing around with this and making a few trial sleeves to figure out the exact volume you want! Based on my trials, I definitely suggest going past the point where your sleeve seams are totally straight—you’ll want them to angle out at least a bit for the bishop-level volume.
Tape the sections down once you have them spaced out the way you want them.
Now, go ahead and lay another piece of paper over the sleeve piece. You’ll want to use something that you see through, so tissue or Swedish tracing paper are ideal here.
Trace your new sleeve piece by following the new curve of the sleeve cap and the new side seams. For the bottom edge, you’ll want to curve the hem to connect the sections—use a French curve to do this step if you have one.
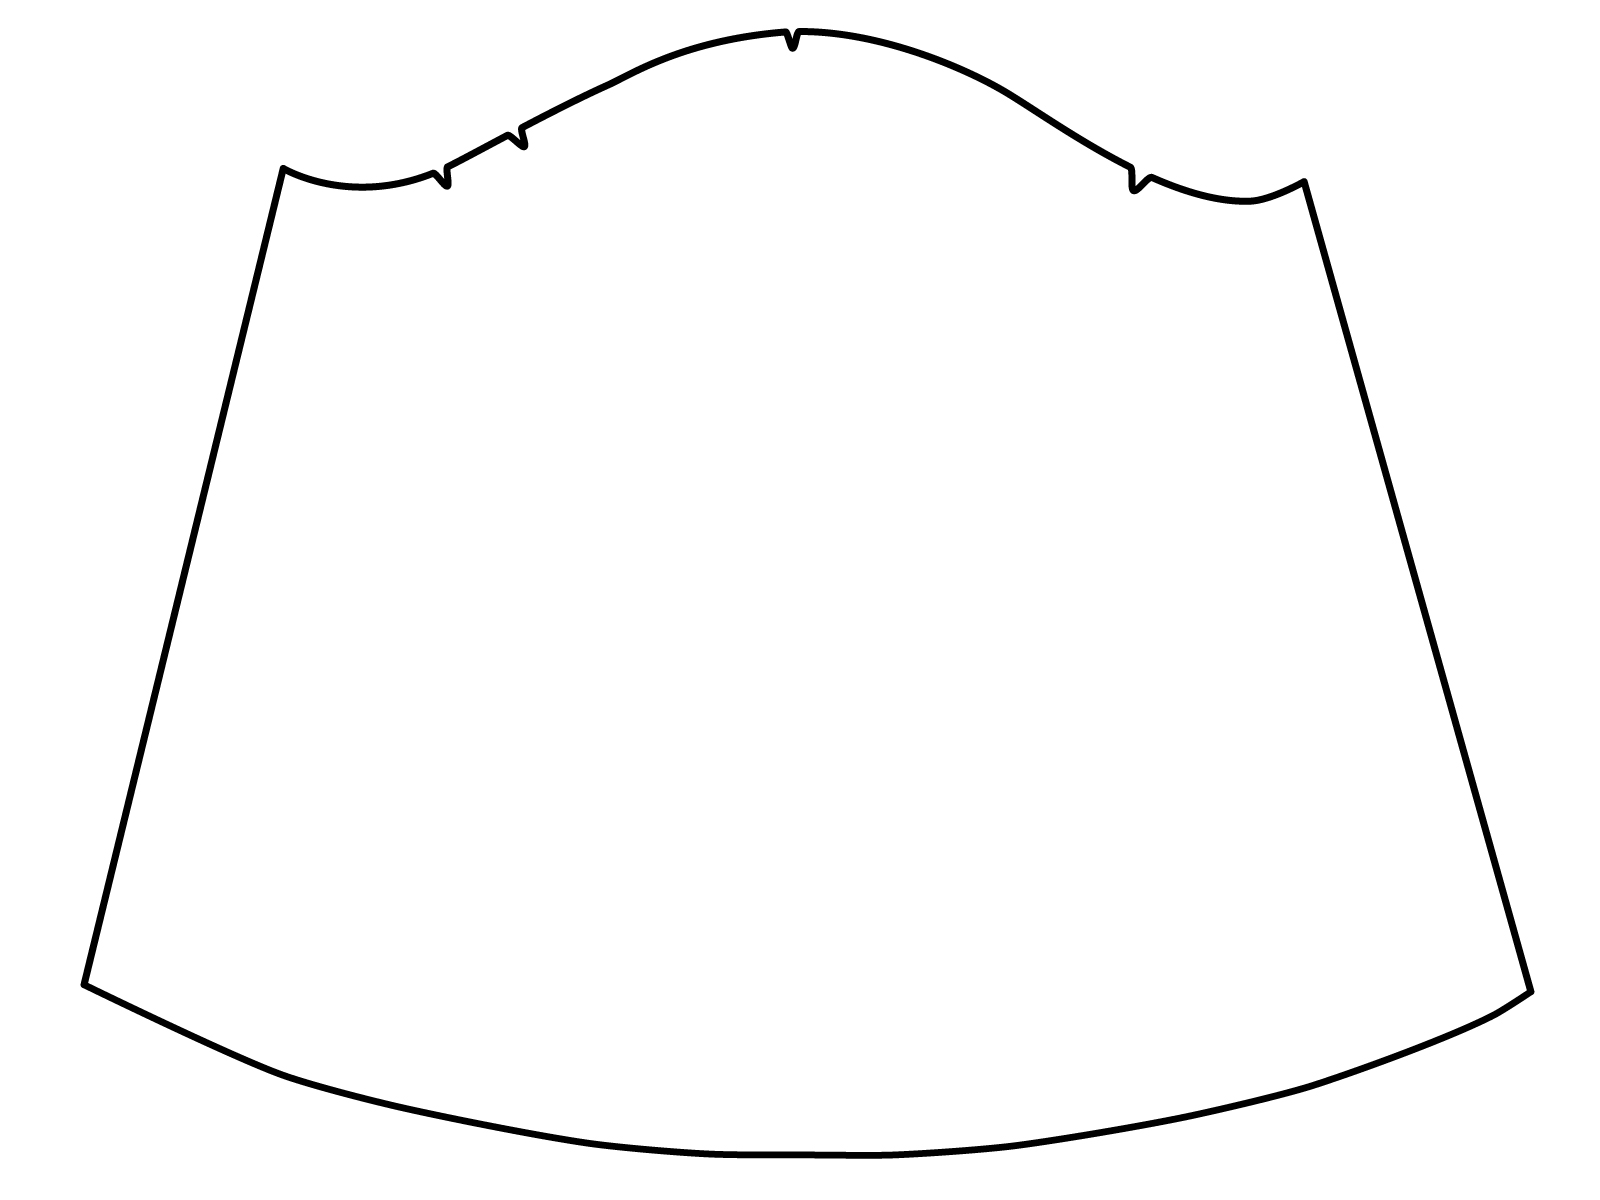
And there you have it! Our bishop sleeve piece is ready, and we can get to cutting.
Make sure you cut two mirrored sleeve pieces, and two cuffs as well. Cut the rest of your pieces as in the regular pattern.
Construction Adjustments for the Bishop Sleeve
It’s now time to sew our bishop sleeve Concords! The construction steps are the same as they are in the regular pattern up until we go to attach the cuffs to the sleeves. Follow along with the instructions in your instruction booklet or in our Concord sewalong to sew the front and back at the shoulders, finish the neckline, and attach the sleeves. You can also construct your cuff pieces as instructed in the pattern.
So now we’re got our t-shirt all assembled with the sleeves attached, and we just need to add the cuffs.
Whenever you attach a cuff to a sleeve, it helps to divide the sleeve and cuff hems into four equal sections. Start by folding your sleeve hem flat, with the seam on one side. Make a notch at the opposite end from the seam. Then unfold the sleeve and match the notch you just made to the sleeve seam, and make two small notches at the two folded ends of the sleeve. This will give you 3 equidistant notches, with the seam as the fourth. Do the same with the cuff.
Now we need to gather the sleeve hem. Sew two lines of long straight basting stitches within the seam allowance of the sleeve. Leave long tails at either end.
Pull the tails to gather the sleeve hem, until your sleeve hem is just about the same circumference as your cuff. In my case, this meant I needed to gather the sleeve about as much as it would let me gather it—tight, close gathers. If you accidentally gather it too much, let a little bit out.
Once your sleeve hem has been gathered to the point where the sleeve hem circumference is the same as your cuff, tie all thread tails together to keep your gathering in place as you go to pin the cuff. Slide the cuff over the sleeve hem, lining up the raw edges and matching the 4 notches. Distribute the gathers evenly between each notch if you can—don’t worry if it’s not perfect, it probably won’t be noticeable due to the volume of the sleeve.
Finally, sew the cuff and sleeve together! I did this on the sewing machine first so that I could unpick it more easily if I needed to before finishing the seam on the serger. You’ll have an easier time sewing the cuff on if your gathers are down against the feed dogs, so carefully flip the sleeve so that cuff is on the inside of the loop, and sew from the inside of the loop. If any of your basting stitches show from the right side, unpick them and pull them out.

Repeat with the other sleeve, hem your top, and then you’re done!

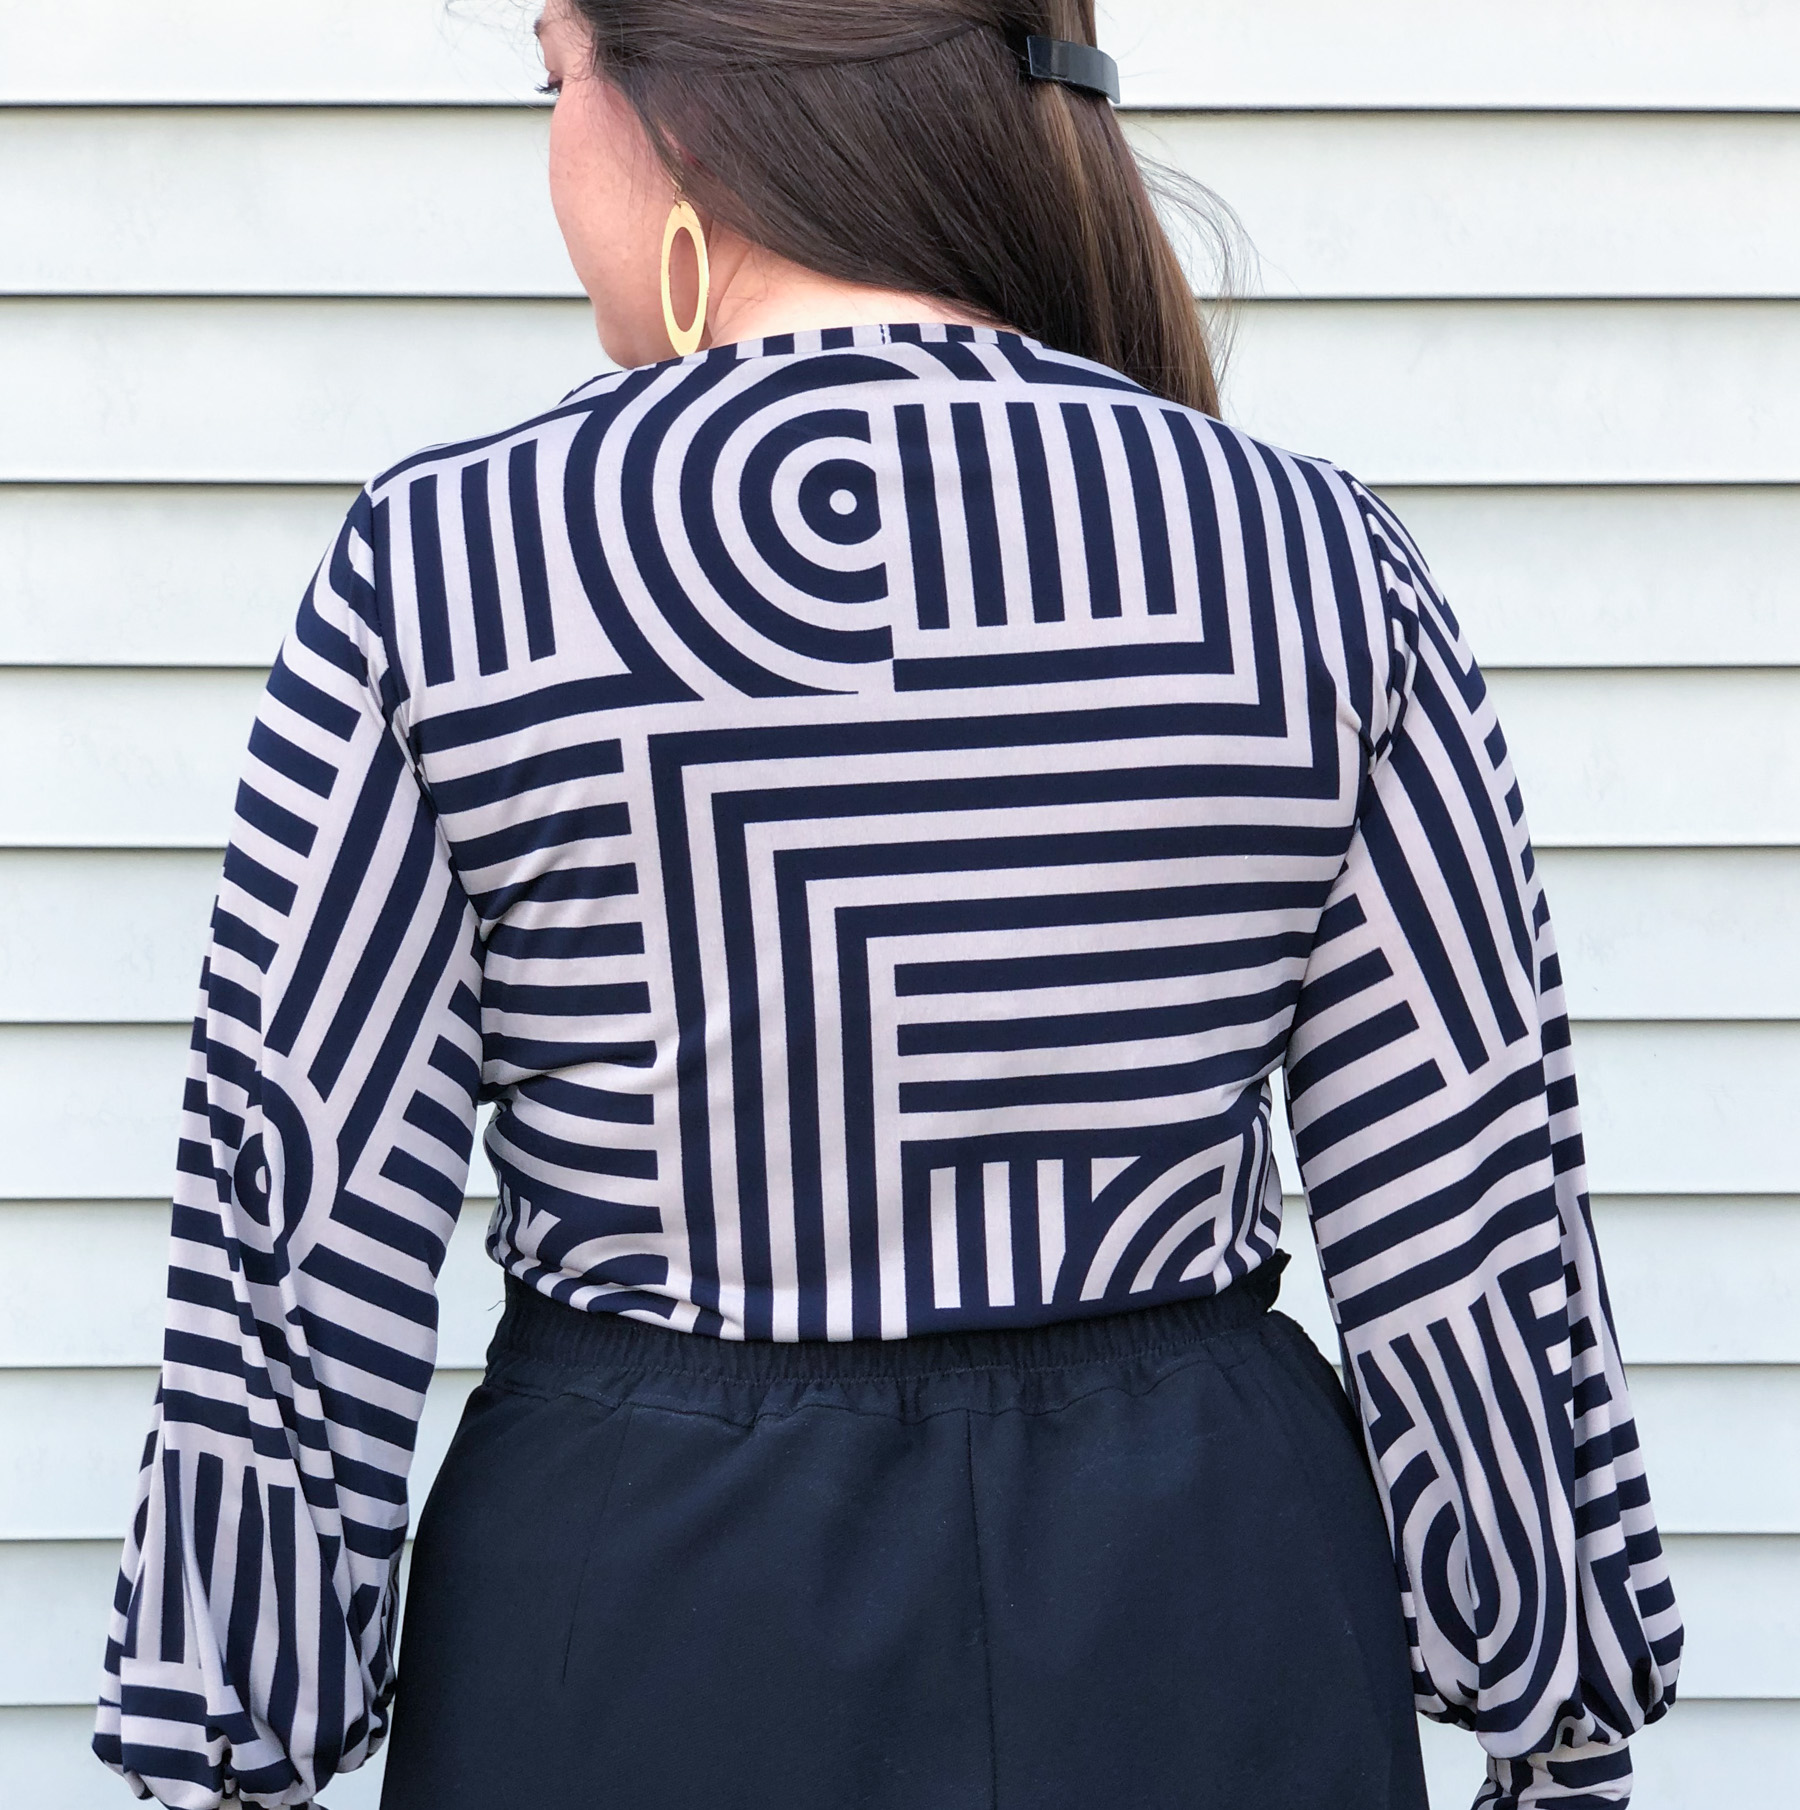
This Concord T-Shirt is in a size 12 G/H, graded out to a 14 waist and hip. My measurements at the time of taking these photos were 42” bust, 34” waist, and 45” hip. I’m wearing it with the Calder Pants in a size 12 pear fit.

Isn’t this print so cool? I used a mystery knit that I picked up on my travels to Montreal last summer. (Everything in the fabric store was labeled in French, or not labeled at all!) I think it adds to the drama of this top.


Thanks again to everyone who voted in our Great Concord Hack-Off! I hope you’re inspired to try this hack on your next Concord T-Shirt. If you do, please show us by posting on social media with the hashtag #ConcordTShirt—we can’t wait to see your bishop sleeve Concords!


Any guidance on how much extra fabric this might require for the Concord?
Hi Amanda,
For 60″ wide fabric, you’d likely be fine with the same fabric requirement for your size–maybe add an extra 1/4 yd just to be safe. For 45″ wide fabric, use the fabric requirement for the size 32.
-Ayelet at Cashmerette
So lovely! The print is just fabulous – you did a beautiful job!!!!!
Love this idea! I am curious as to why you call it a Bishop sleeve. I did a lot of smocking when my girls were young and in smocking a Bishop dress is one with a raglan sleeve line.
It is a common term in the fashion design industry, named after the sleeves clergy often wear. It refers to the volume at the sleeve bottom.
Thanks.
It’s great! I keep coming back to looking at this hack and the amaz
ing result. I showed 1st daughter who said it would suit me so, I’m a making it.
One day…….