
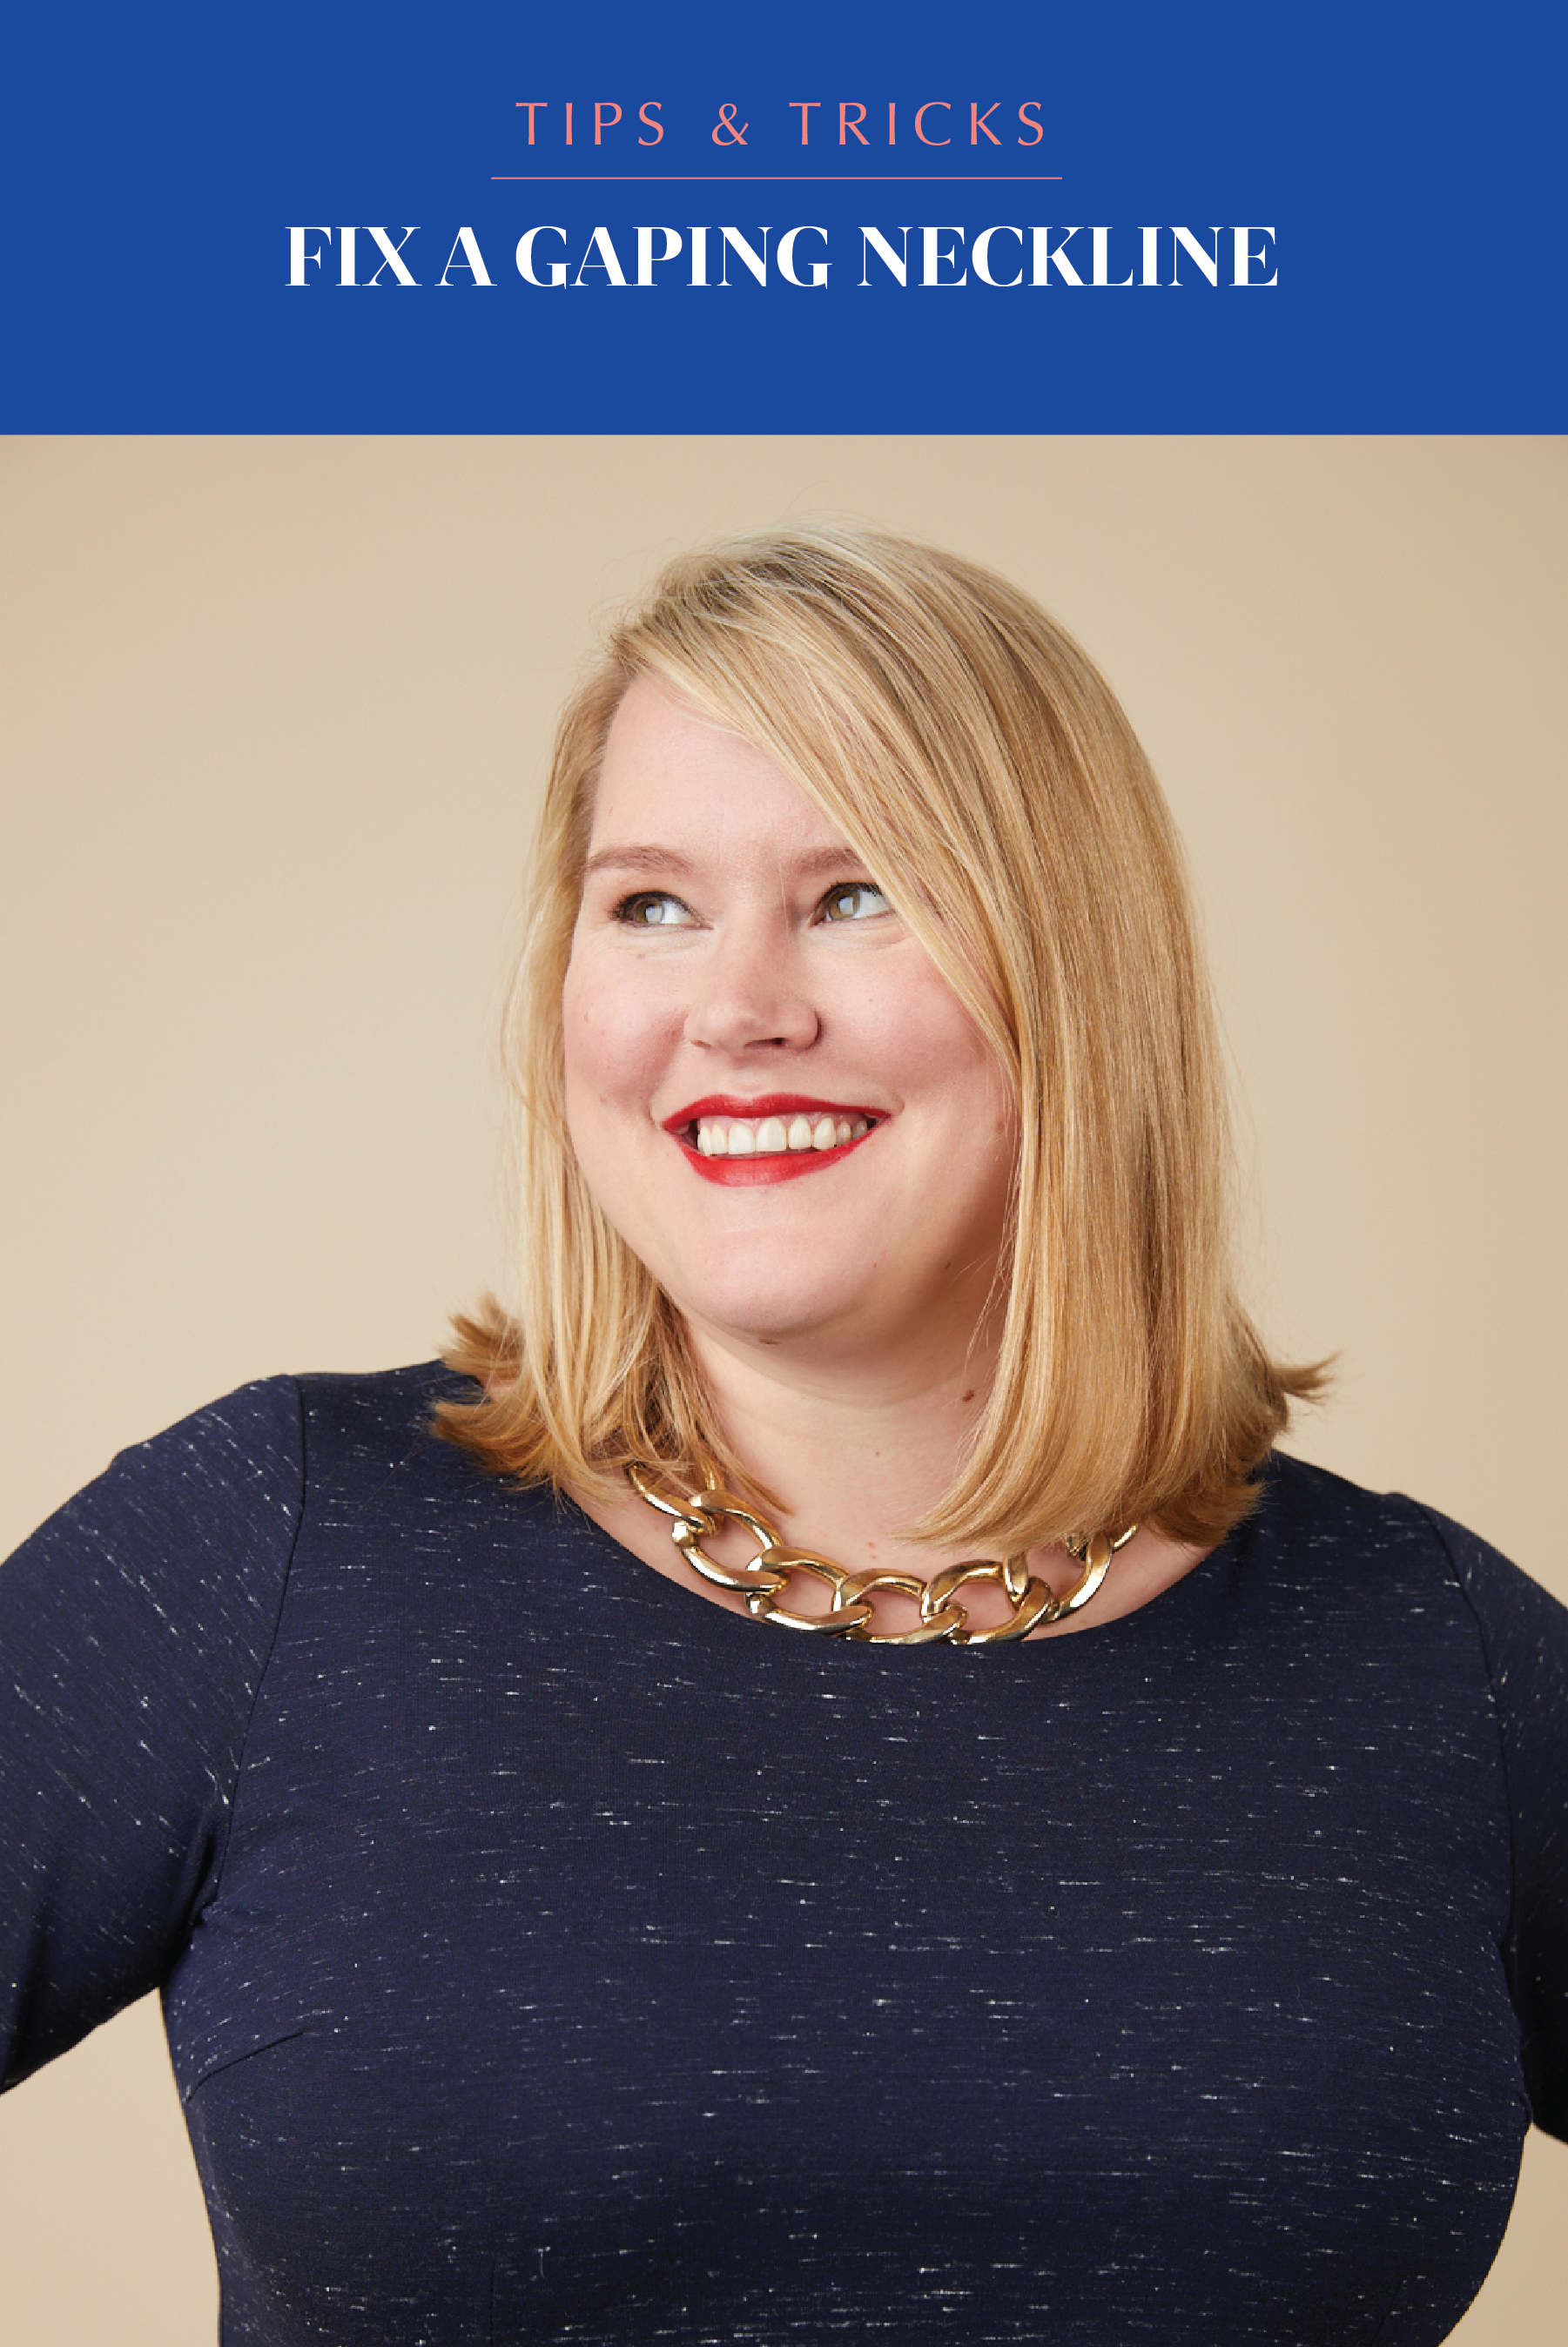
One of the most common pattern fitting issues is having to fix a gaping neckline. There are lots of reasons why you might have a gaping neckline, including having a hollow chest or narrow shoulders, but it’s a fairly easy fix! In this tutorial, we’ll be using the Springfield Top, but the technique would work on any darted woven top. If your top doesn’t have a dart, this approach will end up adding one. As always, trace your pattern before you start adjusting so you can make revisions in the future if needed.
- To calculate how much you need to remove from the neckline, the best approach is to first make a muslin. Pinch out the excess at the neckline, and measure the length of the excess neckline. Divide this number by two, and you’ll be making that reduction to the pattern piece.
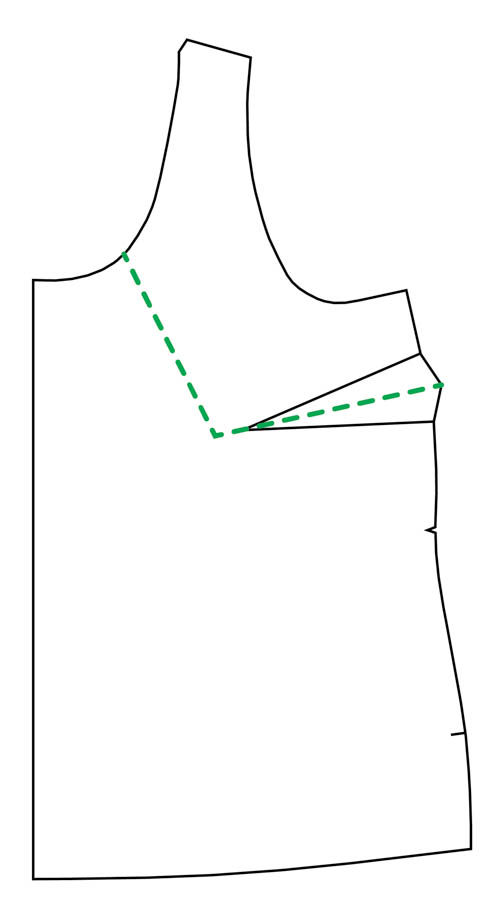
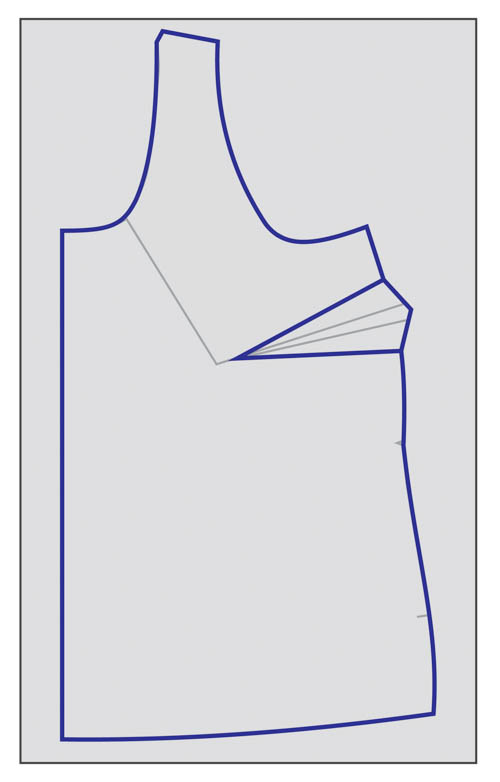
- Draw a line through the center of your dart, to the bust apex (about 2 inches beyond the end of the dart in the case of the Springfield), and then continue the line up to the neckline, as shown. The exact angle doesn’t matter – just make it look roughly like this!
2. Cut along the line, separating the two pieces.
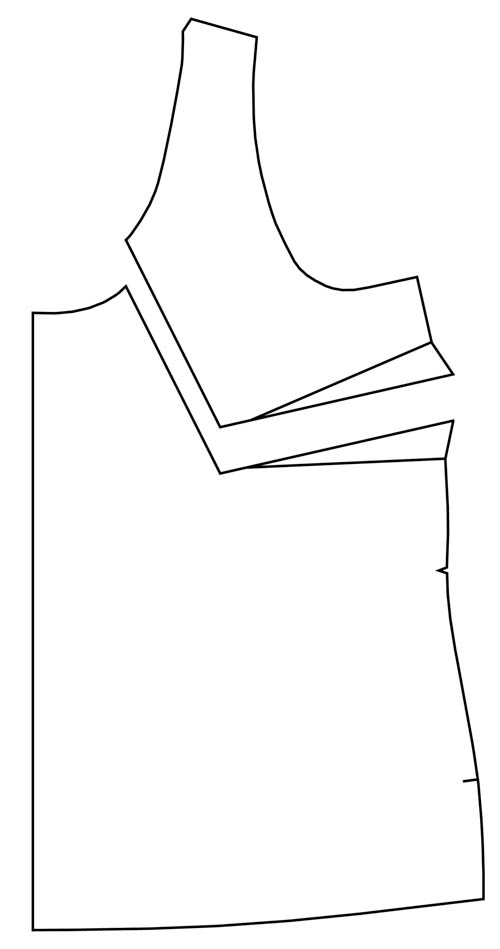
3. Keeping the inner corners of the two pieces together, pivot the top piece, overlapping the two pieces at the neckline by the amount that you need to remove. This will add additional space in the dart, too.
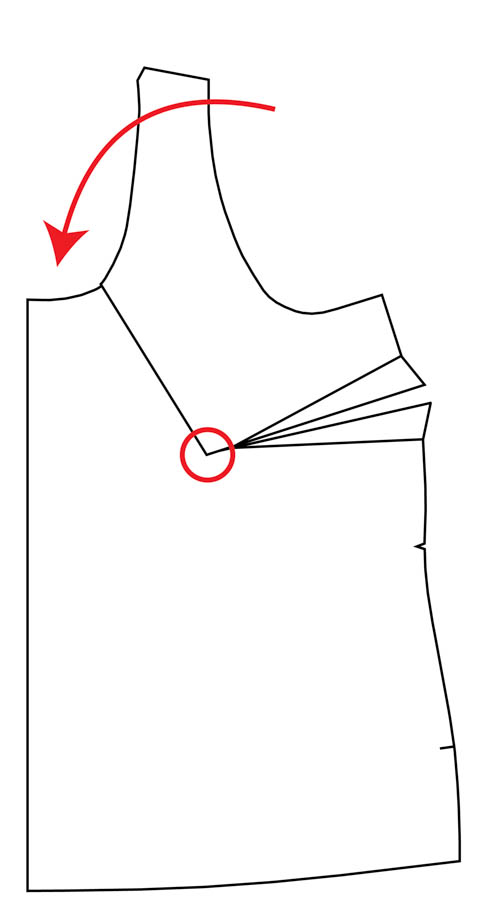
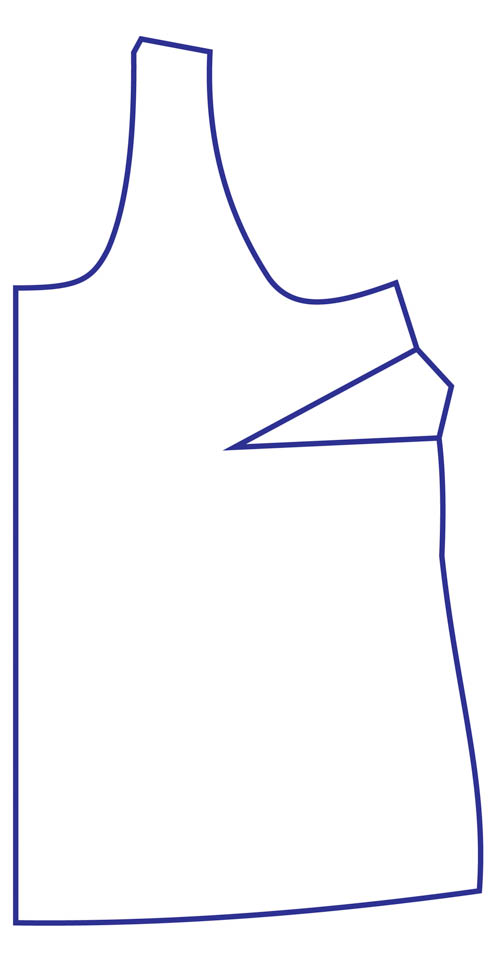
4. Place a fresh piece of tracing paper on top of the pattern piece. Trace the new piece, including the new, bigger dart.
And you’re done! As you can see, the new piece has a shorter neckline and slightly narrower-set shoulders, but the armhole and side seam have remained unaltered.
I hope this helps you to fix a gaping neckline. Want even more guidance? Check out this free video tutorial!

Thank you Jenny! This is brilliant and never in a million years would I have thought to do this. Tips on fitting issues are ALWAYS appreciated!
Thanks Kathleen!
It’s a useful tutorial, but why separate the sections? Just leave a little hinge of a few mm attached and swing it around. Much easier.
You can hinge, it’s just hard to keep it in one piece. But by all means, give it a go!
A someone who typically doesn’t need a bigger dart, I use the standard “hollow chest adjustment” for almost all my patterns (though I didn’t actually need it for my springfield!). I remove a wedge horizontally from the armcythe (used as hinge point) to the neckline (sometimes up to 2″ total removed), which fixes the problem right up and doesn’t alter the dart or side seam. Just wanted to offer another solution for those that don’t want to alter the dart. The “curvy” drafting built into the cashmerette patterns (i.e. the shoulders don’t get ridiculously wide like the upper range of standard patterns) typically means I don’t have to do the hollow chest adjustment, which is awesome!
Precisely! The less to move the better.
Although I gotta admit, I was vaguely hoping this post was a ‘you already sewed it and it’s gaping and please help me’ hint here. I’m looking for something better than my sneaky darts and redoing the facing technique.
Let me know if you figure that one out Ernie k!! I almost always take the hollow chest adjustment before cutting, but sometimes it’s not enough! Grr. Only so many neckline dart design details I can have in my wardrobe before someone figures it out! I have thought about using gathers at the center front for the same effect but haven’t actually tried that out yet…
Hi Ernie, if you already sewed a top with a gaping neckline you could sew radiating mini darts (like tucks), either as a feature on the outside or the normal way. Just make it look as if it was a ‘design feature’ you had intended like that from the very beginning! Turning a bug into a feature can get some really nice results.
The outside tucks would definitely make it look like an intended feature.
Thank you!!! This is exactly what I needed!
Thanks for posting this. I often read about people taking a wedge out for the centre front but never tried it as it would alter the bust apex locations. This seems like a much better option.
In one of my sewing books about flat patterns it said you could take up to 1/4″ off the inside neck edge of both the front and back piece. Essentially you have a slightly curved shoulder seam. It’s just a thought. I’ve had patterns with this before, but never understood why the shoulder seam wasn’t straight.
Great tutorial. Thank you. I was wondering if you might also address necklines that are too deep and how to change them. When I buy ready to wear, I’ll often take them up in the shoulders. It brings the armholes up as well. How would you do this with a pattern?
@Sandy P in NC I have this problem because I’m short between my shoulder and bust point, shirts will often have gaping armscyes on me as well. I find that if I shorten the pattern between the shoulder and the bust line, then it doesn’t move the shoulder seam, shortens the neckline, and creates a better fit at the armscye. If you don’t have this fit issue, why not redraw the neckline up a bit?
This is perfect. I have this same exact issue and you’d think after altering so many tops I’ve made I’d remember to do it at the beginning, but I always have this false idea that it won’t happen with the next pattern. I’m researching what exactly to alter on every pattern going forward and this solution is it! Thanks!
You can pretty much just draw the new neckline that you want onto the pattern – if you’re only changing it by a few inches it should be just fine.
Thanks Jenny! How would you do this on a princess seam, armscye or shoulder? If it has a Dior dart, can I rotate it there?
Using this approach would add an additional bust dart if there isn’t one there already.
I was wondering where you got the white fabric with colorful dots and splashes on it? The top is shown in this fabric on my FB feed and I love it! I looked around here, but did not find it. Thanks!!
I got it at Gather Here in Cambridge MA
Thank you for showing this tip – I always have this problem! I’d just like to ask, is this technique instead of a bust and shoulder adjustment, or would you recommend doing it afterwards if the problem is still there? Thanks! 🙂
Thank you, Jenny! I just found this post and have a constant problem with a neckline that gaps and shoulders too wide. I must have teeny tiny shoulders for my bust or some such deformity. My question is, do you have to or can you also remove width from the back neckline this way as well or do you have other suggestions for that?
Brilliant! I have a gap problem due to lung issues and i have all kinds of books here but they seem very complicated. This i understand and can do. Thank for the simple tutorial and great illustration.
Hi, I get back neck gaping. If I pin it out the shoulder seams ride up my neck. If I pin less out the back neck gaping comes back. I have tried so many different ways to fix this but nothing works. Do you have any suggestions?
Sounds like you might have a high round back, in which case there’s a different type of adjustment: http://curvysewingcollective.com/tutorial-how-to-do-a-high-round-back-adjustment/
This looks great. Does this method work on back neckline as well? With a dart from the waistline to the middle of the back? Sorry if I made mistakes, english is not my native language.
If you don’t have a dart, I would do it in a slightly different way. This technique is covered in my online class, Fitting for Curves (https://workshops.cashmerette.com/p/fitting-for-curves-pattern-adjustments-for-the-upper-body) but I don’t have a blog tutorial for it I’m afraid.
I don’t have a blog tutorial for that, but I cover it in my online workshop, “Fitting for Curves”
What do you do if the pattern doesn’t have a side bust dart?
I don’t have a blog tutorial for that, but I cover it in my online workshop, “Fitting for Curves”.
If you also need to do a FBA say on the scout tee, which do you do first?
I would do the FBA first.
Where on your body do you measure to know how much you will need to cut out of the neckline?
Hi Kim, we recommend making a muslin to determine how much you need to take out of the neckline.
-Ayelet at Cashmerette
Thanks… I had no clue prior to reading this.
Great article! I do that all the time with my patterns. However the question remains. With the bigger front bust dart, the side front will be shorter than the side back. To compensate, should I increase the bottom level of the front armhole on the front piece or lower it on the back piece?
Actually, a bigger front bust dart won’t change the side seam, as all the extra fabric is inside the dart – once it’s sewn up, it’s exactly the same as before.